The use of drywall (GCR) in the decoration of walls and ceiling has nuances. At the stage of finishing work, special attention should be paid to the seams of drywall sheets. Their correct and accurate coating will help to make the surface smooth, beautiful. Drywall seams may involve the use of different technologies and additional materials.
- The need for joint repair
- Seam Finishing Materials
- Paper tape
- Self-adhesive Serpyanka
- Putty
- Primer
- Plaster
- Necessary tools
- Sealing procedure
- Preparation for work
- Stitching
- Seam Primer
- Main job
- Corner joints
- Causes of seam bursting

The need for joint repair
Even the best master will not be able to connect two GKL sheets between themselves without forming a joint. The size of the seams will depend on the type of sheets, the presence of edges, the quality of the fasteners.

The edges of the material can create highly visible recesses or protrusions on the wall, partition or ceiling. You can fix the problem only if the finish is done correctly. Rough seams are formed if not enough profiles have been used, the frame will not be rigid, because under the weight of the sheets, the structures are deformed and sag.
Sealing joints carries both a decorative and a functional role. If you do not gloss over them, such troubles arise:
- the base will be uneven, it will look ugly;
- GCR can deteriorate from direct effects on the edges of temperature, humidity, and sunlight;
- the finish (paint, wallpaper, putty) will become detached from the base, cracking - it will not work to hold it securely.
Seam Finishing Materials
How to repair the seams, what can be used if you decide to do the work yourself? You can apply different types of materials, but it is better to use a "comprehensive" approach.
Paper tape
Paper tape is sold in rolls of 50 - 150 meters, the width is usually about 50 millimeters. Paper tape is stronger than regular paper because it is reinforced with fiberglass in different directions. The surface of the strip is not smooth, but rough, which is necessary for reliable adhesion with plaster, gypsum putty or other finishing materials.
In the center of the tape there is an insert that facilitates the work with the material. The tape can be glued not only between the sheets - it is possible to reinforce the corners of the structure of gypsum plaster. Unlike ordinary paper tape, the tape layer does not wrinkle, does not stretch.

The disadvantages of the finishing method include the complexity of installation compared to a simple sickle. If the putty was made in violation of the technology, air will get under the paper tape - sooner or later the material will peel off. But such a minus is deprived of perforated tape, putty for which does not have such an important role.
to contents ↑Self-adhesive Serpyanka
Typically, experienced finishers when repairing the ceiling, walls for sealing joints on the gypsum board use a sickle. The material is sold in rolls of 20 - 90 meters, can have different widths - up to 5 cm or more.
The most convenient mesh is self-adhesive; it is convenient to attach it to drywall sheets with any edge. Serpyanka can close up cracks, chips, holes, for example, under the wallpaper.There is also a regular, non-adhesive mesh on sale, which is much more difficult to attach, but it costs an order of magnitude cheaper.

It is better to buy a small roll of self-adhesive material, because after opening it cannot be stored for a long time due to loss of properties.
to contents ↑Putty
Puttying is an excellent method to rub the seams between sheets of gypsum plaster. Puttying joints is recommended if the room is being prepared for painting or for pasting with thin paper wallpaper.
Putty mixture must have excellent quality, otherwise it will crack with time. It is necessary to pay attention to the ability of the product to withstand shrinkage.
Plaster-based putties and grouts - a suitable option for drywall, give a smooth, durable surface with a perfectly white color. It is better to putty with a proven means of a reliable brand, for example, Knauf (Knauf).

Primer
The priming of already coated joints is an obligatory step in the process of sealing them. The primer will act as a bonding component, complete the draft repair of the ceiling or walls before finishing.
to contents ↑Which is better to choose a primer? It is worth buying an agent with antiseptic and fungicidal additives that protects the surface from the appearance of fungus, mold. After coating with GKL primer, it will not be afraid of moisture, especially if you apply the solution on 2 - 3 layers.
Plaster
The stucco mixture is used as a topcoat to create a beautiful, even surface instead of a prominent joint. Coating the base with plaster is recommended to enhance the adhesion of the GKL sheets with subsequent coatings.

Necessary tools
For work, you should buy the basic materials with which the seam will be sealed - a dry grout mixture (putty), a finishing agent for creating a perfectly smooth surface, a primer (preferably deep penetration acrylic). If the room is prone to cracking (for example, a new house), the most appropriate option is to purchase an additional sickle reinforcing the paper tape.
To close joints at complex angles, you can not cut pieces from a sickle, but buy finished perforated corners from the same material.
Of the additional devices for repair you will need:
- roller or brush for applying soil;
- different size spatulas for puttying;
- Falcon - a plate with handles, which will be putty on the wall (perfectly evens long sections), can be replaced with a wide spatula;
- a construction mixer or drill with a nozzle for mixing the mortar;
- level;
- sandpaper attached to a bar;
- painting or clerical knife;
- a container for diluting the dry mixture;
- personal protective equipment - gloves, respirator, protective clothing, glasses.

Sealing procedure
In order to correctly carry out the whole range of works, it is necessary to comply with the conditions indicated by the manufacturer on the package (regarding humidity, room temperature). There should not be a draft in the room, it is better to ventilate the room after the putty material has dried.
to contents ↑First you need to check the GCR for the reliability of the connection with the profile. If the sheet is held weakly, this will lead to the rapid destruction of the sealed seam, and even a sickle will not interfere.
Preparation for work
The choice of type of building material depends on the subsequent decoration of the walls or ceiling. If you plan to stick wallpaper, the dry mixture can be coarser, inexpensive, especially when the canvas is thick, embossed. Even cracks that appear do not spoil the appearance of the finish, because under the wallpaper flaws are invisible.
What material to apply for painting? The quality of the putty should be higher, because even minimal defects cannot be hidden under the paint. You should not buy cheap mixtures, it is better to take a good snow-white finishing putty.

As for the sickle, there are a number of recommendations for the purchase:
- for brick walls, the width of the tape should be 50 mm;
- for wooden houses, a tape of 100 mm wide is used;
- to strengthen unreliable corners, it is better to take not a sickle, but a metal corner (there are internal and external corners on sale).
For a quality study of the angles, you can prepare a special angular spatula, although this is not necessary. The main thing is that spatulas of 10 and 25 cm are available.
to contents ↑Stitching
Under the alignment understand the processing of the edges (edges) of drywall sheets. Stitching is needed to obtain a surface that will be suitable for further leveling, smoothing. Use a sharpened sharpened paint knife.
The order of expansion:
- remove scraps, broken areas in the areas of the GKL junction;
- Carefully cut off all protruding parts - chamfers.

Cutting is done by putting the knife at an angle of 45 degrees. As a result, a “tick” should form in the center of the seam. You can even do the alignment before attaching the sheets to the wall or ceiling, as the masters prefer to do. More expensive drywall is already processed in a similar way, that is, it goes on sale in an embroidered form.
to contents ↑Seam Primer
Some miss the time of priming GKL sheets, believing that the material has a good adhesive property.
Indeed, many putties and finishing will stick well to drywall, but in some cases, the finishing and decorative layer are snapped off, so it’s not worth the risk. It is better to invest in the purchase of a primer, especially since the composition is inexpensive, and the consumption will be small.
Acrylic based product will be ideal for GCR due to quick drying and maximum adhesion enhancement. The priming of the seams and the entire sheet will be strictly required if painting is planned in the future.

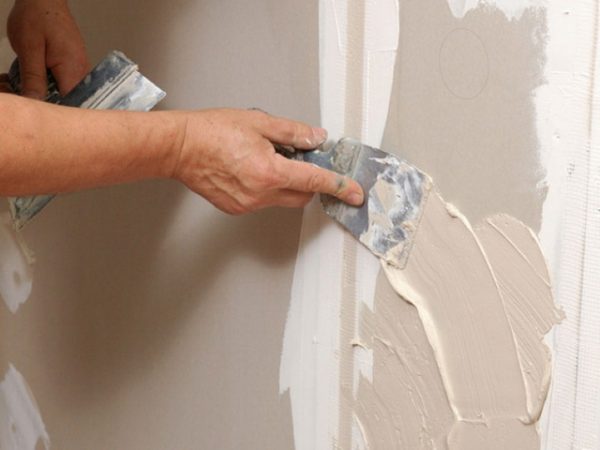
Main job
Initially, you need to start a building mixture. It is worth taking a small container, pour water in, add dry powder in portions, mix (it is better to use a construction mixer). If a ready-made thick putty is purchased, a certain amount of it is also transferred to a jar for the convenience of work.
With a medium-sized spatula, take a little mixture, distributing it over the tip of the tool. Smooth the motion of the mass into the seam. Achieve that the solution fully occupied the entire volume of the joint. Then cut the tape or serpentine, impose on the seam along the length, in the center. Squeeze it, then apply another layer of the product in a similar way. As a result, the tape will be immersed in the solution. Once again, grind everything with a spatula, check for evenness according to the building level. Allow the seam to dry completely, treat it with sandpaper.
How to make a seam perfectly even? Professionals apply this technique:
- The solution is applied with a middle spatula, do not smooth, do not remove excess weight immediately after application.
- A wide sharp spatula, set at an angle, is carried out from bottom to top with pressure.
- As a result, putty fills the voids, forming a smooth surface.
Just a serpentine is simply superimposed on the surface. The paper reinforcing tape is pre-cut strictly in size, poured with boiling water, and after a few minutes it is wrung out. The surface is puttied in advance, dries, polished. At the end of the work, the partially treated seam is lubricated with PVA, and only then the tape is applied to the desired area. From above, the tape is again treated with PVA glue. The final seam is finishing putty.
There are a number of useful tips that you should follow when closing seams yourself:
- When applying a sickle on a self-adhesive basis, you can not tear it off immediately. The material is distributed gradually, tightly pressing to the seam.
- When working with a sickle, it is important to close all fasteners.
- Gypsum putty is ideal for grouting, which allows the walls to breathe.
- You should not dilute immediately more than 3 - 5 liters of the mixture, because the composition dries quickly and can harden directly in the bank ahead of time.
- Oil-glue putties for working with gypsum plaster are not recommended, they give a lot of shrinkage.
- Do not use dirty dishes, tools to dilute the mixture - this will reduce the quality of work.
Corner joints
A large width of 10 cm sickle is used to seal the corners. This will help prevent putty cracking in the future. Alignment of the composition is carried out using an angular spatula for external and internal corners. Directly in the corner, the tape is folded in half for folding. After drying, the grinding is carried out with sandpaper.

Causes of seam bursting
Shrinkage of the house can cause the putty to detach and crack, but this is far from the only cause of the problem.
Other prerequisites for seam bursting:
- the use of cheap materials, including thin profiles (0.3 - 0.5 mm instead of 0.65 - 0.7 mm);
- fastening profiles with plastic dowels (you need to take metal);
- the formation of a wooden crate from raw timber (the tree bends after drying, cracks appear);
- the formation of condensation, steam between the ceiling and the gypsum plaster, if the room is wet and the drywall is not moisture resistant, or when installing the sheets before the plaster is completely dried, with the windows open;
- installation of GKL joint in joint in line without displacement of vertical seams;
- violation of the technology of sealing joints, for example, ignoring the use of sickle, priming;
- the presence of a chamfer on the gypsum board without a factory edge (if you forgot to remove it when sealing a seam);
- the presence of a large amount of dust during work.

If cracks appear, you will have to disconnect the entire finish and repeat the repair. It is recommended not to allow deformation and immediately carry out all the steps correctly so as not to know problems in the future.