Ceiling putty is an important item in the repair of the premises. Without the application of putty, the decoration of the walls and ceiling will not look perfect, because all the bumps will remain. It is important to choose the right composition that will have perfect adhesion to the surface, does not exfoliate, and will provide the desired result.
- Ceiling Putty Requirements
- The choice of putty
- Starting putty
- Finishing putty
- Universal putty
- Types of putty by composition
- Cement
- Gypsum plaster
- Polymer
- Dry mixes
- Ready-made compounds
- Tools and materials for work
- Ceiling preparation and cleaning
- Do-it-yourself ceiling puttying
- Dry mix
- Puttying on the ceiling
- Number of layers
- Last layer
- Final finish
- Plastering plasterboard ceilings
Ceiling Putty Requirements
Putty is understood to mean a building mixture of pasty texture, which is used to prepare surfaces for decoration. Preparation includes leveling the walls and ceiling, eliminating cracks, pits, and other defects. After puttying, the base will be perfectly flat and suitable for applying paint or wallpapering. Plastering and puttying the ceiling is necessary in such cases:
- the house and apartment are old, cracks appeared on the surface due to time and temperature changes, the draft layer began to crumble;
- the previous layer has obvious irregularities, rough, requires the application of a finish coating;
- in the new house there was a shrinkage of concrete walls, ceilings, cracks appeared due to movement;
- a plasterboard ceiling is made, having seams and joints that need to be puttied properly.

Hardening, putty becomes strong, solid and very reliable. The putty layer does not fall off and is firmly connected to the surface. Such properties are given to the mass by its components. The composition of the dry or finished mixture includes:
- mineral binders;
- fillers;
- modifiers.
The main difference between putty and ordinary plaster, grout - in plasticity and elasticity. These properties are achieved by introducing modifiers that provide ease when smoothing, do not allow the mass to drain from the spatula, and prevent detachment. Due to a certain number of modifiers, after application of putty there are no streaks, ugly joints, seams.
Depending on the additives, the putty may dry at different times. This indicator is very important, because drying too quickly causes the need to rather use a new portion of the solution. So, solutions with gypsum dry out already in half an hour or an hour, with cement - in 2.5 hours or a little more, acrylic and other polymer do not harden before 48 hours, provided that the container is tightly closed.

A good putty must meet a number of requirements, which are taken into account when choosing:
- uniformity, elasticity in appearance;
- lack of large particles in the composition;
- moderate curing speed sufficient for comfortable application of the material to the ceiling and adjustment of the layer;
- lack of cracks, crumbling particles after drying.
to contents ↑To obtain the desired effect, it is better to adhere to a room temperature of + 5 ... + 30 degrees, humidity - 50-80%. In this case, the sun's rays should not affect the working surface.
The choice of putty
To align the ceiling with your own hands, you need to start by buying putty. It is not difficult to choose it - the stores offer a wide range at different prices. All putties can be divided into two groups - coarse and fine-grained. The former are usually used to create a base (start), they need to be applied in a thicker layer. The second thin, smooth, obtained by introducing small fractions into the composition. Usually they are used before painting or other decorative finishes.

There is a proportionality between the size of the component fraction and the thickness of the putty. So, with a decrease in the first indicator, the second also decreases. Typically, compositions with a fraction of up to 0.6 mm are used for leveling, with a fraction of up to 0.3 mm for final finishing. Before buying, it is important to assess the degree of evenness of the ceiling - it will depend on what means you can putty on, how many layers to apply, as well as material consumption.
to contents ↑Starting putty
Starting material is used for the primary repair of large defects, smoothing unnecessary relief. It is used to level “curved” ceilings. The structure of such putties is more textured due to granularity, the texture is rough. They can plaster any surface, using a level for adjustment.

Finishing putty
Finishing putty is usually applied as the last layer on any ceiling. It has a fine texture, it is easy to grind, giving perfect smoothness. Usually the “finish” has a snow-white color, which makes it possible to apply it even for painting with light coatings.
Universal putty
Such remedies are most practical. They can be used as a base or finish, so the finishing process is simplified. The component grinding fraction is usually small, therefore the price of such products is high.

Types of putty by composition
In the development of putties, different ingredients are used, because all means can be subdivided into cement, gypsum and polymer in composition.
Cement
Cement putties are most often used on concrete, since they have better adhesion to such surfaces, as well as cement plaster. It is allowed to apply up to three layers of such material, depending on the magnitude of the differences, irregularities. Typically, the size of the fraction is in the range of 0.5-0.8 mm, so for the finish you will have to purchase a different composition.
Cement putties are sold in dry form, they are diluted with water immediately before use. How long such a solution dries depends on additional components, more expensive mixtures can withstand up to 3 hours. Cement-based putties are suitable for wet rooms, but lime is added to such products (as a modifier). If you need to even out surface differences of more than 1 cm, you need to make sure that there is sand in the composition. The cost of putties is low, they are easy to use.

Gypsum plaster
For standard living spaces, this putty option is the most popular. The material is environmentally friendly, vapor permeable after application. They sell products in finished or dry form. The first option is packed in plastic buckets. Gypsum itself is brittle, so various polymer components are included in the mixtures, they are also needed for bleaching the mass. The consumption of gypsum putties is lower than cement, it does not exceed 1 kg per square meter of surface.
Gypsum putties are suitable for concrete, drywall and wood. They allow you to create a smooth, beautiful coating that is not difficult to paint or wallpaper. Among the gypsum materials, there are finishing, starting, and even universal ones, after which the finish is optional. In damp rooms, the use of gypsum is not recommended. They absorb moisture from the air, and when it rises, they give it away, causing condensation and fungus.

Features of the use of gypsum putties must be found out before starting the workflow:
- they never add water to the dry mass, but act exactly the opposite - otherwise the gypsum instantly sets in lumps;
- to achieve the desired plasticity, the product in diluted form is left for 5 minutes, only then they begin to repair the ceiling;
- when the putty expires, grains, lumps are likely to appear, the quality of work decreases;
- it is forbidden to mix gypsum and cement putties, but to introduce sand into gypsum is quite possible - this technology is used to increase the volume and create a starting mixture;
- whitewash of lime before applying the gypsum mass needs to be removed, since even a primer will not help improve adhesion.
Polymer
Polymer putties include latex and acrylic. They can be used for exterior and interior use, including for the decoration of facades. Such materials are breathable, elastic, durable, resistant to temperature fluctuations, completely safe for health. Polymer putties can be used to process walls and ceilings made of concrete, wood and drywall.
Due to the high price, these funds are usually used as finishing, applying them to starting cement putties. Most latex and acrylic materials are already ready for use, they are sold in cans or buckets. Putties are universal, can be used with any humidity in the room. It is better to use latex agents for leveling differences, the risk of their detachment is minimal even with a thick layer.

Dry mixes
These materials are sold in bags; they are white or grayish powder. When mixing with water, you will have to use a construction mixer, otherwise lumps will appear in the solution. Puttying the surface with dry mixes is always cheaper than ready-made, but it takes extra time to prepare the material.
Ready-made compounds
In stores, such products can be found in sealed containers that are used immediately after opening. Usually, due to the high cost, professionals do not use such putties, but for beginners they are ideal, as well as for fixing small defects.

Tools and materials for work
To do the job efficiently, it is necessary to prepare all the materials and fixtures in advance. It is necessary to buy puttying compounds - starting and finishing. To prime the surface, purchase deep penetration material and a roller with a brush. Other ceiling repair accessories:
- container for mixing the composition;
- additional bucket for water;
- construction mixer (for dry mix);
- metal spatulas - narrow and wide, angular;
- sandpaper (to sand the surface);
- abrasive tape (when processing joints and single cracks);
- kapron bandage net (if there are multiple cracks in the ceiling);
- portable lamp to improve lighting;
- step-ladder.

Be sure to buy a narrow spatula - they putty in hard to reach places and lay out the mass. A large spatula aligns the ceiling in the rest of the area. If there is no construction mixer available, a drill with a special nozzle is suitable.
to contents ↑Ceiling preparation and cleaning
The easiest way to work in a new apartment, all stages can be completed in a shorter time. It is not necessary to remove the old coating - it is enough to carry out priming, after which it can be putty. When repairing, you will have to spend more time. Clean the coating as much as possible with a grinder, spatula or sandpaper. Next, you need to remove the dust and primer the base.
As a primer, a deep penetration agent is best suited, and with large irregularities - "Concrete Contact". For wet rooms, soils with antiseptic additives are chosen, for drywall - acrylic. The primer is poured into a convenient container, applied to the base with a terry roller or a wide brush with a long handle. It is possible to start puttying only after the primer has completely dried.

Do-it-yourself ceiling puttying
After completing all the preparatory work, you can proceed to the direct repair using putty.
Dry mix
To prepare the solution, you need to find a container that is suitable in size and shape. Water is poured into it according to the manufacturer's instructions (information is always on the product packaging). The dry powder is injected directly into the liquid, stirring with a stick after adding each new portion. Next, you need to beat the whole mass with a construction mixer, drill. After 5-10 minutes, mix the solution, which has been standing under the lid all this time.
No need to cook a lot of solution at once. It is enough to do so that it is enough for 30 minutes of work. Further, the properties of the material begin to deteriorate (with the exception of latex and acrylic putties). Before making a new portion, you must completely remove the remainder of the previous one. You can not drain the product into the toilet - this will lead to blockage.

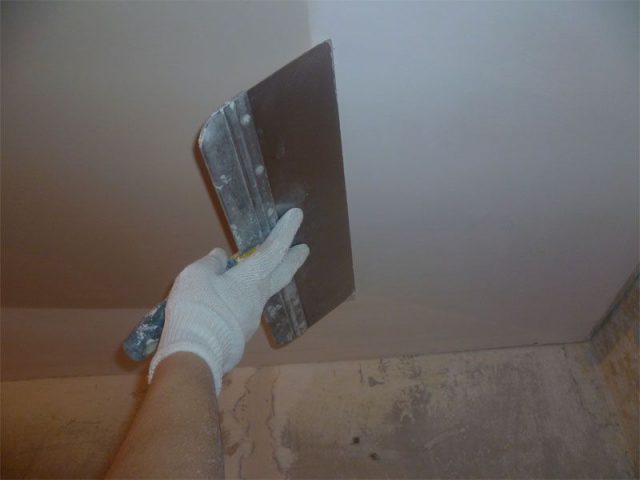
Puttying on the ceiling
Puttying is carried out by uniform sliding movements. Start decorating from the wall or any corner in the room. Gather mass on a small spatula, transfer it to a large one. Then they lead the tool towards themselves so that the entire mass remains on the base. This is repeated until the “painting” of the entire surface, making the layer not too thick. Narrow strips from the spatula immediately wipe with smooth strokes. After the completion of each layer, it is necessary to evaluate the coating for cracks, pits and other defects. This is best done with a lamp.
Starting putties are often applied to special nets to eliminate significant irregularities. The layer of such coarse material should not exceed 1.5 cm. Experienced craftsmen use lighthouse puttying - use wooden planks to maintain the correct level. Finishing putties are applied in the same way after the starters have completely dried.

Number of layers
When applying the material, its technical characteristics, room features, temperature and humidity conditions are taken into account. The larger the defects, the thicker the total putty layer will be. With a thickness of 1 cm, it is better to use reinforcement. Serious defects may require a layer of up to 2.5 cm, then metal grids are used, which are screwed to the ceiling with dowels. The number of layers must be at least two (start and finish), the maximum number is limited by the total thickness of the coating.
to contents ↑Last layer
The final layer is applied in a continuous manner, its thickness is 1-3 mm. Two spatulas are also used for this - wide and narrow. Each subsequent layer is performed in a different direction than the previous one. To obtain an even coating, you will have to work quickly and in compliance with the tilt angle of the spatula. The standard angle is 60 degrees, the smaller it is, the thicker the layer will be.
Final finish
After the ceiling has completely dried, it can be prepared for the final finish. To do this, perform grinding with fine sandpaper, which is attached to the bar. After finishing the entire ceiling, you need to vacuum the room. Then the surface is primed with a roller 2 times. Now the ceiling can be painted.
Plastering plasterboard ceilings
The technology of working with plasterboard ceilings is considered simpler than with concrete. This is due to the initial evenness of the GCR. But you need to consider the presence of some features of the repair:
- first, the drywall sheet is coated with a primer, paying particular attention to the joints;
- putty is applied to the joints of the gypsum plasterboard, the areas of fastening of self-tapping screws (the grooves are processed crosswise with brush strokes)
- a reinforcing mesh is glued to the joints;
- all excess mixture is removed with a spatula;
- corners are putty, while perforated corners are immersed in the mixture on relief structures;
- after the mass has dried, grinding is carried out;
- perform a layer of finishing putty, grinding as it is dried again.

If GKL will be pasted over with wallpaper, one layer of finishing putty is enough, especially if the canvases are thick, embossed. Working with a ceiling for a beginner may seem complicated. With a complete lack of skills, it is recommended to first practice on puttying the walls, and only then proceed to the ceiling. So you can make repairs efficiently.


