The question of how to putty corners so that they are neat and even, excites many home masters. After all, if applying putty on a flat wall is not difficult, then in the corners you get bumps or ugly flows. But is it possible to achieve ideal wall angles, or is it only professionally capable?
- Varieties of corner putty
- External wall connection
- Alignment
- Error correction
- Inner joint
- How to make the angle perfectly flat
- Possible mistakes
Varieties of corner putty
Before you learn how to putty the corners of drywall or from other materials, it is worth deciding which particular corner connection is, because the technique of puttying depends on this.
The corner joint can be straight, blunt or sharp. The technique will be almost the same in all cases, only with sharp or obtuse angles it will not be possible to use a perforated corner for putty, which greatly facilitates the finishing work. The execution technique is affected by the nature of the angle. He can be:
- outer;
- interior.
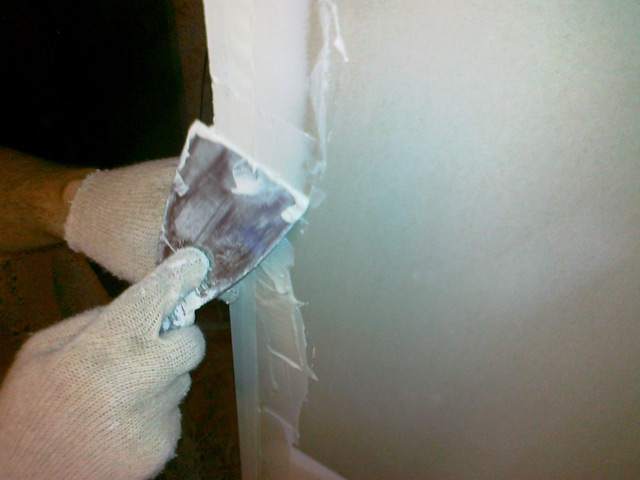
External wall connection
The outer corner, if it is straight, is well formed with perforated pads that give extra strength. You can use plastic or flexible patch elements.
An external corner joint is formed in compliance with the following steps:
- Putty is applied evenly along the entire length of the surface joint.
- Perforated or any other corners are applied under the putty and are pressed tightly. It is necessary that the corner be completely recessed in the putty mass.
- With the help of a building level, the corner is leveled, and the excess mortar protruding from under it is removed with a spatula. Care must be taken when plastering the corners of the drywall is carried out - in the places of the cut the gypsum plaster is very fragile and crumbles easily, with strong pressure from the spatula, the edge can be deformed.

After setting the corner according to the level, you need to wait until the putty mass is seized, and then proceed to further formation.
to contents ↑Alignment
The formation of the external joint is as follows:
- The putty is evenly distributed along the superimposed corner on one side, until it is completely hidden under the mortar, and gently leveled.
- The same is repeated on the other side of the joint, until the perforated or plastic plate is completely covered by a layer of mortar.
- After closing the lining, the putty mass is carefully leveled, its excess is removed.
- The treated area is left until the putty is completely dry.

Dry putty must be sanded to smoothness. For this, a skin of different grain sizes is used. You need to start with the most grainy, allowing you to clean out all the small bumps, and finish polishing almost smooth.
to contents ↑Error correction
From the first time, this operation does not work for many, but errors in operation are easy to fix:
- apply a primer for putty and wait until it dries;
- add putty mortar to places with defects and smooth;
- Re-sand the dried material and coat with primer.
to contents ↑As a rule, after a small additional correction, the result becomes almost perfect, and you can proceed to the decorative finish.
Inner joint
If the GKL wall sheathing was not carried out, at which the wall joints make an angle of 90 ° with a small error, then before deciding how to putty the internal corners of the walls, it is necessary to first align the surfaces. If they are too curved, then before applying the putty, it is recommended to smooth them as much as possible with plaster, and only then, after priming the plastered base, proceed with puttying. It goes like this:
- The walls near the junction are aligned as much as possible. For maximum smoothness, you can wait for drying and sand it with sandpaper.
- In the angular depression along the entire length, on one side, put the putty in an equal layer and smoothly level it, and then repeat the same operation on the other side. You can use special corners - then the method of fixing them and subsequent puttying will be exactly the same as when working at external joints, but you can do without them.
- Using the rule, level the entire applied mixture from floor to ceiling as thinly as possible. Leveling should start from the floor level, gradually rising upwards (for the place where the wall is connected to the ceiling or floor, the direction of movement can be in any direction horizontally).
To facilitate the work, it is recommended to purchase a special spatula to align the internal corners. It is cheap, and it is much more convenient for them to act than with other tools. With the help of such a spatula, it is possible to even out the applied composition much faster than the rule.

How to make the angle perfectly flat
But the resulting result seems far from ideal: ugly curves formed at the junction. After drying, this is easy to fix, but first you need to measure the result with a square and a building level. If the result is not very satisfactory, then before grinding it is necessary to carry out additional leveling, repeating the proposed steps, but already using a smaller amount of putty.
If it was possible to achieve a satisfactory result, then you can proceed to grinding. To do this, you will need a construction grater, you can not do only with sandpaper:
- Emery paper is fixed on the grater so that its edge protrudes slightly beyond the tool and can be freely bent.
- The grater is placed on one side close to the corner joint by the edge where the sandpaper hangs freely.
- Fast and moderately strong movements are carried out grinding one side from the bottom up. The protruding edge of the sandpaper will strip out the curves by straightening the angle.
- The same operation will be repeated on the other hand.
Gradually, changing the grit size to smaller, it is necessary to achieve a smooth surface.

Possible mistakes
For beginners, only one mistake can occur during work: with a strong pressing on the grater or with irregular movements of the tool, small dents will appear on the wall surface. But they are easy to smooth out if primed dents are applied, a little putty is applied to them, and after drying they are gently cleaned with a gradual change in grit size. The adjustment layer is thinner, and when grinding it does not need to exert much effort, the movements should be smooth and smooth.
It doesn’t matter if the external or internal corner connection needs to be puttied, this process is simple. The most important thing when working is to wait for the putty to dry completely, if necessary, before performing the next step. If you hurry up and work with raw material, you will not succeed in achieving a good result. If someone thinks waiting is a loss of time, then you can give advice: while the putty is dry, do other finishing work, for example, level the ceiling or walls.
Knowing how to properly putty the corners of walls made of drywall, brick or monolithic slabs is necessary for those who are engaged in repairing themselves. The proposed simple recommendations will not only help to get a good result, but will also save a lot of time spent on repair.


Write or a video with details on how to properly putty the wall for painting with or without a grid