In recent years, aerated concrete has gained high popularity due to its qualities such as low thermal conductivity and good strength. This material is often used in the construction of private houses. However, aerated concrete also has a significant drawback: it quickly darkens under the influence of humidity. To avoid such an unpleasant effect, you will need putty aerated concrete, which we will talk about in this article.
- Features of aerated concrete
- Finish options
- Materials and Tools
- The choice of putty
- Classic finish
- Lightweight way
- Putty Tips
Features of aerated concrete
Aerated concrete belongs to the class of cellular concrete. Incidentally, foam concrete, which is made from cement, sand, foam and water, is also classified as the same type of material. The composition of aerated concrete is somewhat different: quartz sand, lime, cement, aluminum powder, and also water are used in its production.

Since water is used in the production of aerated concrete, these products are characterized by high humidity reaching 25-30% at the exit from the factory gate. The increased level of humidity persists for a certain time, therefore, after the construction of the building, building codes require a 6-month waiting period. During this period, you can not putty the walls, since aerated concrete must finally dry, and the base of the structure must settle.
to contents ↑Finish options
One of the tasks of puttying is getting rid of uneven surfaces, hiding joints and seams. However, it should be noted that aerated concrete has a very smooth surface on which it is difficult to make out joints. And if any defects are noticeable, they are removed with a grater. Therefore, it is quite possible to be satisfied with the puttying of walls made of aerated concrete without plaster.
If the decision is made to putty the walls, two finishing methods are used:
- Classic, involving the application of plaster, which is reinforced with a metal mesh with a putty applied over it. This method provides the best quality and durability of the finish. The putty surface does not crack, it does not need to be updated frequently. However, the classic requires high labor costs and financial investments.
- Lightweight when only two layers of putty are applied. The method is good for its relative simplicity and low cost. The finish is not as durable as in the case of the classics, but it will last quite a few years.

Often there are questions of this kind: what is the difference between stucco and putty, and is it not the same thing? Plaster and putty (putty) - materials that perform different tasks.
Putty is used to level the base, to eliminate small surface defects (cracks, scratches, etc.). Finishing putty is used to give the surface almost perfect smoothness. Smoothing the putty is possible only after it has completely dried.
Plaster is a carrier layer designed to smooth out surface defects. And we can talk about very significant defects: for example, potholes in the surface can reach 15 cm depth. Plaster acts as the basis for subsequent finishing layers, and also provides thermal insulation and moisture protection of the surface.Unlike putty, it is only possible to level the plaster until it is dry.
to contents ↑Materials and Tools
Any construction work should not be started until the amount of required materials has been calculated and the necessary tools have been prepared.
As for tools, the following devices will be needed:
- capacity in which we will put putty;
- priming roller;
- two meter painting rule;
- construction level (bubble or laser);
- a plane with which we will align the surface of the walls;
- metal trowel (if there will be plastering work);
- putty knife with which we will putty;
- metal sheet or tray for laying putty;
- plaster grid (5 × 5 millimeters);
- galvanized beacon profiles (if a thick layer of plaster is planned);
- electric drill, which we will knead the mixture.

to contents ↑
The choice of putty
There are several types of putties:
- Based on cement. It is used exclusively for interior decoration of buildings. They can be used in damp rooms. The lack of cement mortar in their strong shrinkage, which can lead to cracking.
- Based on glue (10%) and drying oils. Used for facade work.
- Based on epoxy resin. It is used infrequently - usually for puttying tile joints. The main advantage of epoxy compounds is their ability to effectively remove dust and grease.
- Based on gypsum. Very inexpensive formulations with a characteristic fine grinding. Restriction on use: used only in dry rooms.
- Based on oil (drying oil).
- Based on polymeric materials. Polymer putties are among the most high-quality and versatile. However, such compositions are more expensive than all others.
About polymer putty materials should be told a little more. Strictly speaking, polymer composition is too general a definition. When buying in a store from a customer, they will definitely specify: what kind of polymers are they interested in - acrylic or latex?
Acrylic compounds include acrylic resin, chalk and water. As a result of puttying, the wall acquires a glossy sheen. Acrylic is suitable for all types of surfaces.

Latex mixtures consist of fillers, a binder, antiseptic agents, plasticizers and hardeners. Latex putties are characterized by increased elasticity. This material is applied in thin layers. The dried surface does not crack or crumble. Latex putty is not necessary to dissolve in water, since it is offered by sellers in a ready-made form.
If we talk about specific brands, the most popular among builders are brands such as “Ceresit”, “Rotband”, “Sheetrock”, “Weber-Vetonit”. There are putty brands designed specifically for aerated concrete, for example, "Ceresit CT 24".
to contents ↑Classic finish
The composition of the aerated concrete wall:

Work execution order:
- First you need to level the surface, including removing defects and protrusions on the seams. To do this, use a grater or a specialized plane for aerated concrete. When the wall is cleaned, remove dust from the surface.
- If there are defects on the seams (due to uneven masonry), we cover them with a solution for aerated concrete. We wait until the solution dries, after which we check the quality of the alignment with the building level. If necessary, repeat the manipulation of the grater again. Next, clean the surface again and apply the primer. When the primer dries, fix the beacon profile on the aerated concrete blocks (if provided).
- We dilute the powder plaster in the container. It is most convenient to make a batch with an electric drill with a circular nozzle. In this case, the drill should work at low speeds.
- We apply the first layer of plaster, using a trowel. We level the surface with a grater, too, and this should be done immediately, until the plaster layer is dry.
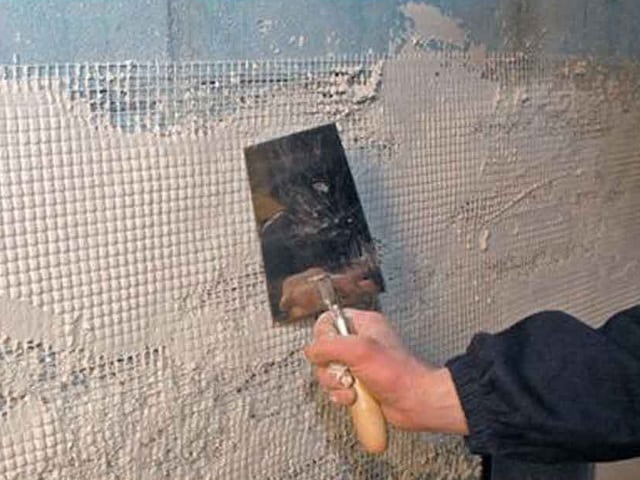
- We install the grid on the wall: we press it into the plaster. We wait during the day until the plaster completely hardens.Next, primer the surface and again wait for the material to dry. The next step is to apply a second layer of plaster at the level of the crests of the beacons. We check the quality of work at the construction level.
- We wait a day until the second layer hardens, and then primer the wall again.
- Apply a layer of putty. Complete drying of the putty surface occurs within 24 hours.
- The dried surface is treated with a grater. If it was not possible to achieve perfect evenness the first time, we put the finishing layer of putty, wipe the surface and apply the soil.

Note! Each layer of putty needs to be primed.
When the surface dries, you can begin its full operation or continue finishing work (for example, glue wallpaper or paint).
Advice! When choosing a primer, it is important to choose a composition with good penetration.
to contents ↑Lightweight way
It is easy to see that the above method is quite time-consuming. There is also a simpler method of puttying, in which you can do only by applying putty. It is recommended to use the German composition "Glatt + Full" - it is characterized by good adhesion. Glatt + Full is produced on a pulp and gypsum basis. The material forms a thick and reliable protective layer on the surface.
Even before applying the putty, we prime the wall. You can use any good primer (for example, water-dispersible soil "Ceresit CT17") The choice of a water-dispersed composition is due to the need to maintain the vapor impermeability of the base.

After waiting for the surface to dry, proceed to puttying. You need to work with Glatt + Full very quickly, otherwise the coating will harden quickly. The setting of the surface begins within an hour. We treat the frozen putty with a grater.
to contents ↑Putty Tips
Puttying of aerated concrete is subject to the following conditions:
- The air temperature during work and for several days after their completion should not be lower than 5 degrees heat and above 25 degrees heat.
- Recently plastered surfaces must be protected from exposure to high humidity, freezing temperatures, ultraviolet radiation, blockages and gusts of wind.
- Initially, internal work is carried out, and only then can the facade be finished. This order of work allows you to maintain the natural process of removing moisture from aerated concrete into the outer space.
- It is important that the physical and technical parameters of finishing materials and aerated concrete do not contradict each other.
- Mixing should only be done in a clean container. If there are traces of old mixes in the container, it must be cleaned with a scraper and then rinsed well with water.
- To create a batch, pour water into a bucket or basin (a third of the total capacity of the container). Next, pour the dry mixture into the container. The required amount of the mixture is determined by eye: as soon as a mound of matter appears from the water, we stop filling up. We mix the mixture with a drill until it turns into a homogeneous composition without any lumps. The consistency of the mixture should resemble thick sour cream.
- We lay out a little putty on a tray. In this case, the composition must be covered with a damp cloth or polyethylene - this will help to avoid evaporation of the liquid and drying of the mixture. We hold the tray at the level of the chest in one hand, and with the other - putty on the surface. We work with a spatula, with which we select small portions of the mixture - such that a thin layer is obtained.
- When a decent surface area is processed, we begin to smooth the coating. Alignment is carried out with sweeping movements of the spatula vertically or horizontally. In this case, the spatula should be at some angle to the wall.
- When the putty is completely dry, we treat the surface with a grater or sandpaper.It will be more convenient to work with sandpaper if you wrap it with a wooden block. Puttying is completed by applying soil.
- Putty is not intended for wet surfaces. For the processing of walls, the operation of which is carried out in conditions of high humidity, facade plaster is used.
- For the treatment of wet rooms inside a building (for example, a bathroom or toilet), the best choice is a cement based composition.
- In the absence of polymer putty, the best choice for interior use is gypsum or lime mixture.
The main task when finishing aerated concrete is not to violate its vapor permeability. This is critical because the benefits of the material are based on its ability to pass carbon dioxide and water vapor outward while letting oxygen into the building.


