Perfectly even single-color walls can look pretty boring. In this regard, many have a desire to diversify the interior, for example, adding decorative plaster or putty to it. At the same time, not only a variety of colors appears in the interior, but also relief drawings (most often flowers). How to make trees on the walls of putty or plaster, and will be discussed in this article.
- Advantages and disadvantages
- The choice of finishing materials
- Main tool
- Foundation preparation
- Create Billing
- Other ways to create colors
Advantages and disadvantages
The advantages of decorative plastering and puttying include the following:
- The ability to replace the wallpaper.
- To update the decorative finish in the future, it will be enough to apply a layer of water-based paint.
- If desired, it is easy to change the interior or add new elements to it.
- Accidental damage to the surface is easily masked by a new layer of putty or plaster.
- Putty material fits well with washed whitewash or previously painted walls.
- There is an infinite variety of patterns and textures that can be placed on the wall.
The disadvantage of the decorative texture is the same, and it consists in the fact that if you need to return to the option with wallpaper, you will have to remove all the putty and paint, and this is a rather time-consuming process.
to contents ↑The choice of finishing materials
There is a wide variety of decorative materials. Plastering and filler materials can be purchased at a hardware store or in the market.
According to the method of application, all mixtures are divided into three types:
- external;
- domestic;
- universal.
By their content, mixtures are mineral, acrylic, silicate and silicone. Also, the compounds are classified by degree of readiness: ready-made solutions and powdersto be kneaded before use. The advantage of dry powder is the ability to maneuver in dosages, since it is possible to produce exactly the amount of solution that is really necessary for work.
Note! Dry mixes are always ultimately cheaper.
In addition, the compositions are classified according to the decorative effect. They are textured, structural, flock and with special effects.

Main tool
Most often, a regular cellophane bag is used to create a decorative finish. To make it, you must perform the following steps:
- We take a large piece of newspaper (or other paper) and crumple it in such a way as to obtain a large lump (about the size of a fist).
- We put the lump in a plastic bag.
- Entrance to the package tightly knotted. The tool is ready.
Below we will talk about how to work with a plastic bag.
to contents ↑Foundation preparation
Before creating a putty bas-relief, it is necessary to carefully prepare the base:
- We noticeable irregularities by grinding. We fill the depressions with the starting putty.
- We remove dust and dirt from the surface.
- Primed the surface (the best choice is an acrylic primer).
- When the primer dries, apply a layer of putty. Approximate layer thickness - 1 centimeter. The solution immediately after application should be smoothed over the surface.
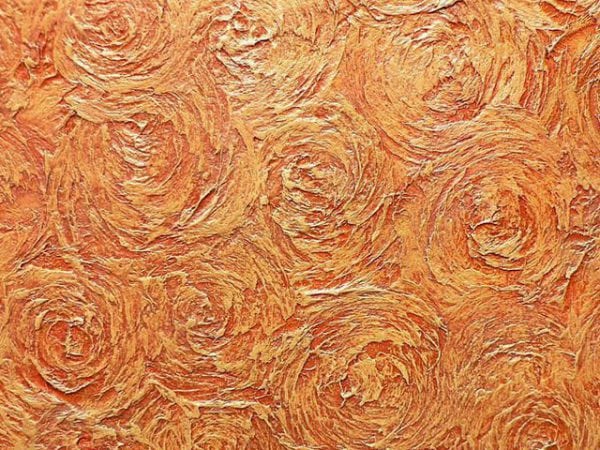
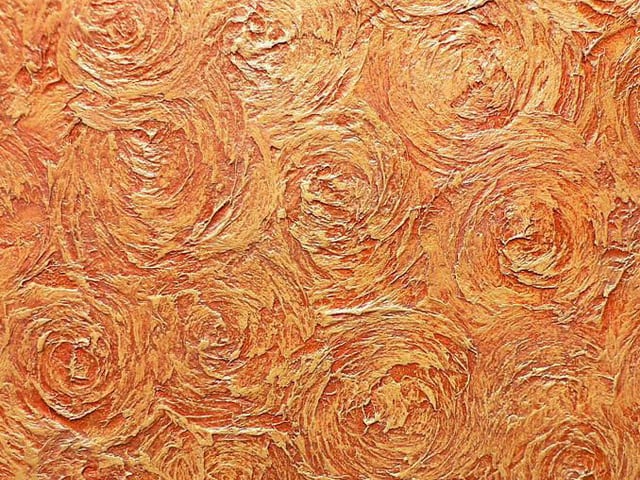
Create Billing
At this stage of the work, it all depends on the artist’s imagination:
- One of the options: we apply a tool made of a bag to the putty and with a little pressure we turn it around its own axis. As a result, the texture will look like a flower bud.
- With the help of a bag you can create both separate “flower bouquets” and a solid texture over the entire surface.
- When the texture is created, let the surface dry for 48 hours. Two days is usually enough to completely dry the walls.
- We apply an acrylic paint composition of a suitable color on a dry surface. And we use only a fleecy roller. We apply the paint carefully, without missing anything, in order to achieve the uniformity of the entire relief.
- When the paint is completely dry, take a brush with hard and short bristles and remove the pigment from the upper points of the created texture. The brush can be replaced with a standard spatula. Thus, we get the effect of artificially aged surface, which visually emphasizes the embossed floral pattern.
to contents ↑
Other ways to create colors
There are other ways to create embossed surfaces. For example, instead of a bag to create a relief pattern, you can use a plastic sponge for washing dishes (brush). The picture is created in the same way as described above, but the result will be different: the relief will look like flower buds with many small petals.
To create embossed drawings, it is not necessary to use only home-made devices. On sale there is a special device for applying images on the putty - textured (patterned) roller. And if you want, you can choose a model that will create exactly the picture that you need.
Sometimes in stores there are stencils or matrices for decorative plaster. The main difference between such devices from the roller is the ability to create not only small, but also large patterns.

Also, images on decorative plaster can be created using a conventional spatula. The tool is pressed into a fresh coating, and then flower petals are formed with appropriate movements. However, decorating with such an instrument requires a certain skill.
Putting patterns on putty or plaster is a rather complicated task requiring art skills. However, if you have patience and practice, everything will work out.