Columns are original and very beautiful designs that serve as a support, withstanding certain loads, and also perform a decorative function. Unlike walls, they have a limited plane and a different section. Their external decoration is distinguished by many nuances, especially when it comes to the most complex forms.
- Preliminary suspension
- Device stamps
- Curved columns
- Beacons
- Plastering technology
- Round designs
- Tetrahedral columns
- Multifaceted columns
- Flute finish

Plastering the columns requires proper preparation and careful adherence to the instructions and is usually carried out with the proper experience.
Preliminary suspension
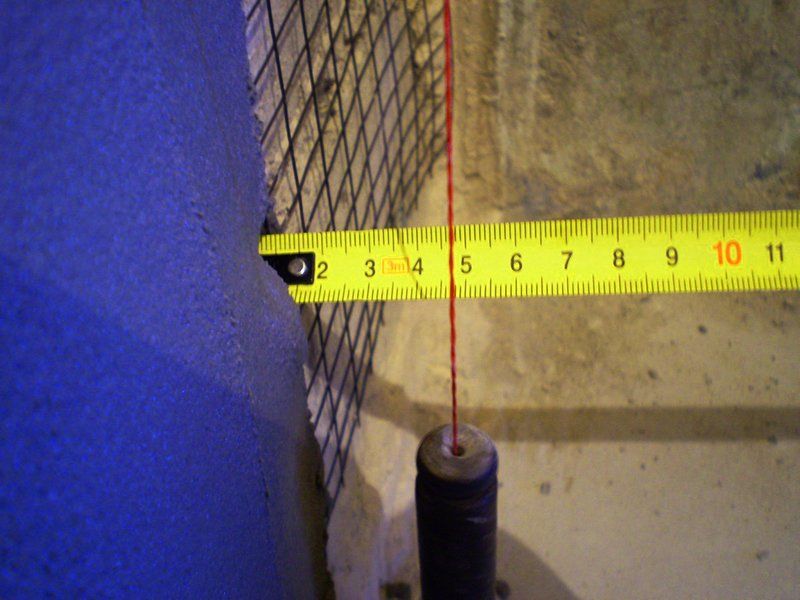
Suspension is a technological operation carried out to establish the exact deviations of surfaces from the norm vertically and horizontally. Thanks to hanging, you can evenly set up beacons and in the future eliminate all irregularities. The more accurately this manipulation is performed, the better the plaster layer will turn out.
Hanging columns is a difficult operation, it is recommended to do it together with a partner. It is especially difficult to suspend unusual designs, for example, drop-shaped, multifaceted. For work, a plumb line is required, and for subsequent plastering - a special rule, made individually. First, you will have to measure all the constrictions and extensions, faces, make a layout, draw the necessary lines on the board and cut out the device.
to contents ↑It happens that on the surface of the column there are irregularities, tubercles. They need to be eliminated - cut down, polished. Another option is to increase the thickness of the plaster in order to level the surface, but it is more time-consuming and less efficient.
Device stamps
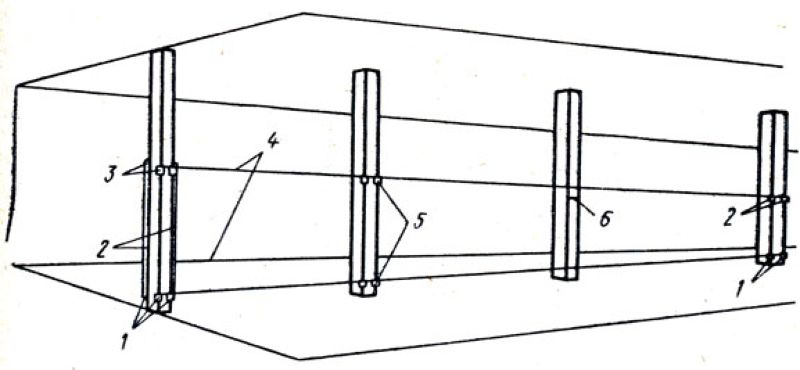
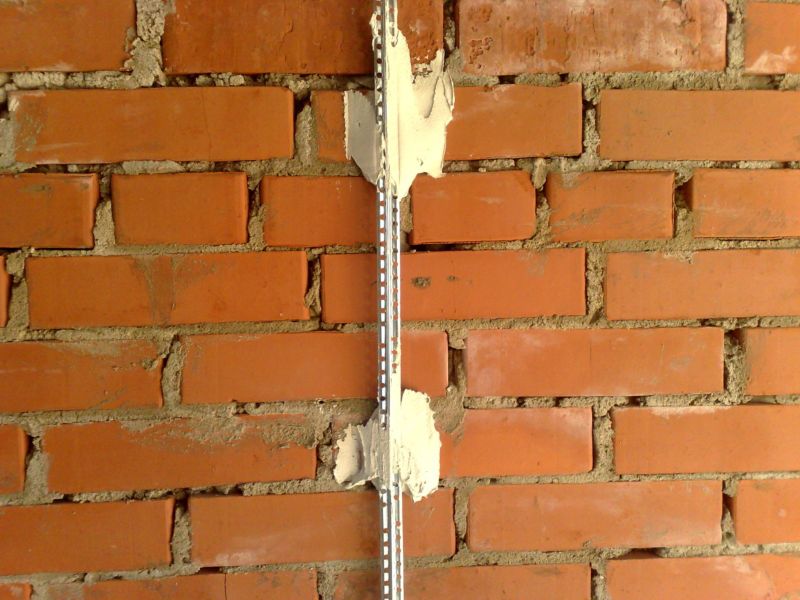
The process of hanging and installing beacons when working with standard cut posts (square, rectangle) will be the same as on ordinary walls. A nail is driven into the upper section of the structure so that the distance of its protruding part with the cap is equal to the estimated thickness of the plaster. A mark is placed around the nail - a small cake made of gypsum or other quick-hardening mortar, which will help control the thickness of the layer.
Next, a plumb line is tied to the hat, another nail is driven from below. A cord is stretched between the extreme marks, carnations are also driven in the gap, the amount of which depends on the height of the column.
to contents ↑It happens that the design includes several columns embedded in one row. In this situation, the extreme columns are hung up, then a cord is stretched between them and stamps are put on other architectural forms.
Curved columns
If the design has the usual round cut, but its diameter varies in the center or along the edges, then the suspension procedure is done in another way:
- measure radii in the thin and thick parts of the column;
- at the top location of the entasis (arcuate reduction of the column trunk), a nail is driven in the lower part of the structure, a stamp is placed 2 cm thick;
- from the crowning part (capitals), a plumb line is lowered so that the twine touches the nail head;
- in the area of entasis from the plumb line, measure a distance that will be equal to the difference between the measurements of the column;
- in the tapering part of the structure, one more nail is hammered, the brand is equiped;
- perform marks along the entire radius of the column along the ring every 2-3 cm;
- a plumb line is passed from the side, the protruding sections of the marks are cut along the line of the cord;
- ready-made stamps will serve as a guideline for the installation of lighthouses, and if there are several tapering spots there can be quite a lot of ring marks.
to contents ↑
Beacons
After arranging the stamps, installation of beacons (guides) is started, which should be located "belt" around the entire circumference of the column.
For this purpose, a template ring is required, which is made and used as follows:
- put together a shield from 2 wide boards 2.5 cm thick with a temporary rail;
- on the shield with a thread and a pencil attached to it, draw a circle with a diameter 2 cm larger than the column;
- for a multifaceted structure, draw the corresponding contour on the shield by inscribing it in a circle;
- the rail is removed, the boards are disconnected;
- saw through the drawn contour strictly along the lines;
- the edges of the sections are wiped, polished, then again fold the halves of the shield together;
- in the presence of entasis, two or more shields are made with circles of different diameters;
- the finished template is put on a ring mark, from below, cloves are hammered in or a solution is applied to prevent slipping;
- the gaps between the template and the column are filled with plaster;
- after the plaster dries, the split rings are removed by tapping them with a hammer;
- defects that appear on the lighthouses are covered with mortar and smoothed out, set the rule for the lighthouses and begin to plaster the columns.
to contents ↑
Plastering technology
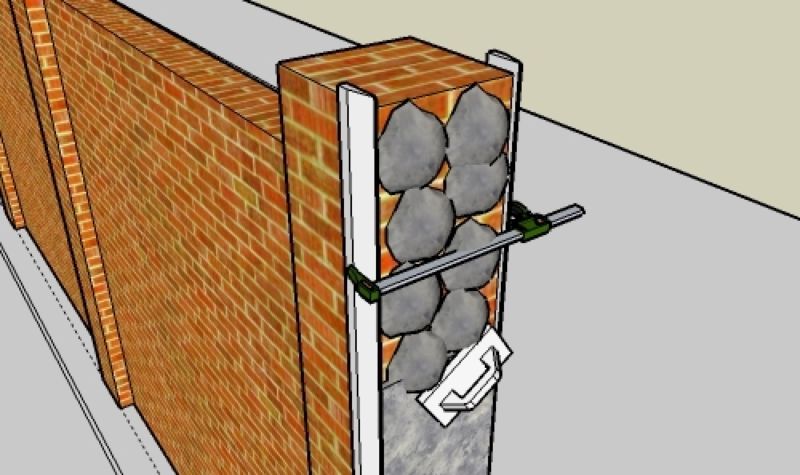
Experienced craftsmen plaster on lighthouses only round and complex columns. In even square and rectangular constructions, cloves are only driven in, a little solution is thrown between them to prevent bending. They set the rules for nails and carry out plastering work.
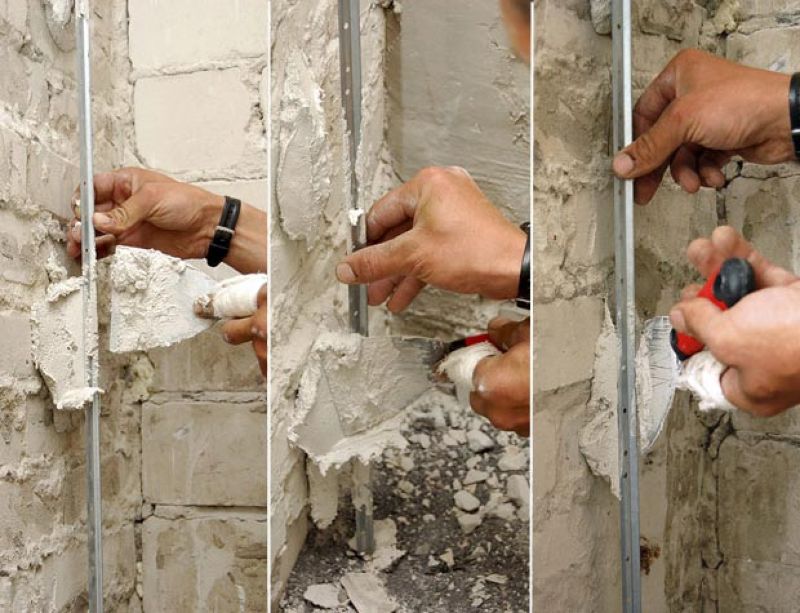
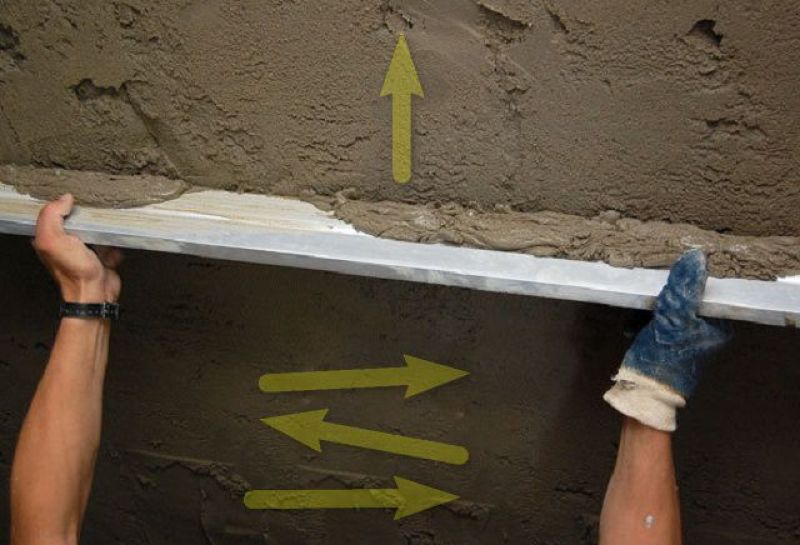
Most often, 2 long rules are used for plastering at once, which are set vertically, on opposite sides. Their ribs should protrude beyond the column to the thickness of the screed. Between the devices they throw a solution, level it with the third rule or a half-trowel.
Apply 3 layers - spray, soil, nakryvka - according to the classical technology of plastering. After the solution solidifies, the rules are removed, the holes from them are covered with a solution. Repeat the work on the following faces in the same way. At the end, the outer corners of the column are pulled using a special corner half.
to contents ↑Round designs
For high-quality lining of round columns, several important conditions must be observed:
- correctly make a template half-radius;
- control the vertical in two directions of the plane;
- follow the straightness of all the columns in a row;
- gently perform surface mashing.
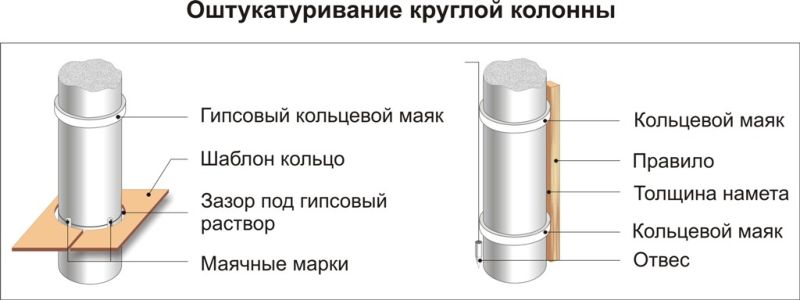
The technique by which round columns are plastered has long been worked out. First, carry out the suspension of the structure, put stamps (from 4 on a pole - two at the top and two at the bottom). After they put the beacons and begin to stretch the base. Between the guides they throw a solution, press the rule, move it from top to bottom and remove the excess.
First, 1/2 columns are processed, then the second part, then the strobes remaining from the dismantled beacons and stamps are closed. The work is performed in a non-stop mode so that the finished plaster layer becomes a monolith. Next, perform the primer and covering the entire area. After drying of the coating layer, the base is rubbed with a trowel.
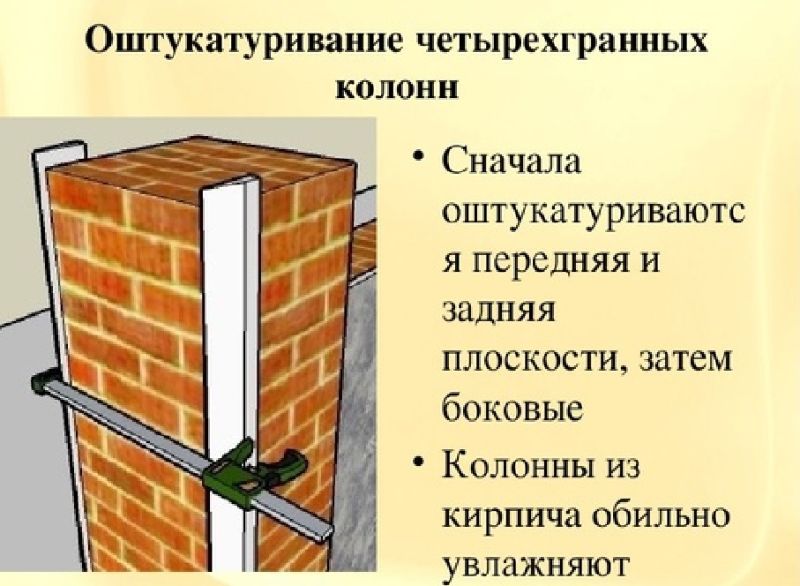
to contents ↑Tetrahedral columns
During the plastering work, it is necessary to take into account the angle of rotation - it should be exactly ninety degrees to any face.It is important to monitor the straightness of the ends and faces, their vertical level and deviations along the plane in two vectors. If the pillars are lined up, their faces should have the same width.
Finishing 4-sided structures is carried out in the same way:
- Hanging up. Initially, the front or rear planes of the extreme columns are hung, installing the upper marks from the dowels. Next, they attach a cord, pull it through the entire row of columns, calculate the thickness of the solution. Change the distance by moving the loop or further clogging the dowel. Fasten plumb bobbins, equip lower brands, then intermediate ones.
- Installation of guides (beacons). After determining the thickness of the plaster layer, beacons are placed, although some craftsmen prefer to simply pull the cords along the dowels from the corners on the extreme columns.
- Plastering. First, the front and rear planes of the columns are processed, then the side ones. Apply cement-sand mortar or plaster based on sand, cement and lime.
When working with concrete columns, first, before hanging, a metal mesh is nailed. When using modern polymer plasters, the reinforcement step can be skipped. Brick columns moisturize well first. The first layer (spray) is produced with semi-liquid plaster, using a building bucket, and a thicker soil is applied with a trowel.
to contents ↑Multifaceted columns
Such columns are very difficult to finish. For their plastering, a specially made template is required. However, in comparison with round structures, the process will be simpler, because in multi-faceted columns you can work with any face individually.
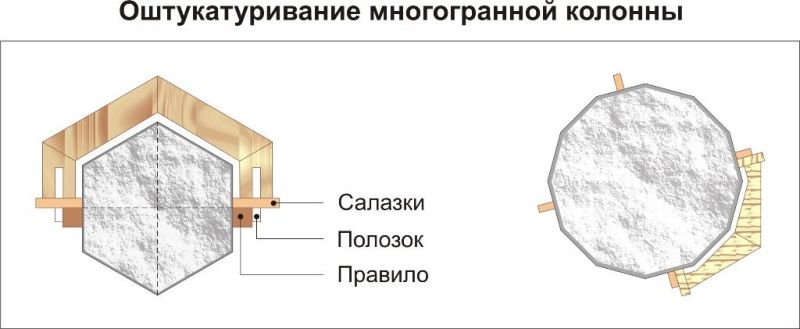
First you need to find out the size of each face (it should be equal to the other), the compatible location of the rear and front faces, the evenness of the surface. The plastering process will include the same steps:
- hanging;
- installation of beacons;
- applying the solution in three layers.
During the mashing of each face, it is necessary to assess the condition of the corners - they should be displayed perfectly, since here all the defects will immediately catch your eye. When installing stamps, it is important to control their position on the central axis, so that guides can be set correctly.
The installation of the rail, which will go in the center of the front face, is carried out in accordance with the requirements of the Building Code. Permissible deviations in level and plane are indicators of 2 mm for every two meters of height and 5 mm for the entire column of any height.
Plastering is performed on beacons (racks). The entire structure with the help of beacons is divided into two grips, a solution is thrown from top to bottom on each of them from the rail to the rail, then the template is pulled. As a result, clear edges with evenly drawn corners should form. After removing the beacons, the holes are overwritten with a solution.
to contents ↑Flute finish
In some cases, working with art forms is even more difficult. For example, difficulties await when decorating flutes - vertical grooves on the trunk of the column, which is called cannulated. Simply put, the pillar is not smooth, but embossed, with uniform longitudinal slots.
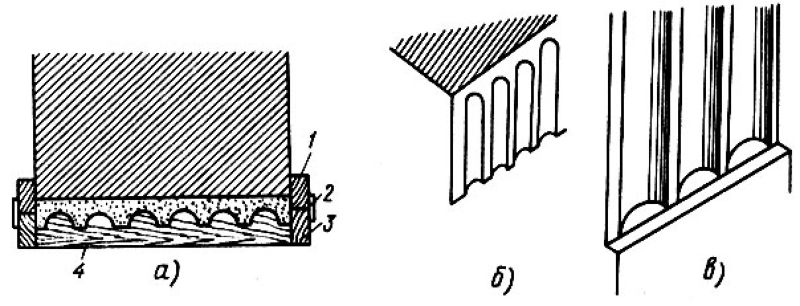
There are different options for plastering flutes:
- On columns with square or rectangular cut. Decorative elements are finished using a template with slots in the form of flutes.
- On any columns. The newly applied plaster is molded as needed using a metal template, and then the decor is done manually using special tools - malki, cuts, as well as foam, fabric.
- On pillars with enthusiasm. The recesses here will narrow together with the base. For plastering works, a swinging template is used, which moves obliquely.
Column decoration is a laborious and responsible process.For its implementation, it is worth inviting professionals or pre-workout on a rough surface in order to do the finishing work perfectly.