In any living room we can find a ton of furniture, which is the most important component of any interior. Depending on the purpose of the room, here we can meet a variety of chairs, tables, sofas, armchairs and cabinets. This furniture is always in sight and therefore, in addition to its main functions, it should also have an attractive appearance that will decorate the interior of your room. Any thing wears out over time, which is why it is necessary to constantly repair and update your furniture. To update the appearance of the furniture, sometimes it is enough to paint it. This option is the most cost-effective and simple. At the same time, everyone who thought about painting with their own hands the same cabinet from chipboard had a reasonable question: how to paint the cabinet?
- Preparing the cabinet for painting
- What paint should I use
- Primer process
- Paint tools
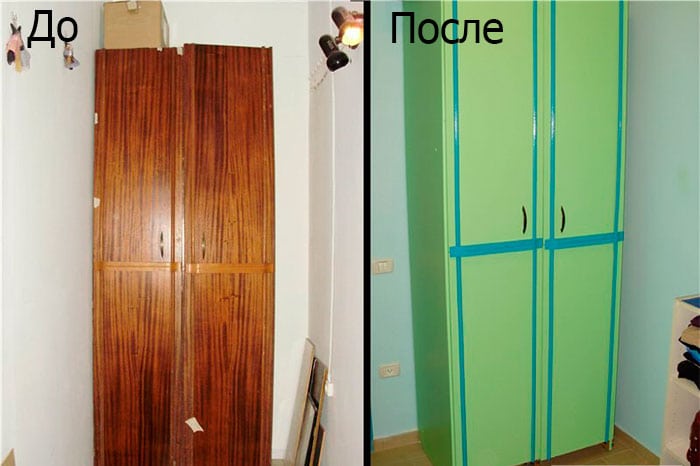
- Paint the wardrobe
First of all, it is important to note that painting the cabinet with your own hands is the most profitable and successful solution. So, you can update and embellish your interior without any special expenses. This is possible if your old cabinet has a high-quality assembly and durable materials.
to contents ↑Preparing the cabinet for painting
We assure you that any old and shabby chipboard cabinet can shine again. Therefore, you do not need to throw it away right away, you just need to repaint it. This is due to the fact that, as a rule, old furniture is of higher quality. It uses natural materials, and therefore this cabinet has high reliability and durability. The same thing, we can say about another element of the interior, like a chest of drawers or a curbstone. The painting of these elements is carried out according to the example of the cabinet, and is also separately described in the article on how to repaint furniture.
It should be noted that the material of which the cabinet is made is not of particular importance. Of course, here we will find some features, but you can upgrade both a wooden cabinet and a chipboard cabinet. If we talk about the differences, then the chipboard cabinet absorbs less moisture than a wooden cabinet. That is why chipboard will dry longer. On a chipboard it is much easier to display the color you need, you also need to use a smaller primer layer than for wooden products.
During the preparation of the cabinet for painting, we need to remove all removable elements, which are presented in the form of handles, hinges, drawers and doors. We should get a clean cabinet frame.
All preparation and painting work should be carried out in a well-ventilated place, and best of all, do it on the street.
For the preparatory phase of the painting, you will need the following:
- sandpaper with different grains;
- flat brush;
- sponge or rag.
First of all, we take a sponge or rag and remove all dust and dirt from the cabinet surface. Then we proceed to remove the remnants of old paint and varnish. We remove the old layer of paint using sandpaper. This is done with sweeping circular movements. Cleaning is carried out first with coarse sandpaper. It is necessary to completely clean the cabinet from all the irregularities of varnishes and paints. This is what will allow the new paint to lie on it with a smooth and even layer.

It is important that you do not erase the veneer layer while rubbing the surface.Otherwise, you will have to, and wipe the surface from bumps and holes. Therefore, do not overdo it with grout.
After the cabinet surface has been treated with coarse-grained sandpaper, you should cover the surface of the dust with a flat brush. Never clean the cabinet or chest of drawers with a rag. So, you will not be able to get rid of all the dust, and also run the risk of driving its remains to the surface, which will subsequently affect the quality of the cabinet painting.
Then, those places that have not been processed with coarse sandpaper, we begin to process, using paper with finer grains. After that, we again brush the cupboard or chest of drawers to remove dust.
After the cabinet cleaning phase is completed, you should definitely thoroughly wash the room in which you work, so that at the time of painting, the room is clean and not dusty. A dusty room can adversely affect the quality of the paint.
to contents ↑What paint should I use
If we talk about the type of paint, it is best to give preference to acrylic paints. This paint has a bright color, practically odorless and it is quite simple to dilute it with water to get the desired color. Plus, it’s quite easy to wash off such paint, which allows you to correct errors in painting. After the paint dries, the water evaporates and the paint acquires stronger properties. This point should be considered during the application of several layers.
It is not necessary to paint your wardrobe or chest of drawers in the same color. Here you can experiment a bit. Taking, for example, two colors. For example, take a beige color for the base and a brighter color for the details. If you can’t find the color or shade you need, you can also buy regular white acrylic paint, and then add color to it. So, you can get the right color and shade. When choosing a shade, you can check how it looks by applying it to a small area of the cabinet. So, you determine which color is best for you, and determine its saturation.

Primer process
Many people ask about the need for a primer, and we can say with full confidence that if you want to paint your wardrobe or chest of drawers with high quality with your own hands, then you should definitely prime the surface. This is due to the fact that the primer will not allow the cabinet surface to absorb moisture. This will contribute to better drying. Also, with a primer, you will not lose the color you need, since when applying paint to a non-primed surface, this chipboard or ordinary wood will not matter. During drying, the color changes slightly, as part of it will be absorbed into the material.
If we talk about the most suitable primer, it is best to use an acrylic based primer. This is due to the fact that the components of such a primer will interact wonderfully with your chosen acrylic paint.
Processing the surface with an acrylic primer is quite simple. You should first read the instructions for using this material. An important point is the accounting for the drying time of the soil. Before applying paint to a dresser or cabinet, let the primer dry completely. It is also important to make clear calculations of the surface that you decide to process. So, you can purchase the necessary amount of material for you.
A dresser or cabinet should be primed with a roller, in a relatively thin layer. Then leave for a while our chest of drawers or wardrobe, for it to completely dry.

Paint tools
Tools - this is another important question that arises for everyone who decided to paint a chest of drawers or a cabinet with their own hands. What is better to paint the cabinet with a brush or roller? Of course, here you must take into account your preferences and skills, but we still recommend using a brush. This tool is more reliable and practical. With a brush, you can apply the paint in an even, uniform layer over the entire surface. Plus, the brush will be an excellent helper in painting hard-to-reach spots.
Having come to a hardware store, you can find a huge selection of different brushes and rollers. The choice of tools is as important as the selection of paint. You should buy only high-quality brushes and rollers. Otherwise, villi may remain on the surface to be painted, which will fall out of the brush with poor quality.
to contents ↑We recommend stocking up brushes with different sizes, which can facilitate your work.
Paint the wardrobe
We need to carry out the painting process in a well-ventilated, clean room or on the street.
The first layer should be applied with paint, the color of which is lighter than the selected tone. The paint should be liquid, if it begins to harden, dilute it with water.
The color of the surface may be different, depending on how many layers have been applied. When applying one thin layer, we get a clearance of the tree structure, which is very suitable for the Provence style.
Learn more about how to paint provence style furniture.
To get a thicker layer, paint should be applied several times. Each coat must be applied after the previous one has completely dried. Smears should be applied in only one direction, so you get a uniform color and a nice structure.
If you use two or more colors, we recommend that you seal the borders between them with masking tape. This can help you not mix colors.
A few days later, after complete drying, a thin layer of transparent matte varnish is applied to the cabinet or chest of drawers. It is designed to protect the painted surface from damage. After the varnish has dried, you can back attach to it all the parts that were previously removed.
As you can see, painting the cabinet with your own hands is not so difficult. Thus, you can transform an old cupboard or chest of drawers into a fashionable and original element of the interior, including your imagination and making a little effort.


