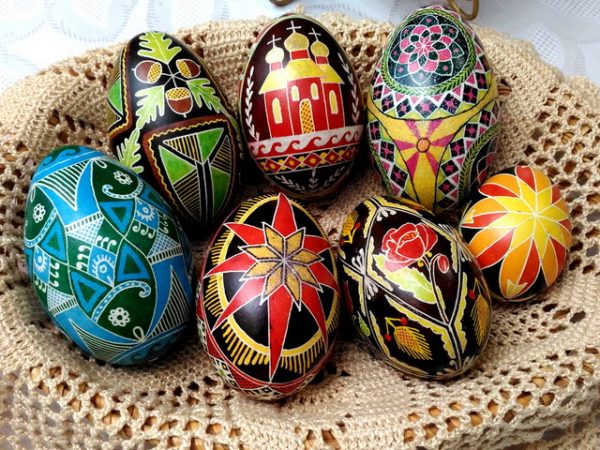
The custom of beautifully decorating eggs for Easter comes from the time of Ancient Russia, and it is still popular with most Slavic peoples. Easter eggs painted with paints or wax are called Easter eggs.
- Ideas for decorating wooden eggs
- Decoupage
- Decorative threads
- Nail polish decoration
- Hot wax painting
- Easter Pendant Instructions
- Necessary materials
- Working process
- Decorative egg "Angel"
- What is needed
- Working process
- Vintage egg on a stand
- Necessary materials
- Master Class
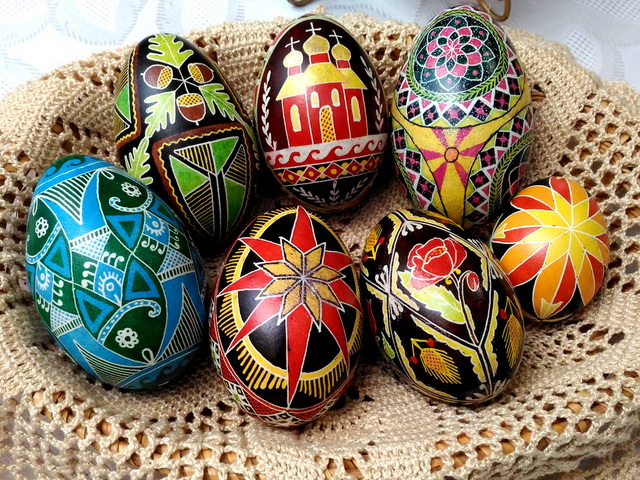
Previously, painting Easter eggs was not made for themselves: the resulting product was used only as a gift, it was so valuable. There were special masters who were engaged in painting on eggs - pisankari. Now in the stores of goods for needlework, wooden blanks are being sold, allowing you to perform unique patterns and other decor even without the presence of creative skills.

Ideas for decorating wooden eggs
You can decorate an Easter egg with your own hands by painting and in a number of other ways. Wooden souvenirs will be a wonderful gift for a loved one. When creating masterpieces, you do not need to limit your imagination, experiments are only welcome!
Decoupage
Decoupage technique is simple, it is available even to beginners. To decorate an egg, you need to purchase a suitable decoupage napkin, cut out the elements. After the workpiece should be uniformly painted with acrylic paints, apply a sticker to the still dry paint. After drying, coat the egg with colorless varnish on wood.

Decorative threads
You can make Easter souvenirs in the original way: wrap them with threads. To do this, stick the needle into the blank, adjusting it from above in the center. After greasing the egg with glue, lay the threads of the desired color in turns up to half the egg. The hole through which the tree shines through should not be. Then transfer the needle to the opposite end of the workpiece, repeat all manipulations with the threads. As it dries, decorate the surface of the egg with ribbons, rhinestones, and beads.
to contents ↑Nail polish decoration
Nail polish is also suitable for coloring Easter eggs; it lays great on a tree. With varnish you can cover the entire workpiece or first paint it with acrylic paint, and then paint with a brush from varnish. If you use varnishes of different colors, pearlescent, with a metallic effect and glitter, the souvenir will turn out to be unusual and beautiful. You can glue rhinestones and small beads on dry varnish.

Hot wax painting
Drawing with molten wax is an interesting creative process, but is suitable only if you have perseverance, the ability to focus. If you have experience, you can create complex patterns, cover blanks with ornaments. The following materials will be required for work:
- wax crayons or melted wax candles - colored or painted with food colors;
- several metal containers (spoons, lids);
- crochet hooks or copper wire;
- food colors.
As dyes, chemicals or those traditionally used for continuous staining of eggs (for example, onion husks) are used. Typically, substances that require digestion in water are used only for chicken eggs.On wooden blanks, the background is created in a different way - for example, dyes are bred and the egg is covered with a brush. After complete drying and drawing a drawing with a simple pencil, you can proceed to the next stages of work:
- Melt crayons or candles, each color in a separate container. It is more convenient to do this in a regular old spoon above the flame of a candle. Wax will have to be heated regularly, otherwise drawing a pattern will be impossible. The wax should not be brought to a boil.
- Warm the egg a bit. If it is cold, then the wax will harden too quickly, and it will be difficult to create the necessary contours.
- Proceed to create patterns. To do this, on a hook, wire draw a little wax, put a point or make a line. After all the rest of the strokes according to the outline. First, perform the drawing in only one color, and after drying, proceed to further coloring with other shades.
to contents ↑The finished dried wooden pysanka should be greased with sunflower oil: after soaking, it will give it a beautiful glow. Multi-colored souvenirs look festive, although monophonic items also look stylish.
Easter Pendant Instructions
Decor is of great importance for Easter. On a holiday, it is customary to decorate a house and give souvenirs to relatives. Therefore, you can make Easter pendants yourself, especially since it is simple and interesting.
Necessary materials
To make a unique pendant, you need to get a flat piece of plywood. Also, a master class will require two colors of acrylic dyes: purple and gold. Separately, you need to buy a contour paste of a golden hue, a thin embossed paste, a decoupage varnish, glossy acrylic varnish, and glue for poured. Of consumables and tools you need:
- stencil;
- sticker;
- transfer foil;
- tassels;
- ribbon (lace);
- sandpaper;
- napkin.

Working process
First, the wooden blank should be sanded with the finest grain sandpaper to make it perfectly smooth. After the procedure is as follows:
- Cut the image to be used for decoupage. Lubricate the workpiece and the sticker with decoupage glue, attach, iron well. Remove excess glue with a napkin.
- Apply relief paste through the stencil. It should be a pattern to cover the rear of the suspension, as well as the sidewalls, without going to the picture. Allow the paste to dry, then gently sand it.
- Paint the workpiece in the main tone (purple), well passing over the entire area and along the end of the suspension. You can make two layers of paint so that it looks saturated.
- Dry the craft. Take a dry brush, highlight volumetric elements with gold paint.
- Apply the paste again - apply the letters "XB". Lubricate the letters with glue for the sweat with a thick layer, attach the foil with the gold side up, press with your fingers, then remove the top of the foil. Similarly, gilt the ends of the suspension.
- Circle the contours with golden paste, dry the pendant. Cover it with acrylic varnish in 2 layers. Drill a hole, insert the cord.

Decorative egg "Angel"
This egg will also have a beautiful relief pattern and a decoupage picture in the center on the front side.
What is needed
For work on the manufacture of an original wooden egg for Easter, you will need such materials, tools:
- an egg blank having a small saw cut below;
- acrylic primer on wood;
- acrylic paints - white, pink, chameleon;
- embossed paste;
- decoupage card;
- glue for decoupage pictures;
- acrylic lacquer;
- tassels;
- sandpaper;
- awl;
- scissors;
- a small syringe with a thin nose.

Working process
First, the workpiece must be sanded so that it regains smoothness. It is more convenient to work with it after sitting on the awl, so it will be possible to process the egg with the whole paint. Further work is done in this way:
- Apply acrylic primer. Place the egg vertically to dry on a stand (cardboard, jar, etc.).
- Cut a picture from a decoupage card. Mark under it an oval area on an egg of a suitable size.
- Color the selected area with white, the rest of the egg with a pale pink tone. Repeat painting in one more layer.Allow to dry.
- Moisten a little decoupage picture with water, grease with glue, attach to the workpiece. It is good to smooth, removing bubbles, also smear with glue on top.
- Take a syringe, fill with relief paste. Make egg painting according to a pre-invented pattern. If there is no experience in such work, you can pre-execute a pencil drawing.
- Allow the paste to dry. Process the entire egg, except for the sticker area, with the “chameleon” paint to give the product a beautiful glow. Apply 1-3 layers of varnish, drying each of them.

Vintage egg on a stand
Making an egg with an imitation of an aged surface is somewhat more difficult, but with minimal artistic experience and accuracy, everything will work out!
Necessary materials
Before starting work, you need to make sure that all the necessary tools and consumables are selected:
- wooden blank;
- acrylic primer;
- acrylic paints - white, blue;
- shellac varnish;
- acrylic varnish;
- craquelure varnish;
- bitumen varnish;
- decoupage glue;
- image printed on the printer;
- tassels;
- sandpaper;
- awl.
Master Class
After standard preparation of the egg (sanding, priming), the stages of the creative process will be as follows:
- Take a printout of the picture, cover in 3 layers with acrylic varnish. Dry each layer for 15 minutes.
- Cut the picture, soak in water for half an hour. After removing the varnish film with the printed image. Apply decoupage glue to the wrong side.
- Apply the film to the egg with wet hands, place it nicely, stretch it a little. Act carefully so as not to tear the film. Carefully smooth the folds, otherwise you will have to wait for drying and sand them with sandpaper.
- Paint the egg, without capturing the area of the picture, with blue paint. If a stand is attached to the product, paint it in the same color. After jabbing, perform “shaggy” decor with white paint in blue directly around the picture. According to the type of gradient, make a drawing in which white paint goes to blue by gradually increasing the tone.
- Apply clarified shellac to the egg, then craquelure varnish. After drying of the latter, cracks will remain, which must be wiped with bitumen varnish. After finishing, make another layer of shellac or acrylic varnish.

These options are not exhaustive when decorating Easter eggs. The blanks can be painted with a permanent marker, wrapped with lace and dipped in food coloring, greased with glue and sprinkled with confectionery powder. Bold decisions are welcome, because the result is a unique handmade souvenir!