Often during the repair work there is a desire to simplify the task - not to waste time and effort on removing paint and lay the tile directly on top of the paint layer. About whether it is possible to put tiles on the paint will be discussed in this article.
- Paint and Tile Compatibility
- Enamel
- Oil paint
- Water based paints
- Tile adhesive selection
- Laying tiles

Paint and Tile Compatibility
When laying tiles on a painted surface, the following problems will surely appear:
- The adhesive qualities of the painted wall will not allow the tile to firmly fix, and the solution will crawl.
- Even if the tile can be glued to the paint, in the future it will crumble even with a small load on it.
- Laying a tile will be difficult, as it will creep under its weight.
- Surely, very soon you will need a second repair.

To avoid the problems listed above, it is necessary to prepare the surface correctly. The nature of the effort depends on the type of coating. Below we consider the main types of coatings.
to contents ↑Enamel
The most difficult to lay tiles on enamel surfaces. The fact is that enamel is characterized by a glossy shine, it is slippery and smooth. The enamel surface is resistant to moisture, but at the same time differs in very low adhesive qualities.

The tile will lie on enamel very unreliably. Therefore, before laying the tiles, it is recommended to clean the surface of enamel using the following tools:
- Sanders. To work, you need a grinding nozzle that will allow you to process the maximum possible area. Work should be in safety glasses and gloves.
- Ax. With this tool you can remove thick layers of paint along with plaster. The disadvantage of this method is that the surface will certainly not turn out quite smooth.
- Sandpaper. The processing accuracy is much higher than in the case of an ax, but the complexity of such an operation is much higher. Sandpaper is usually used for small amounts of work.
Only after cleaning from enamel can you start laying tiles. Minor areas where enamel could not be completely removed are not a big problem. However, it is better if the wall is maximally cleared of enamel composition.
to contents ↑Oil paint
Unlike enamel formulations, oil paints are significantly better adhesion. However, in this case, it is necessary to carry out preparatory measures. Their goal is to give the surface the maximum possible roughness to improve adhesion of materials.

So, before laying the tile on a surface painted with oil paint, we perform the following actions:
- Using sandpaper or a grinder we make the wall rough.
- Over the entire area of the wall we make small notches. Recesses can be done with an ax. A chisel or chisel is also suitable.
- We clean the wall from dirt and dust. Degrease the surface.White spirit or acetone is suitable for degreasing.
- We process the wall with a deep penetration primer. We use a brush for this. The task is to fill each cavity with a primer.
to contents ↑The actions described above will significantly increase the adhesive properties of the paint-coated surface.
Water based paints
Such compositions are especially often used in rooms with high humidity, as they contain latex. Water-based paints are characterized by the fact that with a lack of oxygen and high humidity, they begin to swell and exfoliate. Thus, laying tiles on a surface coated with water-based paint is not the right solution. In this case, even a good primer composition will not help.

Water-based paint is removed more easily than an oil compound or enamel. It is advisable to remove paint with plaster.
to contents ↑Tile adhesive selection
When it comes to laying tiles on old paint, the issue of choosing the right glue is especially important. You will need not a standard cement-sand mortar for laying tiles, but a special reinforced adhesive composition.

An adhesive can be made independently by adding PVA glue to the cement and sand solution. If you do not want to mess with the manufacture of the composition yourself, you can purchase ready-made reinforced glue in the store. It is advisable to give preference to quick-drying varieties of glue, especially when it comes to laying tiles on a damp surface.
to contents ↑Laying tiles
The tile is laid with special glue on a non-plastered surface.

Below is an instruction on how to complete the work:
- We glue the glue according to the recommendations from the manufacturer on the packaging with the goods.
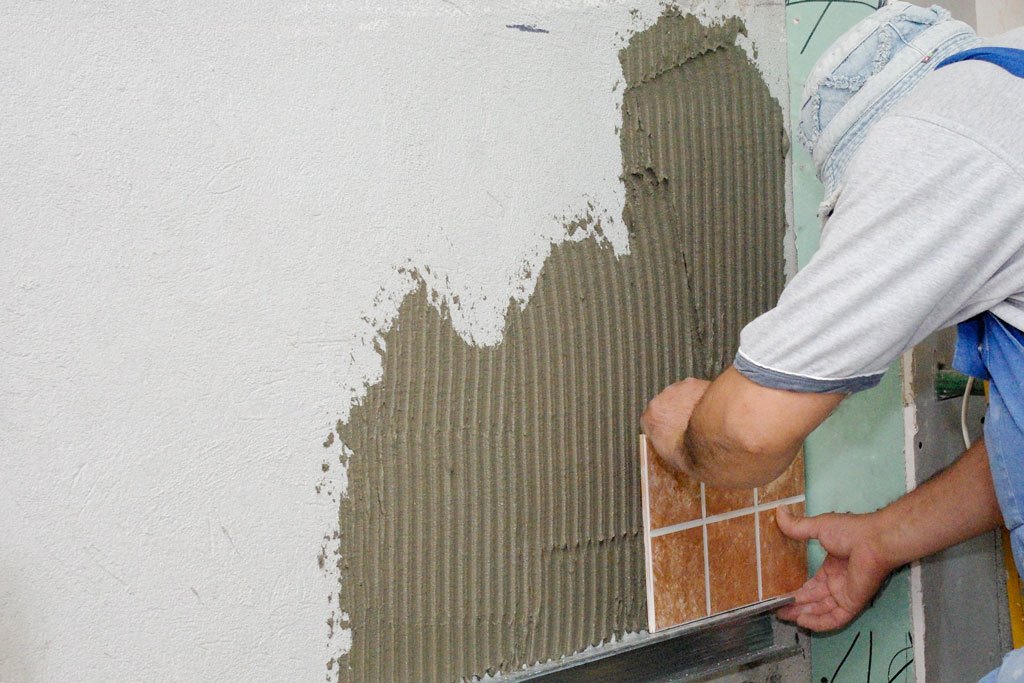
- The adhesive composition is applied to the treated surface using a notched trowel. It is recommended to start from the bottom left corner. Excess glue is also removed with a notched trowel.
- We take the first tile, put it on the solution and slightly press down, waiting for the moment of reliable fixation.
- We apply the building level to the tile and check the evenness of the installation. If there are deviations, we level the tile with a rubber mallet.
- When the tile is installed, we cover it in the corners with plastic crosses. Thanks to these details, it is possible to maintain normal joint sizes.
- We put the first row of tiles. After installing each of them, we check the correct location of the tiles relative to each other. If necessary, tear off the tile in order to add a little glue or vice versa - remove excess.
- At the end of laying the first row, measure the horizontal level.
- We put all subsequent rows in the same way.
- If the tile does not fit entirely, take a tile cutter and cut off the excess. Ideally, use not a tile cutter, but a grinder, since in this case the edges of the tile will be smoother.
- When the tile is completed, remove the crosses and wait until the glue completely dries.
- The final effect is grouting of joints.
So, as can be seen from the article, laying tiles on the paint is not always justified, especially when it comes to water-based and enamel paints. In the case of oil paints, it is quite possible to lay the tile on a painted surface, however, in this case, preparatory work can not be avoided. Also, in any case, you need a reinforcing element, which must be mixed with a cement-sand mortar.


If the paint holds tight, then I did this: I bought transparent TITAN glue, acetone to dilute it, poured a portion of titanium and diluted it with acetone so that it could be applied with a brush. Then he poured several handfuls of tile glue into the glue and acetone mixture and mixed everything. Then this mixture was applied to the painted walls, it turned out a dark rough matte surface with a splash of sand that could not be torn off or peeled off from the painted wall, it turned out super paint-contact. Then I laid tiles on the treated wall. Cheap and without the power of removing paint.