In order to achieve the perfect result when painting the ceiling, you need to know how to paint the ceiling without streaks. Painting is considered the easiest and most effective way to repair the ceiling, but this process is not as simple as it seems at first glance, and has its own secrets and performance features. If you complete all the stages of work correctly, then as a result you can get the perfect ceiling.

Preparatory work
If you are thinking about how to paint the ceiling without streaks, be sure to take care of the quality preparation of its surface for painting. Before performing the process of painting the ceiling with water-based paint, its surface must be prepared accordingly.
Regardless of the quality of the material with which the ceiling was coated before the start of the painting process, it must be dismantled and completely removed. All defects or irregularities must be primed, sanded and a layer of fresh putty applied. If it comes to painting a smooth and prepared surface, it can simply be primed. Well, of course, before starting the painting, you need to free the room from furniture and things.
It is best to start preparing with the removal of old coatings or flaking plasters. And if the ceiling is affected by mold or fungus, then all the darkened areas must be cleaned to the very base.

You can perform these operations yourself using a special spatula. You can pre-wet some parts of the ceiling in different places. This is done so that there is less dust, and the plaster itself exfoliates as easily and quickly as possible.
All places that have been affected by mold or fungus must be treated with antiseptic compounds. If the room in which the ceiling will be painted differs in dampness, then it is best to treat the entire surface with antifungal compounds.
In order to get rid of fungus and mold, you can use various traditional means and even just fluids, which include chlorine. But unlike a real primer, such funds will help to remove the fungus, but will not be able to provide him with long-term protection.
After treatment with antiseptic agents, the ceiling must be allowed to dry well and cover it with a penetrating primer, which will strengthen the base and can provide better adhesion of the paint and surface. Further, all irregularities must be carefully putty with a starting putty. After drying, the surface is sanded with sanding paper.

The next step is the final putty of the entire surface of the ceiling, which is best applied in two thin layers, with successive drying of each, using a wide steel spatula
Next, clean sanding with thin sandpaper is needed. After this, the ceiling surface is necessarily primed again. There is no doubt about the need and financial feasibility of performing this procedure so many times. The primer will improve the quality of the surface, and its cost is always less than the cost of high-quality acrylic or water-based paint.
to contents ↑Dyeing
If the ceiling is ready for painting, you can begin to prepare all the necessary tools. To complete the final stage of work and perfect staining, you need:
- paint;
- spray gun, roller or brush;
- tray for paint;
- stepladder or special paint extension for the roller.
Today, you can often find ceilings of a variety of colors, which are painted in different colors in accordance with the design and interior features of the premises. It is very modern, and a colored ceiling can even bring notes of freshness and originality to the interior.
If there is already finished paint with the appropriate pigment, then you can not worry. But if color is added to the white paint, then it is best to prepare the amount of the mixture with a margin. This can be explained by the fact that mixing paint yourself and manually, without using modern tinting technologies, it is almost impossible to achieve the desired color several times in a row. Each time you mix, it will produce a different shade. And if it seems to you that the composition in the bucket and on the ceiling is the same in color, after drying it may turn out that the strokes on the ceiling are completely different colors.
It is most convenient to paint the ceiling with a special spray gun tool. But to buy it for the sake of one coloring is not worth it. Unless you have plans to carry out other work in the future with its help.
In the process of painting the ceiling with a spray gun, the material diverges least, and the process of painting itself does not require much physical effort.
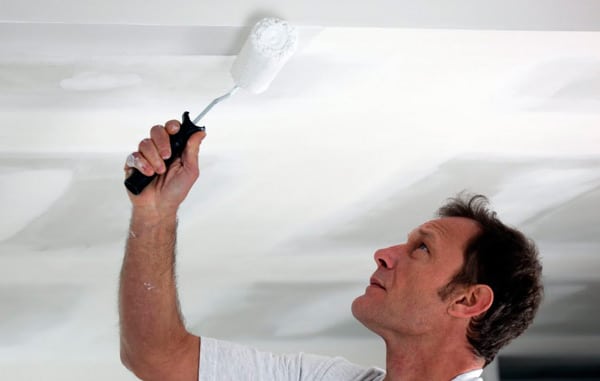
Paint the ceiling with a brush is not so convenient. In addition, such a process will require much more time. And therefore, if you choose between a roller and a brush, it is best to give preference to the first.

Using a roller, the coating is applied to the ceiling more evenly. And in the process of working there is no need to dunk so often in the paint as a brush. But in the process of working with a roller, it is impossible to do without using a brush. With its help, it is possible to qualitatively process the joints of the ceiling and walls, as well as all hard-to-reach corners.
to contents ↑Application technology
Paint for the ceiling can be purchased ready-made. But a more affordable option would be its self-cooking. To do this, simply connect the emulsion with water in a 1: 1 ratio and add a pre-selected color scheme. It is best to immediately prepare such an amount of paint, which is enough to cover the entire surface. The reason for this precaution is that it is unlikely that it will be possible to tint the paint just the second time, and therefore, it is better if the prepared amount is enough for the entire room.
Before starting work, it is best to draw a wide line along the edges of the ceiling and try to paint over all joints whenever possible. Thus, it is possible to ensure uniform distribution of the material over the entire surface.

The painting process is best started from the farthest corner of the room. First of all, it is necessary to pay attention to problem areas and paint with a brush corners, borders and so on. After that, the roller is dipped in paint and well rolled out on the tray.
The movements of the roller should be parallel, it is best to apply overlap paint, 5-10 cm.
In the process of performing work, no accumulations of paint should appear at the joints, but in order to achieve such a result, the composition must be correctly distributed with a roller over the surface.It is necessary to paint at a fairly fast pace, otherwise strips from quickly drying paint may appear on the surface.
As a rule, staining is done in 2-3 layers, but practice shows that in order to achieve a decent result, the paint should be applied in 3-5 layers. After complete drying, each layer is applied perpendicular to the previous one. For applying the last layer, it is best to use a roller with a medium pile, parallel to the sunlight from the window.
It is worth noting that the water-based paint will hold out better if, in the process of drying, put in the room a kind of water bath, using water containers for this. If, after drying, minimal imperfections remain on the surface, they can be sanded with zero sandpaper and an additional coat applied on top.
Painting the ceiling without streaks on your own is pretty easy. You just need to prepare the necessary amount of paint and try to correctly and carefully follow all the instructions. And then, the updated ceiling will delight its owners with a beautiful, well-groomed and fresh appearance.

