Skirting for the ceiling - a decorative detail in the room, it gives a finished look to the room. But it is also necessary to mask minor defects - chips, uneven edges of the wallpaper, which inevitably remain after the repair. Ceiling skirtings will also cover ugly joints of walls and ceiling.
- Skirting board adhesives
- Polymer Compounds
- Clay "Titan"
- Clay "Moment"
- Eco-naset glue
- Polyvinyl acetate adhesives
- "Liquid Nails"
- Putty
- Silicone sealants
- Self-made glue
- Skirting Types and Glue Selection
- Polystyrene and Styrofoam
- Polyurethane and plastic
- Gypsum and wood
- Skirting board
- Take into account the width of the material
- We take into account design
- Basic installation methods
- We use putty
- Glue mounting
- Sticking on different surfaces
- To stretch ceiling
- On wallpaper
- On plaster
- On drywall
- How to glue the skirting on the ceiling in the corners - the specifics of trimming
- With the help of a miter box
- No extra tools
- Joint masking and painting
Is it possible to mount the skirting board with my own hands? The process is simple, but it is important to consider all the features of the material. How to glue a foam plastic skirting board? It is worth familiarizing yourself with the nuances of technology.

Skirting board adhesives
What glue is better to mount ceiling moldings, you need to decide in advance. A wide assortment is presented in stores. Each glue is characterized by special properties, application specifics, they have different prices. According to the type of adhesives are divided into polymer, putty, sealants, "liquid nails".
Among the many brands are popular "Master", "Moment", "Europlast", "Kleber" and others. Some tools help glue the cornices on the wall and ceiling, while others have leveling properties. The latter are used if surfaces with differences.

Polymer Compounds
Such adhesives are considered universal, they are suitable not only for skirting boards, but also for most known materials. All compositions based on PVC, vinyl or other polymers have high adhesion to the surface (glued with wallpaper, plastered), rather viscous. The ability to withstand high loads allows you to glue even large wall plinths and massive decorative moldings.
to contents ↑There are instantly hardening compounds, and with a gradual coupling. Among the minuses should be called an unpleasant odor and harmful fumes - a respirator should be worn when working.
Clay "Titan"
One of the best adhesives is “Titan”, it is perfect for polystyrene foam and products made of it, suitable for plastic, wood, cork, MDF, gypsum. "Titan" can be used for other household needs - it will help to seal ceramic, leather, rubber products, with its help lay linoleum, laminate, parquet.
The main characteristics of the glue are as follows:
- can be used at any temperature, humidity;
- resistant to sunlight;
- elastic;
- not stratified, not crumbled;
- after drying, it is absolutely harmless to humans;
- economical.

"Titan" perfectly glues foam plastic skirtings, it will not be possible to tear them off after final drying (usually it lasts a day).It is possible to apply glue for external and internal works. It has no color, so the seams will not be noticeable.
to contents ↑Clay "Moment"
“Moment” for skirting boards is most often chosen by professionals, “Moment Installation Express Decor” is especially popular. It may be difficult for a beginner to use this tool, because the glue dries in a few seconds. After fixing the plinth position will be difficult. But the quality of gluing is excellent, in addition, “Moment” is suitable for fixing the joints of a baguette, decorative elements.
Of the minuses, it is worth mentioning the content of ethyl cyanoacrylate - a toxic substance that often causes allergies in contact with skin. To work with glue you need a respirator and gloves. Eye contact may cause loss of vision! Other disadvantages are high consumption and a rather high price.

Eco-naset glue
Installation of ceiling skirting boards is possible with the help of Eco-naset glue, which is similar in composition to Titan. It is well suited for polyurethane skirting boards, they can also be glued polystyrene tiles, ceramics, gypsum, wood, cork. The glue has good adhesion to brick, concrete, putty, gypsum, gypsum board. Eco-naset is transparent, cheap, and safe for humans.
Polyvinyl acetate adhesives
Such products do not contain harmful components, without an unpleasant odor, can be used even in a children's room. An example is PVA glue. Also in the group are its analogues based on water and polyvinyl acetate. But the quality of gluing is much lower than that of polymer compositions. Such materials can be used to fix small, light skirtings, individual elements of polyurethane. The disadvantage should also be called high consumption - glue must be applied abundantly.
to contents ↑"Liquid Nails"
Is it possible to glue the curbs with the help of "liquid nails"? Yes, this glue is very convenient to use and is considered by many to be optimal for attaching decor. "Liquid nails" do not harm the texture of the material, their adhesive ability is very high. There are two types of tools:
- Neopropylene adhesives - include solvents, due to which they have a pungent odor and give toxic fumes. Only after complete drying become safe. They should be used for gluing skirting boards in high humidity conditions.
- Acrylic adhesives are odorless, made on a water basis, have no negative health properties. At low temperatures they cannot be exploited - they are destroyed. Due to the lower quality of adhesion, large skirting boards should not be attached with such means.

Putty
Acrylic putty is more difficult to work, not everyone can apply it correctly. But if the walls are crooked, it will cover up all cracks, bumps, the appearance of the joint will be more attractive. You do not have to choose what to attach corners, decorative elements. Even the joints of the skirting boards can be covered with this material, while it does not exfoliate, does not externally stand out against the general background. The product is completely safe, non-toxic, odorless. Work with putty mixture is allowed at low temperatures and high humidity.
to contents ↑Silicone sealants
It makes sense to acquire adhesive sealants in the presence of large joints in order to seal the seams. The consistency of adhesives is dense, elastic, after drying, they give a strong white seam, resistant to moisture, dirt. The sealant is based on silicone rubber, plasticizers, adhesion enhancers, vulcanizers. Some manufacturers introduce fungicides into the composition, it is advisable to buy such adhesives for gluing the baseboards of the kitchen, bathroom.
When installing baguettes in the living room, it is better to use two types of sealant. Transparent (it is cheaper) is used for the back of the baseboard. White joints in the corners are closed up.

Self-made glue
What else can you glue the borders on the ceiling? Many prepare the composition on their own to save money.For this we need: PVA glue, dry finishing putty, water, as well as a jar or other container. The procedure is as follows:
- putty putty in a jar - 4 parts;
- add PVA glue - 1 part;
- while stirring, add water to the consistency of sour cream, there should be no lumps;
- allow the product to infuse for 15 minutes, mix again;
- glue can be used within 2 hours.
You can attach borders with such glue in the usual way. It is applied to the inside of the decorative element, press the latter against the wall, hold for a couple of minutes. The cured agent must be removed immediately until it has frozen.

Skirting Types and Glue Selection
The tool must be selected depending on the material from which the baseboard is made. Some adhesives can destroy the structure of the product, they are not suitable for work. In stores you can find different types of borders, the main ones are described below along with recommendations for choosing glue.
Polystyrene and Styrofoam
These skirting boards are the most inexpensive and practical, widely distributed, and are sold in every hardware and hardware store. They can be painted - the appearance will be no less attractive than that of gypsum. Ordinary plinths, two-level cornices, fillets (plinths with a groove) are realized. Even in the absence of experience in the repair of foam and polystyrene borders can be glued to the wall, the process is simple.
Many are interested in what is glued first - first wallpaper or baseboard? Foam elements can be glued directly to the wallpaper, the reverse procedure is less convenient. Due to their low weight, skirting boards will adhere to any glue, but their fragility must be taken into account. You need to cut it carefully, then coat with two strips of glue. The use of acrylic putty will be effective. The gaps between the planks and the ceiling can be repaired with a gypsum finish mixture, in which a little PVA glue is added. Joints are sealed with white sealant.

Polyurethane and plastic
Polyurethane is a flexible material that is resistant to wear and temperature changes. Usually, polyurethane skirting boards are bought for those areas where there are a large number of corners, bends, recesses of different sizes and shapes. They are especially relevant for rooms with columns, perfectly combined with a false ceiling, successfully glued to a stretch.
When choosing glue, one must take into account that such skirting boards can shrink during operation. The joints are made as tight as possible, any gaps, even small ones, are filled with silicone sealant. Use reliable glue - "liquid nails", "Moment", "Titanium". Be sure to glue the ends of the baseboards with glue, it is advisable to buy a special tool for the latter.
A plinth made of plastic usually comes with corners - external, internal, connecting strips. It must be glued with "liquid nails" or other glue with high adhesion to the surface.

Gypsum and wood
Wooden skirting boards are used less often than others, they require professional skills and very reliable glue. Basically, they are purchased for apartments, houses with a classic interior, are not recommended for high humidity. Lighter models are glued to "liquid nails", and heavy skirtings are additionally drilled with self-tapping screws.
to contents ↑Gypsum cornice is very durable, has an excellent margin of safety. Even molds for self-casting of parts are sold, to which dry weight is attached. For reliable bonding, a mixture of alabaster with PVA or other polyvinyl acetate glue is used. More massive structures are also coated with “liquid nails”.
Skirting board
Before you start, you should choose the right skirting boards so that they are ideal for a particular room. This will depend on a number of conditions.
Take into account the width of the material
Skirting boards differ not only in appearance - they have different widths. The choice will depend on the height of the ceiling, this is a determining indicator. Types of baseboards and fillets:
- narrow (up to 35 mm) - designed for low ceilings, help visually “lift” the wall;
- medium (36-50 mm) - suitable for ceilings of 2.5-3 meters;
- wide (from 55-70 mm) - are glued to walls more than 3 meters, visually reduce the height.

It is important to immediately calculate the number of skirting boards that you need to buy. To do this, measure the room, calculate the perimeter, add a little material to the error, damage (if it was cut off incorrectly, broken). On wide skirting boards, glue is necessarily applied along the entire wrong side, this is the only way to avoid material detachment. Narrow borders are spotted with glue, especially if they have a high grip quality. Most often used are medium in width, they are glued with a wave-like application of the product.
to contents ↑We take into account design
Particular attention should be paid to the appearance and shape of the skirting boards, because they will complete the design of the room. Usually the color is white, but colored, often light, pastel shades are also sold. If the color of the wallpaper and decoration elements completely matches, then the room will seem smaller in size. On the contrary, white visually enlarges the room. Since it will be difficult to peel off, it is better to pre-try one skirting board and evaluate the result. If everything is fine, you can continue to work.
The gluing of the skirting board will be determined by its design:
- flat, thin can be glued pointwise, it will sit firmly in place;
- baguettes with stucco molding, volumetric details are glued in 2-3 wave-like products;
- wide decorative products are attached with a continuous layer of glue.

to contents ↑The classic interior requires the use of complex forms of baguettes with stucco patterns. For the minimalist - they buy thin fillets or skirting boards of the correct geometric shape, without a pattern. Borders with volumetric decorations are not suitable for colored wallpaper with an ornament; they will look better on plain ones. Also, such skirting boards are not suitable for small rooms.
Basic installation methods
It seems to many that it is possible to glue the skirting board without carefully measuring the details and clarifying the nuances. The result will be crooked, poorly docked, detachable elements. To avoid problems, you must carefully familiarize yourself with the installation methods. There are two options for joining skirting boards - for glue and putty, they are slightly different from each other.
We use putty
Before or after the rest of the repair, the baseboards must be fixed, depending on the type of glue. So, laying on a putty mixture is suitable if the wallpaper is not already pasted. Professionals prefer this type of installation, since the untreated surface has the most reliable grip.
Plinths are needed for installation, putty is a common tool sold in each store or remaining after repair. Sold in finished form or in the form of a dry powder. The latter must be crumbly, without lumps. If you have working skills, you can use gypsum compounds, they are strong, but very quickly set. They are bred in small portions. You also need to buy a deep penetration primer to improve adhesion. Of the tools purchased:
- hacksaw for wide cornices, clerical knife - for narrow (up to 20 mm);
- miter box for forming corners (you can work without it);
- spatula of small width;
- fine grain sandpaper if the back is too smooth.
The work is carried out in several stages, the first - preparatory:
- Carefully inspect the entire perimeter along which the cornice will be laid. Remove defects, irregularities. If the baseboard is thin, perfect alignment is required. For polishing, use a bar on which fine sandpaper is nailed.
- Apply a primer to the walls, wait for it to dry completely. Of course, such work is best done in the initial preparation, in advance.
- Mark up. The easiest way is to attach individual panels to the right place, mark the junction line with a construction or simple pencil. You can calculate fragments even at the stage of purchasing material by drawing a diagram on paper.
- Trim the details.This stage is for beginners the most difficult, especially when working with foam plinth. The latter has the ability to crumble, break out unevenly, with notches. You need to cut the joints in a straight line, the corners - at an angle of 45 degrees. It is better to pre-train in small pieces, for this purpose you can buy an extra baseboard.

Next, you can proceed to gluing on the putty. It is bred according to the instructions - they fall asleep in a bucket, pour water in, knead manually or with a mixer. It is better to dilute a little mixture at first, then add powder to it and add water. Further, the process proceeds as follows:
- collect a small amount of solution;
- put on the wrong side of the baseboard, spread with a thin layer;
- immediately erase the rest of the mixture on the front part with a cloth or sponge;
- start installation from the corner (any);
- carefully press the part into place according to the marking lines, evaluate the correct installation;
- it is not necessary to press the eaves too much, it nevertheless normally clings to the surface;
- remove the cured mixture, but if there are bumps, try to distribute it under the edge;
- when attaching the second baseboard, grease the end face with a small amount of putty, after - combine it with the previous one;
- continue work until completion, then leave the skirting boards to dry completely - for 24 hours;
- in a day, clean all the flaws and paint the baguettes (if necessary).
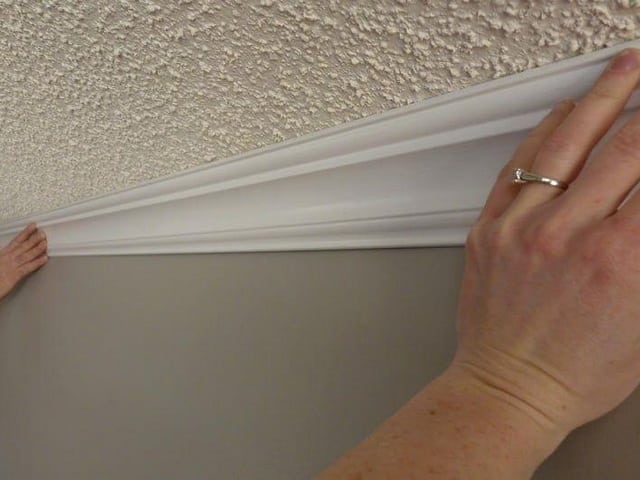
Glue mounting
Usually glue is used if there is already wallpaper in the room, and the ceiling plinth has to be mounted on top. Although it can also be glued to bare walls in a similar way. Important high-quality wallpaper stickers - otherwise they may lag behind the installation of fillets.

Preparation of tools, surfaces and marking are carried out in the same way as before using putty. Then the following actions are performed:
- apply glue according to the rules (depending on the width, gravity, type of material);
- be sure to distribute the tool in the center, where the main support will fall;
- attach the baseboard to the wall, press firmly, withstand as long as the instruction indicates (some compounds require peeling, re-gluing, others need to be pressed to the wall as quickly as possible);
- repeat the process for other parts according to the markup, carefully combining the cut products;
- do not forget to carefully grease the ends of the joints, and immediately remove excess glue;
- leave the fillets to full fixation (usually up to a day);
- after the gap, coat with white sealant.
If you had to cover a lot, then it is recommended to stain the skirting board with white paint. Such an action will help to hide visual imperfections. Pre-eaves are primed.

Failures often happen to newcomers, and skirtings are peeled off. The reasons may be:
- dirty walls - if you do not clean the surface, then the dust will seriously reduce the adhesion rate;
- too smooth, glossy surface of the baseboard - this is rare, but when buying such a product, it must be sanded from the wrong side;
- poor-quality, improper glue - thick, wide panels often come off when glued with a "weak" tool;
- drafts - the room cannot be ventilated for a day, in the presence of an unpleasant odor it is recommended to tightly close the room.
Sticking on different surfaces
There are some features of fixing baguettes on the walls and ceiling depending on the type of base material. The differences are described below.
To stretch ceiling
Now stretch ceilings are at the peak of popularity, they are mounted everywhere. A smooth surface is achieved without laborious leveling, the design may be different. Before starting work, you need to pay attention to some features:
- Light weight. It is best to buy polystyrene, polystyrene foam products, plastic and polyurethane are slightly less preferred.
- Special shape. The side lying on the ceiling is smaller than the size on the wall. This is due to the specifics of gluing - they apply the substance only to the part of the panel adjacent to the wall.On the ceiling side, the baseboard is not lubricated with adhesive!
- Reliable composition. You should choose a tool with maximum fixation, quick-drying, durable.
- Additional mount. If you choose wooden cornices, other massive baseboards, they are fixed with glue and dowels, anchors.

to contents ↑A PVC skirting board looks good on a stretch ceiling. It is fixed with clips, they must be mounted with self-tapping screws. The corner is made out with one bar, which is bent. You need to glue the baguettes carefully - getting glue stains on the stretch ceiling can cause damage.
On wallpaper
Having acquired high-quality glue, you will be able to establish a border on "rightful" place. It is important to ensure the adhesion of wallpaper to the wall, especially if the decoration was done a long time. If necessary, glue the cloth with wallpaper glue and wait 1-2 days. You can also use PVA glue. When installing curtain rods, try not to stain the wallpaper. To do this, first make a thin mark with a pencil across the width of the plinth, after which masking tape is glued to the border. Upon completion of the work, it is removed.
to contents ↑On plaster
Before attaching the baguette, it is important to check how smooth the surface is. Minor defects can be sanded or left unchanged if glued to the putty mixture. She flattens the wall, eliminating the flaws. You can also purchase skirting boards with soft edges to smooth out bumps. In case of significant defects, they will have to be eliminated - to level the wall, primer and sand.
to contents ↑On drywall
Since drywall is a very even material, gluing ceiling panels on it is a pleasure. Only at the joints of the sheets of gypsum plaster can there be putty streaks that must first be cleaned with sandpaper. For GKL, any type of skirting board is suitable. A reduction in floor space when using drywall is inevitable. To visually expand the space, you can attach the eaves with the wide side to the ceiling. This will increase the room, it will look original.

How to glue the skirting on the ceiling in the corners - the specifics of trimming
Usually gluing skirting boards to a flat wall, even for beginners, runs smoothly, but difficulties often arise in the corners. There are several methods that will help you deal with the problem.
With the help of a miter box
You can solve the problem of fixing the corner joints of the skirting boards with the help of a miter box and without it. Under the miter box is understood a joinery device in the form of a tray for cutting any profile material. The cutting angle is 45 or 90 degrees, depending on the type of tool. This is the most convenient device for cutting baguettes; all professional installers use it without fail.
The miter box is made of iron, wood, plastic, it has holes for a hacksaw. The most expensive models have a swivel mechanism, it can be moved to different positions. The principle of operation of the miter box is as follows: the plinth is placed in the tray, pressed, sawed through the side slot, as a result, a slice is obtained at the desired angle. The order of their manufacture for the inner and outer corner will be different. Here is the methodology for creating the inner corner:
- make the necessary measurements;
- insert the baseboard strip face up into the fixture as needed;
- press the part firmly with your left hand;
- put a hacksaw at an angle of 45 degrees through the slot, make a cut;
- cut the second baguette the same way, only in mirror image, so that together they form an inner corner.

A hacksaw for metal is used as a tool for cutting skirting boards, in some cases it is better to use a sharp construction knife. This will allow you to get even sections of products.
The external angle is made in this way:
- measure the baseboard along the length from the beginning of the wall to the outer corner, put a mark on the seamy side with a pencil (the edge should go out a little);
- put the material in the miter box, cut at an angle of 45 degrees;
- in mirror image cut off the second baseboard, also leaving a small margin in length;
- try on the details on the wall, check the evenness of the connection - if there are flaws, cut them with a sharp knife (for this an allowance is made).
to contents ↑At first, it is recommended to get used to the miter box - try to make corners on pieces of baguette. You can also make a DIY tool from boards, scraps of plywood. They are knocked down by the letter “P”, after they make the marking of the corners and cuts under the hacksaw.
No extra tools
Not everyone has a miter box, but you can adapt to work without it. It is possible to cut a skirting board for a corner as follows:
- attach one element to the ceiling, firmly pressing a flat edge to the corner;
- draw a line near the long side on the ceiling;
- do the same with the second part on the other side;
- mark the point of intersection of the lines, when drawing from this point to the edge, an angle of 45 degrees is obtained.

You can also make a template that simulates the miter box, with your own hands. Need a board, thick plywood. A horizontal rectangle is drawn on it, on which 45 degrees are marked on both sides. Draw connecting the opposite sides of the line. Next, you can impose a pattern on the baseboard, make a cut according to the layout.
to contents ↑Joint masking and painting
Skirting is carried out both for decorative purposes and for masking sealant. It is especially recommended to carry out painting when there are a lot of joining seams, they need to be hidden. You should also paint white baguettes, because without coating, they turn yellow over time.
Professionals advise, after the glue has completely dried, to walk along the ledges with a finishing putty (dilute in thickness as a water-based paint), paint them well, let them dry. Excess composition, drips should be removed with a sanding plaster sponge (sold in hardware stores). Skirting boards will take on a beautiful look, any traces of sealant will completely disappear.
If you did not have to use a sealant or there are few seams, you can simply paint the baguettes with water-based emulsion, latex, acrylic paint. It is possible to use nitro paints, but with preliminary priming. Work is carried out with a small brush, it is better to do them before wallpapering. This will avoid problems and get the perfect ceiling plinth.


