Drywall is the most suitable material for leveling walls, an inexpensive replacement for plaster. You can fix it with your own hands, for this purpose metal profiles or special glue for drywall are used. The latter method is simpler and faster, and its reliability is not inferior to the use of metal for fasteners.
- Drywall mounting on glue - when possible
- What can be glued drywall - the basis of walls and ceilings
- Brick, aerated concrete, shell rock
- Concrete
- Expanded polystyrene
- Drywall, GVL
- Tile
- Baguette
- Tree
- Types of glue
- Advantages and disadvantages
- Glue consumption and storage conditions
- Necessary installation tools
- Wall and adhesive preparation
- GKL mounting technology for glue
- Option for flat walls
- Walls with slight bumps
- Walls with large bumps
Drywall mounting on glue - when possible
In some situations, the adhesive method of leveling the walls with drywall will be the only right solution. On the contrary, in some cases, the technique is impractical or does not give a truly qualitative result. How to glue drywall to the wall and when is this possible? Most often, gluing drywall is recommended to be selected when repairing small rooms in order to preserve the usable area. Here are other examples when it is allowed to stick drywall:
- The presence of minor wall defects - blockages, pits, drops up to 5 cm in size. Good glue will help to hide irregularities by firmly fixing the GKL sheet. With extensive pits and potholes, it is better to use screws, because the money spent on glue will be significant.
- Finishing door, window openings. To form slopes correctly use only glue, the metal frame should not be used.
- Leveling the ceiling. GKL fastening without a profile will help to maintain a normal ceiling height in initially low rooms. It is only important to securely fix the sheets until the glue has completely dried, otherwise they may fall under their own weight. Usually dowels are used for this purpose.

to contents ↑Also, glue is occasionally used for double-layer drywall finishing, when the first layer is attached to a metal frame, and the second is glued on top. In this case, experienced builders simply fix the gypsum board with screws, but glue can be additionally applied for reliability.
What can be glued drywall - the basis of walls and ceilings
When choosing mounting glue, you need to take into account not only its suitability for drywall work. A suitable product should not “conflict” with the base material, which is supposed to be leveled. As for GCR, it is not difficult to choose glue: porous kraft paper, or building board (the top layer of drywall) perfectly adheres to most thick, astringent compounds. Restrictions usually apply to the wall base, this issue should be given attention.
to contents ↑Brick, aerated concrete, shell rock
Gypsum plaster has proven itself for gluing gypsum plasterboard. It is ideal for patching uneven surfaces with wide seams. Most gypsum-based building mixtures are inexpensive - the cost per 1 sq. M. m area will be about 50 rubles. The most popular are Perlfix from Knauf, Volma.

Foam is also suitable for masonry, gas blocks, foam block bases. Work with it is fast, high quality, the result on the reliability of material fastening is excellent. Foam is applied to the sheet with a "snake", wait a couple of minutes, apply GCR to the wall. A further expansion of the foam may become a problem, therefore it is better to additionally use dowel-nail fastening. Instead of foam it is worth using a special polyurethane adhesive in cylinders, but its price is an order of magnitude higher.
to contents ↑Concrete
The easiest way is to glue drywall to a concrete wall, ceiling on ordinary cement tile adhesive. If the wall is monolithic, then its irregularities are insignificant, and the finishing process is fast. Panel partitions can be more curved, in some cases it is better to use the frame method of installing drywall.
In addition to cement mortars, for gluing GCR are suitable:
- gypsum mortar or putty;
- polyurethane foam and polyurethane adhesive;
- acrylic putty.

All these tools will provide excellent adhesion with a small thickness of the seam, but it is economically more profitable to use cement mixtures with fine grain.
to contents ↑Expanded polystyrene
Often, the basis for the installation of gypsum fiberboard is insulation - foam, foam, polystyrene foam. They protect the room from freezing, but can not be subjected to finishing and must be covered with drywall. If we take into account that heaters so hide enough room space, then the use of a metal frame will only exacerbate the problem. For gluing sheets, you need to use acrylic putties or special adhesive foams for gypsum plaster.
to contents ↑Drywall, GVL
On gypsum fiber, drywall, the second layer can be glued with GCR by almost any means. The master does not need to smooth out flaws, wall defects, the base is perfectly smooth. Therefore, it is better to choose solutions and adhesives that provide the minimum thickness of the seam - silicone-based sealants, acrylic fillers, and liquid nails. Foam, gypsum, cement should not be used, since they will give an unnecessary joint thickness.

Tile
It happens that the sheets of drywall are glued directly on the tile during the repair of the kitchen, bathroom. If the room is wet, it is worth using silicone sealants. With a moderate increase or intermittently high humidity, you can do with moisture-resistant tile adhesive. Such funds do not deteriorate from a change in the microclimate in the room, serve for a long time, and have a high degree of adhesion.
to contents ↑When buying tile glue or sealant, you need to make sure that it contains an antiseptic, fungicide - such components will help to combat the appearance of mold and fungus. Sealants can also be used to fill cracked tile joints for a more reliable fixation of the structure.
Baguette
For gluing ceiling skirting boards to plasterboard walls, acrylic putty is used. It has a thick texture, and the baguette will not move down the wall until the composition finally grasps. Also, with white putty, you can beautifully wipe the gap between the wall and the finishing material, hide irregularities. Instead of acrylic putty, synthetic adhesives such as Titanium, Moment, and Liquid Nails are also often used.

Tree
Polyurethane adhesive is usually used for cladding wooden walls. The packaging should be marked on the possibility of woodwork. Instead, you can buy products based on epoxy resin, but they are difficult to operate and quite expensive. Before gluing the walls with drywall, they must be treated with an antiseptic that will protect the material from infection with the fungus. In addition, it is recommended to supplement the GKL fastening with dowel-nails.
to contents ↑Types of glue
All adhesives can be divided into specialized compounds (based on gypsum, cement, polymers), polyurethane foams, mastics and synthetic products and putties.Dry building mixes are diluted with water to the desired consistency, then applied to a previously primed surface with a spatula.
Mastics usually include gypsum, lime and special adhesive components. They are also mixed with water, left to swell the granules, then they make the installation of drywall sheets. Foams and liquid nails are sold in 750 ml cylinders, they are applied not by the continuous method, but pointwise, with a snake, strips, etc. Putties for drywall are more often ready for use, they do not need to be diluted, they are made on the basis of acrylic.
The most popular adhesive brands on the market are:
- “Ceresite” - includes a large line of products, many are suitable for drywall;
- "Perlfix" - makes it possible to stick GCR even on porous and uneven substrates;
- “Fugenfuller” - the company produces a variety of building mixtures, diluted with water and applied with a roller;
- “Knauf Fugen” - includes a line of plastic adhesives that help stick GCR and other deformable materials.

Advantages and disadvantages
High-quality adhesives provide a very reliable fastening to the walls and ceiling, so the frameless method is used quite often. Advantages of using adhesives are beyond doubt:
- easy, quick installation of drywall;
- lack of need for special skills;
- lower cost of facing compared to spending on a metal frame;
- significant space savings;
- universality of adhesives - they can be used both for puttying walls, and for subsequent gluing of gypsum plaster sheets.

The adhesive method also has disadvantages. Such tools can not always be used, because drywall is most often used to hide serious wall defects, and the user will be forced to mount the frame or crate. Also a minus is the long drying time of some adhesives. Many of them make it possible to fully operate and finish the walls only after a week.
to contents ↑Glue consumption and storage conditions
The consumption per 1 m2 of drywall adhesive depends on the type of material, its composition, method of application. This indicator is always indicated by the manufacturer on the package and depends on various parameters:
- for even bases - from 1 kg / sq. m;
- with small defects - 2-3 kg / sq. m;
- with defects from 2 cm - 5-6 kg / sq. m;
- for partitions - 2 kg / sq. m
to contents ↑All means for gluing drywall must be stored in the original packaging. The remainder of the glue is tightly closed and stored in a dry, dark room. Mixtures should be stored on wooden pallets to avoid the harmful effects of moisture. Shelf life of different adhesives can be 6-12 months.
Necessary installation tools
To knead the glue, you need a large plastic container (you can take a bucket with a lid), a construction mixer or a drill with a whisk. Manual mixing is also allowed, but the quality of the solution may be lower, often lumps remain in it. Drywall sheets should be glued with a trowel and a notched trowel. Also required:
- building level;
- knife;
- pencil;
- brush, roller for soil;
- if necessary - reinforcing tape, sealant.

Wall and adhesive preparation
Preparatory measures are required, they will help strengthen the adhesion of the adhesive to the surface. First you need to carefully level the wall. Perhaps it is seriously curved, and the gypsum board will have to be fastened to the profiles. All protruding elements, protruding nails must be removed. The following should be done:
- remove the remnants of paint, wallpaper, falling off plaster - the wall should be strong, without unstable sections (ideally, only a concrete or brick base with plaster should remain);
- remove all contaminants - dust, grease, dirt stains, which reduce the adhesion of the adhesive to the surface;
- on a painted wall, to which the adhesive will not adhere well, apply a special adhesive composition with a quartz additive;
- to draw a wall, ceiling with lines along which drywall will be glued, this will help to lay it evenly;
- to treat surfaces with low adhesion with a primer (primer), and apply to the layer of highly absorbent substrates in 2 layers, or use means of the “Concrete contact” type;
- let the base dry completely.

to contents ↑The glue is kneaded by introducing a dry powder into the already poured clean cold water. Measure the liquid strictly in the proportion indicated on the packaging of the adhesive. Mix the product with a mixer at low speeds, let stand for 5 minutes, then repeat the procedure again. After the glue is ready for work.
GKL mounting technology for glue
The set and sequence of actions for gluing GCR will depend on the quality of the walls to which the sheets are supposed to be attached. The surface may be:
- flat (monolithic plastered walls, brickwork, where level differences are absent or minimal);
- with moderate height deviations (up to 2 cm);
- with level differences of more than 2-3 cm.
to contents ↑
Option for flat walls
On concrete, plastered foundations in new homes or after a previous repair, the walls are usually straight. For fixing drywall, any mortar (gypsum, cement) or mounting adhesive, foam, polymer mastic is suitable. The last specified funds must be applied using a glue gun, which will have to be purchased separately.
The sequence of work is as follows:
- Since the drywall is mounted directly on the wall, you should immediately install the wiring. First, they think up a plan for the location of electrical appliances in the room, then make the strobes of the right size in the wall. A cable is laid in them, all the necessary connections are made. Strobes are covered with cement plaster (mortar). The wires are removed, the puncher makes sockets for sockets, switches.
- If the wall will be glued with drywall on a cement or gypsum mixture, the base must first be sprayed with water from the spray gun. GKL sheets themselves must be prepared - cut according to the desired height, width, cut holes for sockets and switches. This can be done with a screwdriver with simple crowns, nozzles.
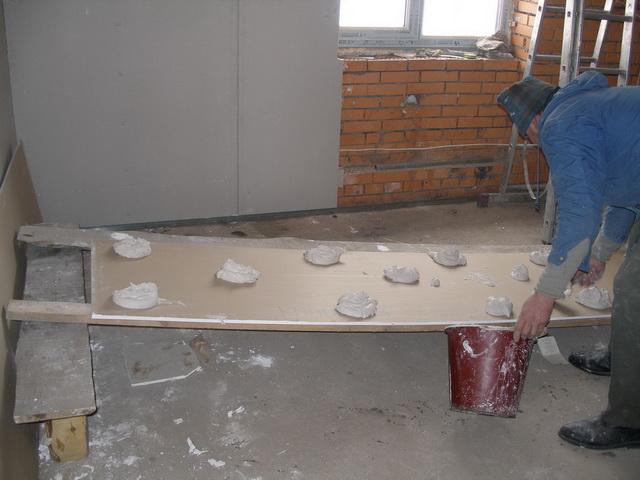
- Lay a sheet of drywall on a clean floor (if it is not yet finished, it should be covered with boards, plywood). Apply glue with a notched trowel, remove excess immediately. It is necessary to strictly observe the layer thickness indicated by the manufacturer on the adhesive packaging (usually 10-15 mm). Foam, polyurethane adhesives are applied with stripes or a snake. The distance between them is 20-25 cm.
- Lift the drywall, pull the wires through the existing holes, if necessary. Gently press the sheet against the wall without strong pressure. Using the rule, find the areas where the material must be pressed harder. You can also do this by tapping with a mallet on a board attached to drywall.

The wall will be ready for further decoration after a period of time until the glue has completely dried. Usually it is 1-2 days.
to contents ↑Walls with slight bumps
It happens that the wall differences are 2-3 cm, and the technology for gluing drywall has to be changed. Preparation of the base, cable laying is carried out according to the same scheme. In a similar way, drywall sheets themselves are prepared, cut out. Glue is bred more than in the previous version, since its consumption will increase. The application will be carried out without a notched trowel - in large heaps (dots) that will help hide the unevenness of the wall.
The sequence of work will be as follows:
- You need to start installation from the most protruding section of the wall, which is located using the level. Apply glue on the drywall sheet around the perimeter - make large dots through 25 cm. In the center also lay glue heaps through 40 cm, avoiding the appearance of large voids.The height of the dots should be approximately equal to the size of the wall drops. If GCR is glued to aerated concrete, foam concrete, then the solution must be applied to the wall, and not to the sheet.
- Pull the wires through the holes in the drywall. It is easy to press a piece of GCR to the wall so that it initially mates with it. The work should be done together, so that the assistant continuously supports the sheet.
- Align the sheet. This is done by constantly measuring the plane with a level and knocking out those sections that do not correspond to a given indicator. The first sheet must be set especially carefully so that all subsequent elements of drywall are aligned on it.

After clarifying the position of the GCR and the final tamping, you can proceed to the subsequent pasting of the wall. With due dexterity, you can finish work with GCR in a small room in just a couple of hours.
to contents ↑Walls with large bumps
Surfaces with significant elevation differences are best subjected to continuous leveling plastering, but there is an option to make the job easier. To begin with, you should probably get rid of falling off pieces of plaster, close up the pits and prime the surface. To apply the primer, a brush-brush is used, which helps the composition penetrate even the smallest crevices.
Next, 200 mm wide rectangles are cut from drywall to help align the wall. Such elements will be located around the perimeter of the room, as well as every 60 cm, the only way to give the walls an ideal look. Cut the sheet easily with a regular sharp knife, then gently break it. After the work procedure will be as follows:
- Set up lighthouses. First, mark the base around the perimeter, then fix the first plasterboard elements, adjust their level by tapping. Fixing is done on glue, which is applied in piles by the spot method. After the glue has dried, you can proceed to the next step.
- Stick up vertical posts. They also need to be set in order to assess the location individually and as a whole. Drywall can be adjusted until the glue dries.
- Glue the base material. The cut pieces of drywall cover with glue with lines along its width, carefully press to the base on top of the beacons. The composition can be applied directly to the resulting "site", and not on the sheet, but the amount of glue should be sufficient.

Then the work is carried out until the walls are completely leveled with drywall. If necessary, you can additionally fix the sheets with dowels - 5 pieces per plate. Work with glue should be at temperatures above +10 degrees and moderate humidity - so the composition does not dry out ahead of time. After the glue has dried, you can start priming, painting or stickering the wallpaper, depending on the chosen finish.


