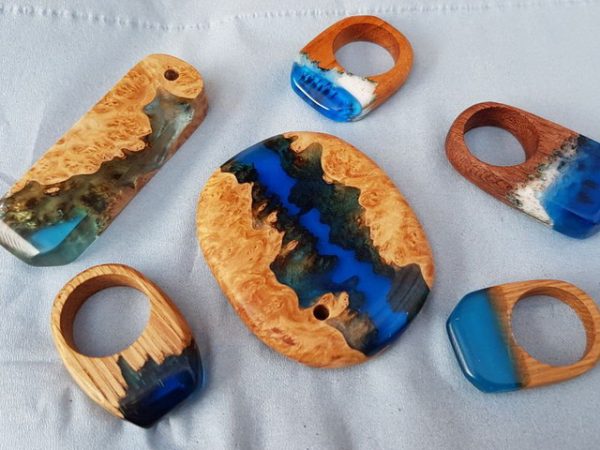
Epoxy is a popular creative material. With its help, you can make jewelry with your own hands - earrings, pendants, other jewelry. Epoxy furniture will be no less beautiful: it goes well with wood, wood shavings and sawdust, cuts of stumps and twigs.
- What is epoxy resin, properties
- Material application
- Various types and conditions of glue
- Differences between resin and glue
- Pros and Cons of Epoxy for Wood
- Features of working with epoxy
- Epoxy wood impregnation
- Air bubble elimination
- Resin Use - Design Options
- Cut furniture
- Solid wood table
- Filling table
- Shelves
- Table with card inside
- Ice in the house
- LED lamp made of wood and epoxy
- Resin Jewelry
- Decorations with dried flowers
- Bracelets
- Colored resin products

Products made of epoxy resin and wood will decorate any interior, in addition, the price of such an exclusive is very high, and you can make money on it.

What is epoxy resin, properties
Epoxy is a synthetic oligomer containing epoxy groups. According to the production method, it is very complex, it is a condensation product of bisphenol A and epichlorohydrin. You cannot use the material in its original form: only hardener can stabilize its state, after which the polymerization reaction will begin.
The composition of different types of epoxy can include other components - chalk, cement, alabaster, which compact the mass. Another resin goes well with aerosil, wood chips, graphite, various dyes, aluminum powder. Different oils and other substances are also added to the composition, depending on the needs of users.
For pouring wood and other creative activities, a transparent resin without fillers, in which plasticizers and modifiers are introduced, is perfect. The material has the following properties:
- resistance to abrasives and mechanical damage;
- low wear rate;
- low moisture permeability;
- lack of shrinkage during operation;
- lack of reaction to the action of chemicals, with the exception of strong acids;
- excellent adhesion to wood, plastic, metal substrates, glass, ceramics, rubber and leather.

Material application
The uses of the resin are diverse. It is used in most large industrial sectors:
- electronics;
- aviation;
- machine manufacturing;
- equipment repair;
- shipbuilding;
- construction;
- fiberglass production;
- pouring floors;
- production of glue, putty, grout;
- release of paints and varnishes.
You can work with epoxy at home. It is ideal for the manufacture and processing of furniture from natural wood and its derivatives, slab. Using pouring, you can make an original stool, chair or table, doors for the cabinet. Souvenirs, jewelry, watches, figurines, cutting boards and products for the kitchen, bathroom, vases, tambourines and other toys for children are also beautiful.

Various types and conditions of glue
There are different brands of epoxy on sale - domestic and imported. For the manufacture of furniture fit most of them. It is only important to decide whether a colored or transparent resin is needed for decoration.Usually, so that beautiful sections of wood and its fibers are visible, they acquire transparent compositions. For example, high-quality resin YD-128 is colorless and transparent, like glass. Epoxy MG-Epox-Strong also has no complaints about transparency, even suitable for creating jewelry. By the way, such resins can be combined with color - to make bright blotches inside the bulk.
These materials are two-component adhesives. Liquid resin is stabilized by the addition of a hardener, which is included in the second bottle. It will not be possible to fill furniture parts with thick pastes in the forms, so you should not buy them.
There are 5 main states of resin:
- liquid is a material without hardener or immediately after its introduction, has excellent fluidity;
- honey - reminds molasses, already a little thickened resin, which is best used for layer-by-layer filling of crafts;
- thick - the fluidity is sharply reduced, the mass flows poorly and is suitable only for gluing parts or for putty;
- rubbery - epoxy resembles rubber or hardened plasticine, sticky, but can change shape;
- solid - fully hardened resin.

Differences between resin and glue
In master classes on pouring wood products, it is necessary to use epoxy resin, but not glue based on it. The main differences of materials:
- the curing time of the adhesive cannot be changed, and the freezing speed of the resin can be increased or slowed down;
- the glue turns yellow, but the resin remains transparent;
- the glue has a low elasticity, while the resin is malleable, allows you to carry out the work necessary for the master;
- glue is used for joining parts, they cannot be filled with products, almost any figures can be made from resin.
Pros and Cons of Epoxy for Wood
Previously, epoxy was used in the form of glue for various parts, it was almost never used in creativity. Later, this material began to be flooded, noting its low abrasion, great strength and durability. Now resins with dyes or in their pure form are widely used to create unique products for the home. The advantages of epoxy for wood are as follows:
- the mass can be given any shape - it flows, fills the smallest pits, cavities and cracks;
- the frozen product is easy to grind and polish, you can drill holes in it, sharpen grooves;
- there is an epoxy of different colors on sale, but even a transparent resin can be given any shade by introducing a dye;
- since the composition does not shrink, the furniture will remain attractive for a long time.
The tool also has disadvantages. So, you must strictly observe the proportions of the resin and hardener, otherwise the mass can be irreparably damaged. The price of resin is high, especially with transparent grades. The cost of large products will be large. Another disadvantage is the toxicity of epoxy. During work, you will have to use a respirator, gloves, glasses, and ventilate the room well. After solidification, the composition is safe.
to contents ↑Features of working with epoxy
Wood is heterogeneous in structure, therefore, air can accumulate inside its parts, around which a vacuum is formed. After a change in temperature, the material expands or contracts, therefore, until it completely hardens, air bubbles often emerge from the internal cavities of the wood.
to contents ↑To avoid defects, you need to stabilize the temperature in the room for 2-3 hours after pouring epoxy. It is advisable not to work outside or to choose the time after dinner, when the sun is not so hot. If you plan to perform a thick layer of epoxy, it is better to divide the work into 2 stages. The risk of bubbles in thin layers is lower.
Epoxy wood impregnation
On the contrary, the base is heated for high-quality impregnation of the wood with an epoxy composition. After the expansion of the pores of the wood, they perfectly absorb the mass, which will also become very liquid upon contact with a hot surface. After solidification of the impregnated tree, it is covered with a top layer on top.When drying, you will again have to control the temperature so that the air does not come to the surface.

Air bubble elimination
It happens that the bubbles still appeared on the top of the fill. It is not necessary to warm the product, this can cause the formation of new bubbles. It is better to use a thin needle, piercing the air "balls". Another option for removing them is to spray the resin with alcohol from the atomizer. Although in this case there is a risk of a change in color or degree of transparency of the mass. Large bubbles are removed after the resin has hardened. They are drilled, cleaned, degreased and repeated pouring.
to contents ↑Resin Use - Design Options
Transparent resins for optical fillings are ideal for combining with wood. Through them will be visible any design "little things" - crumbs, sawdust, metal elements. If you decide to add color, it is better to buy the same brand so that there are no problems with mixing.
Colored masses are usually unclear, and are not used for the main fill. But filling the pores of the tree with colored composition looks beautiful, voids from knots, bark beetle moves. For example, a shelf or bar counter will be unique in which cracks are painted with resin with luminescent dyes. Then the furniture will glow on its own.
to contents ↑There are other interesting design tricks. So, when a drop of water in the resin is added, milk stains will be obtained. Drops also make beautiful blotches in colored epoxy.
Cut furniture
Unusually looks like furniture reminiscent of jewelry - its details are cut. For example, a beautiful stump is enclosed in a transparent cube, polished, polished and attached to clear lines. The product can be used as a table, chair, and simply install as an element of the interior.

Solid wood table
To create a designer table, the method of coloring grooves and holes is used, which you can do yourself. Any breed of wood will do. You can take a whole piece or make a countertop from glued strips. So that the painted resin does not leak out, they are covered with paper tape on the inside of the board, which is removed after hardening. The cured resin is ground, then varnished.
Filling table
A similar method of creating furniture is more complicated. As a basis for decor, use thick glass or plywood, which give the shape of the future table. Light decor elements must be glued, because they can float. Next, make a side that will hold the epoxy on the base. It is carefully beaten with furniture cloves.
Before pouring, the base must be dry. The pores of the wood are treated with an epoxy primer. In one go, make the fill no more than 1 cm thick. Large pieces of wood, stones will have to be hidden in the resin several times, performing work in layers. Each stage is carried out two days after the previous one. You can use the table only after 7 days, after the same period it is sanded and polished if necessary. It is desirable to varnish the filling tables - this will reduce the risk of minor defects.

Shelves
To create luminous or ordinary shelves, boards of the right size are used. Affected by mold, fungus, areas are removed using a hand tool. Next, the resin is mixed with the dye, choosing the right color. On the reverse side, the board is sealed with tape, and the pores are filled with a coloring composition. After drying, a layer of transparent resin is applied. At the end of the work, the surface is varnished.
Table with card inside
Such a table is made in a similar way, only they select a cut of a tree trunk with a lot of cracks, stains, branches. Drill holes imitating a map of the world - seas, oceans.After pouring the product, staining the resin in the right colors.

Ice in the house
A bar or countertop can be made to resemble a block of ice. Such plates are cast in molds, performing inside a “crack” of colored resin. The use of such a product in the interior will be a unique design technique.
LED lamp made of wood and epoxy
Even nightlights and lamps can be made of epoxy yourself. In such a device, a diode lamp is attached to the bottom of the frame, it also serves as a stand. The procedure is as follows:
- From the pieces of chipboard to collect a box 33x20 cm with strict observance of angles of 90 degrees, it will serve as a form for pouring.
- Put the box on an even base, tighten it with clamps, seal the cracks with sealant.
- Dilute the resin in dark color, pour it with a thin layer.
- After curing, lay a piece of wood with the bark inwards, decorate with decor (for example, dry moss).
- Pour transparent resin on top (3 cm thick).
- Let the product dry.
- Attach it to the lamp.

Resin Jewelry
For the independent manufacture of rings, trinkets, pendants, earrings and other jewelry, you need to purchase suitable casting molds - silicone molds. You will also need a high-quality transparent resin, decor - rhinestones, glitter, beads, sequins.
Decorations with dried flowers
To make such jewelry, you need to prepare flowers in advance. Forget-me-not, Veronica, heather, small roses or individual petals, buds look beautiful. Stencils of the desired shape are drawn on paper, laid out on a clean, film-covered surface. Stencils are covered with multifors on top.
The finished diluted resin begins to be applied directly to the multifora, carefully distributed according to the stencil, using a wooden stick until it reaches a height of 2-3 cm. Then, the mass is covered with a dome shape on top - this option is ideal for making earrings, pendants. After a day, the blanks are removed from the multifora, the dome is removed, and they are well ground. The work is repeated, only the dried flower is laid inside the workpiece. After both halves are glued together.

Bracelets
For work, special molds for bracelets, resin, a container for kneading, a wand and any decor will be required. The filler is laid out in a dry form, the resin is gently poured (in a thin stream). They straighten the decor with a toothpick, pierce air bubbles. Allow the workpiece to solidify (24 hours), then grind it, removing it from the mold. To give gloss, the bracelet is varnished.
Colored resin products
Any jewelry can be made not only from transparent, but also from colored epoxy. On sale there are dyes of all colors of the rainbow, luminescent and fluorescent colors. The work of filling jewelry will be similar, only the resin is pre-stained with dry pigment. Knead it gently, strictly in a circle so that air bubbles do not appear. The blanks are covered with lids so that they do not get dust.

Some prefer to fill in whole whetstones, after cutting out sets of jewelry from them. By the way, when decorating them, it is quite possible to use wood - tiny knots, twigs, sawdust. This will add uniqueness and originality to jewelry, allowing you to create a real designer accessory.