When working with epoxy resin, pouring is carried out in special forms - molds. They are sold in hardware stores, departments for creativity. But the cost of such products is usually high, and the range is scarce. In this case, you can make molds for epoxy with your own hands.
- Forms - purchased and home-made
- Silicone molds - what are they made of?
- Other raw materials for production
- Step-by-step instruction
- Mold - sphere and hemisphere
- Silicone Care
Forms - purchased and home-made
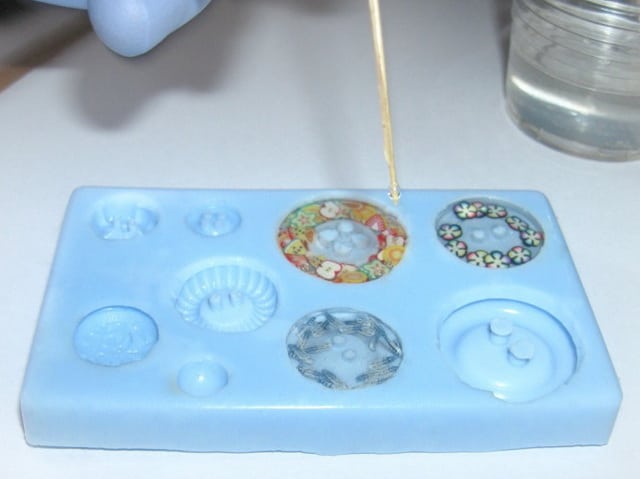
To create real masterpieces from epoxy, you will have to get the original molds (molds). Usually they are made of silicone, this material is ideal for pouring the composition. It is easy to extract the finished product from silicone molds, their walls are smooth, therefore, grinding the jewelry will be minimal.

In addition to casting from epoxy, such molds are perfect for making products from clay, gypsum, mastic, and you can also make soap in them. It is permissible to even cook food in the oven, however, then food-grade silicone must be used to create molds. Finished molds for jewelry epoxy are usually flowers, leaves, geometric shapes, ovals, balls. The cost of a small set is 300-500 rubles or more.
Everyone can make silicone molds on their own. Most masters who create jewelry and figurines on a professional level do this. The price of work will be much lower, especially if you immediately produce several different products. In addition, it can become a profitable business.
to contents ↑Silicone molds - what are they made of?
Two-component liquid silicone is the best material for the production of molds for casting items from epoxy. It hardens without shrinkage, it does not even require heating - room temperature is enough.
Some use ordinary silicone sealant mixed with gypsum, but the quality of such molds will be lower. It is recommended to buy just two-component silicone - it is specially created for injection molding, it does not stick after hardening.
All such silicones are represented by a base and a catalyst in different packages. For technical (non-food) purposes, silicones of the Pentasil, Kopipasta, Elastolux and Siliflex brands are used. They are very durable, have minimal shrinkage - up to 1.5%.

"Siliflex" is highly dense, it is slightly less strong. “Elastolux” cannot be broken, it is very durable, perfect for creating molds of any complexity. Silicone "Copy-paste" is applied with a brush in layers, it is usually used for the manufacture of large molds. As a catalyst, "Platinum" is often used in an amount of 2-3% (the exact proportion is indicated in the instructions). Also good means are "Mold Star", "Rudy". Even a novice can work with them.
to contents ↑Other raw materials for production
How to make molds and ready-made filling yourself, what else is needed for this? The main filling material is silicone compound (two-component silicone) or rubber, it is easily subjected to manual processing. When purchasing a single-component composition, you must additionally purchase a catalyst. The following materials and tools will also be required:
- syringes for measuring the catalyst, epoxy;
- container for mixing silicone;
- stick for stirring;
- capacity, scales for weighing silicone.
If you need to create a mold with a dividing half, you need to additionally buy a special composition. Aerosols with wax are recommended; candle wax (melted), petroleum jelly can also be used. The base (formwork) will be created from plasticine, therefore, this material must be available.

to contents ↑For subsequent pouring, a transparent epoxy resin (jewelry) will be required. The range of this material is wide, there are expensive and cheap compounds. It is important that the polymerization time is not short, otherwise the novice master will not be able to form the product.
Step-by-step instruction
Before starting work, you need to familiarize yourself with a number of important rules:
- It is necessary to make a test fill to determine what silicone of a particular brand does not stick to. If the material is sticky, it is necessary to cover the walls with a release agent.
- Make sure that the room temperature is + 20 ... + 25 degrees. If it is lower or higher, the gel time of the silicone will change with the same amount of catalyst. The quality of the finished mold will be reduced. In the cold season, you need to let the compound stand in a warm day.
- Stir the material carefully so as not to cause air bubbles. When stirring, you can add special dyes for silicone. The ideal option is to place the mass before pouring into a special vacuum chamber.
Tin-based silicones exist and can also be used for work. They are suitable only for non-food purposes, and are often used for casting jewelry. Before pouring such a material, make a cure test. Generally, more catalyst is required to be added than to conventional two-component silicone.

You should also find the product from which the mold will be removed. It should have a glossy surface, because silicone will repeat even the smallest scratches. In the future, they will be clearly visible on the subject of epoxy. For example, for the manufacture of a round shape using a bearing.
Detailed instructions for creating molds are as follows:
- Apply plasticine on a flat, solid foundation with an even layer. Press the part to be copied. Flat products are pressed into plasticine to the level of passing ½ of the future mold. For bulk parts, it is worth applying another layer of plasticine.
- Walk along the perimeter of the part, pressing the clay to its walls to draw a clear border. For this purpose, you can use matches, toothpicks. Next, it is important to make sure that the clay is firmly attached to the part. Otherwise, liquid silicone will leak under it when the master pours the mold.
- Make walls for future molds from plasticine. The distance between the part and the wall is up to 7 mm, the wall is the same height as the largest point of the item to be copied. All joints must be carefully leveled.
- Perform a series of recesses in the bottom of the tank. They will prevent the displacement of the half of the new shape. After the plasticine container will be ready for filling.
- The desired portion of liquid silicone is mixed with the catalyst, as indicated in the instructions. Accurate kitchen scales are used for measuring. Usually silicone is white, transparent, and the catalyst is colored.
- Pour the mixture into a plasticine base. All actions should be smooth, slow. As a result, voids are excluded in the fill, the air has time to go outside. But it is also necessary to take into account the fluidity time of a particular grade of material - some freeze in 10 minutes. At the end of pouring, the mold is cleaned in a secluded place where it will solidify.
- After complete curing, carefully remove all clay. It is easily separated from silicone, does not stick. First clean the areas on the sides, then from the bottom.In the hands will remain half the form with the copied product inside.
- Put the form on a new plasticine, again build walls around it. Especially carefully glue the joint, it should subsequently be airtight.
- Coat the surface of the first half with a separating layer of petroleum jelly, paraffin, wax. They are applied with a brush, impose a very thin layer.
- Pour silicone in the same way as for the first half. Then it is necessary to wait for complete curing.
- Remove the second form, remove the clay. Separate the halves of the forms. If the separation layer has not completed its task, you will have to cut them apart. Remove the part to be copied.
Epoxy products can be cast immediately after the mold is ready. The resin is mixed with the hardener in the proportion indicated on the package, if necessary, the pigment is dripped. Gently mix the epoxy, allow it to stand so that air bubbles come out. Next, apply resin to both halves of the form with a brush, making an even layer. Fold the parts together, the excess epoxy at this time squeezed out.
Molds are pressed firmly or fastened with rubber rings, hard plates. Leave the resin for a day to harden. After halves are disconnected, the product is removed. The stains are cleaned with a toothpick, the product is treated with a fine sandpaper.

Mold - sphere and hemisphere
When creating jewelry made of epoxy resin, the shapes of spheres and hemispheres are used quite often. Therefore, it makes sense to make the right size molds in the kit with your own hands. Some masters prepare molds from an equal ratio of corn starch and silicone sealant. Small molds can be molded from such a mass, larger molds can only be made from two-component silicone.
After combining the two ingredients of the material (silicone and catalyst), you need to thoroughly mix the mass so that there are no lumps and streaks. Then take a disposable cup, cut. At the bottom, drop a little glue “Moment” and put a few glass balls of the right size. Literally after 5 minutes they will stick and will not move. Next, pour a very thin stream of silicone directly on the balls (or on one, as it is more convenient).
After 5 minutes, tap the bottom of the glass on the table, this will help remove air bubbles that have appeared. They will rise to the surface, after which they must be pierced with a needle. Press the balls into the mass by ½. Then you should wait until the material has completely cured. After a day, you can get the balls of silicone. The molds are removed from the glass and trimmed carefully. You can use them right away.

Silicone Care
There are a number of tips for servicing silicone molds. They tend to attract specks of dust and dust, so they should be stored in a closed box. They are laid out in one layer to prevent deformation. Before pouring epoxy, the forms are washed with soap and dried.
Finished castings are removed from the molds under running water; this is easier than pulling them dry. Molds are easily scratched with sharp objects, and then they will not be used. If you follow all these rules, the molds will last a long time and can be applied repeatedly.


