Plastering and other finishing works are considered rather laborious and time-consuming. If the area of the room is large, the complexity and cost of the work will be impressive.
- What is a hopper bucket
- Design features
- Advantages and disadvantages of buckets
- Plastering Bucket Technology
- Preliminary stage
- Plastering
- Cleaning the air bucket from plaster
- Manufacturers
- How much is the use of a pneumatic bucket
- Self-made plaster bucket
- Blueprints
- Tools and materials
- Bucket Stages
The appearance of a special tool called the “hopper bucket” has greatly facilitated the task of builders in starting and finishing finishing houses and apartments. Due to its high efficiency and ease of use, this device is now very popular.
What is a hopper bucket
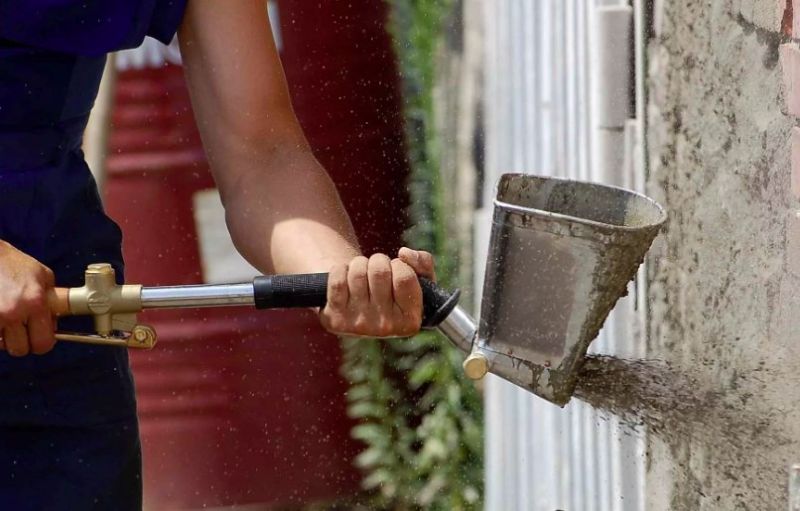
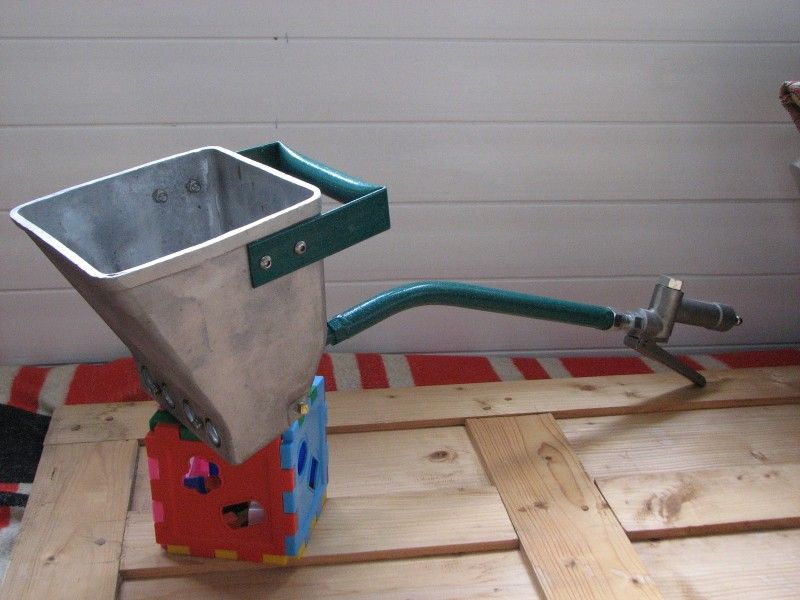
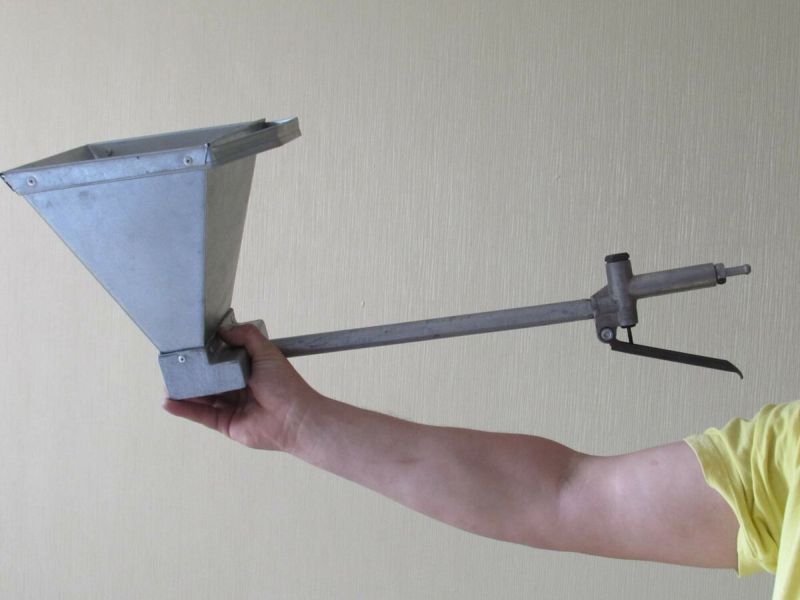
A stucco bucket, or hopper bucket, is a pneumatic device for construction and finishing works that allows you to quickly and evenly apply liquid mixtures and solutions to any substrates.
In appearance, the device really resembles a metal bucket with a handle. Inside it is stucco, which is thrown onto the wall by the force of compressed air. The feed rate of the solution from the bucket is approximately 60 cubic meters / hour, while the mixture is saved by 40% or more compared to the manual application method.
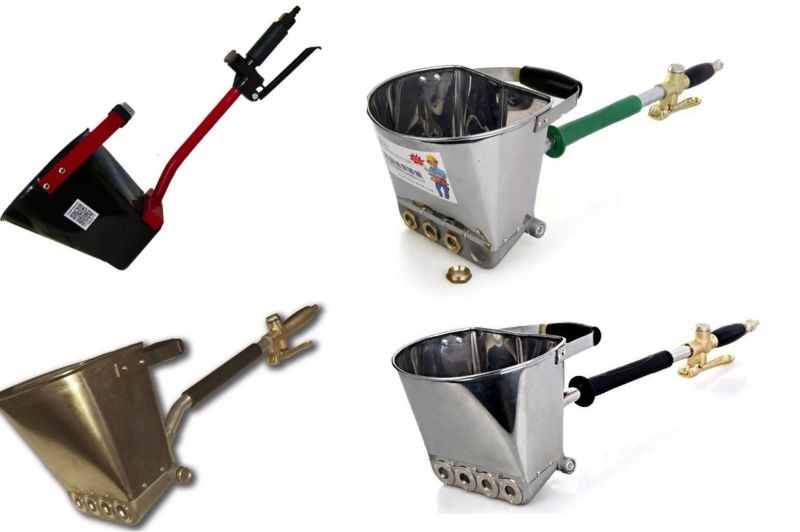
All plaster buckets have approximately the same shape - bowl-shaped. Depending on the application method, they are divided into two types:
- Hopper. This device is a classic bucket. It connects to the compressor and applies the plaster at high speed.
- Hand bucket. Such devices are sold in hardware stores or are made of thin metal with your own hands. They are used as ordinary trowels or ladles for mortar.
The plaster hopper bucket is designed to work with large surfaces, right down to the processing of an entire building. In small areas, it is not practical to use it, because installing and washing the unit after the process is also difficult.
The hopper bucket is suitable for walls, ceilings, individual sections and inclined planes. It allows you to spray plaster, paint, adhesive, apply silk and mosaic plaster or liquid wallpaper. Also, the hopper bucket simplifies working with decorative plaster - Venetian, bark beetle, liquid cork, and helps in surface finishing with paints and varnishes.
to contents ↑
Design features
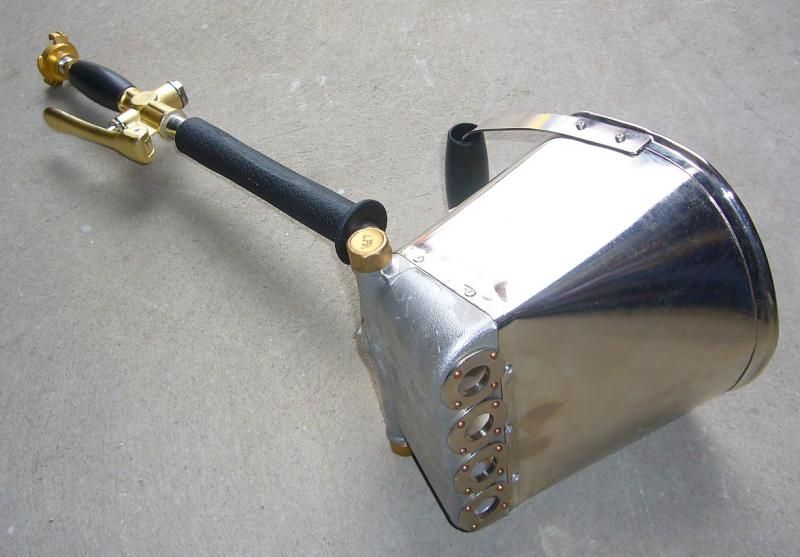
The device consists of several parts that are present in any design of hopper buckets:
- Spray nozzle. Gives the working mixture the desired speed, disperses it.
- Capacity. Designed to store the mixture. The performance of the hopper bucket depends on its shape and size.
- Pneumatic control valve. Ensures the flow of solution into the nozzle.
- Fitting with outlet nozzle. Helps to move the solution at a certain speed.
- Handle. Located at the right angle, it is responsible for moving and controlling the device.
Industrial type hopper buckets are immediately equipped with compressors that are designed specifically for working with building mixtures - cement, gypsum, lime, etc.
Depending on the specific type of mixture, the hopper-bucket nozzles can be changed, because they have different spray angles (within 30–90 degrees). The top of the bucket capacity is equipped with a closed part, which is located on the compressor connection side.
to contents ↑Such a part prevents the spreading of the mortar during the plastering of ceilings.
Advantages and disadvantages of buckets
The advantages of devices such as plaster buckets are beyond doubt:
- serious savings in solution, and therefore, cash;
- reduction of time spent on plastering surfaces;
- high accuracy, accuracy of applying the mixture;
- the ability to work with almost all types of liquid finishing materials and building mixtures;
- high productivity of the process both on smooth bases and on surfaces of complex configurations;
- improving the quality of the finished coating by increasing adhesion to the base;
- suitability for outdoor and indoor use.
Even a beginner can work with a hopper bucket - this device is simple, and the instructions for factory models are understandable. The price of buckets is low, especially those that are sold without a compressor in the kit (even ordinary automotive compressors can be connected to them).
The products last long enough, but subject to timely cleaning and regular maintenance. If the appliance is made of metal, it can be washed without any problems. Hopper buckets are sold in a large assortment, with different technical parameters and performance.
The hopper bucket has a few drawbacks. If the plastering work is carried out in several layers, then it is better to practice the manual method of applying the solution: so the spray will be carried out faster. In addition, the cleaning of the excess composition will need to be done immediately, otherwise then it will solidify tightly. If the time is delayed, you will have to soak the top of the tool in a container of water.
to contents ↑Plastering Bucket Technology
The technique of using the tool resembles the technology of working with a spray gun. First, a compressor is connected to the bucket using a rubber hose. After this, they begin to plaster, provided that the surface has already been carefully prepared.
Preliminary stage
From the base, garbage, dirt, dust and grease stains are removed in advance. After 20 cm from the corners of the walls, beacons are installed that are located at equal distances. Profiles align vertically, check the correctness of their position level. On large grounds, additional intermediate beacons are installed.
Plastering
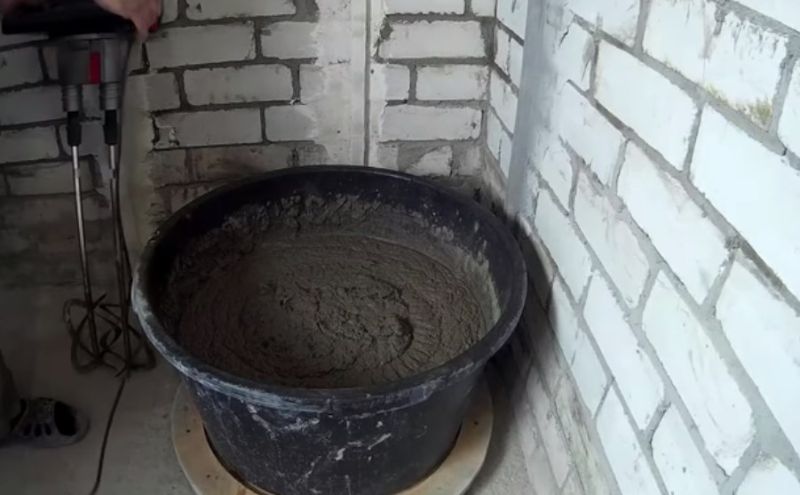
A solution is prepared from cement and sand (for example, in a ratio of 1: 3) or a ready-mixed building mixture is diluted. Stir it with a mixer until smooth and free of lumps. The finished mass should not be too liquid, it is better if by consistency it resembles porridge.
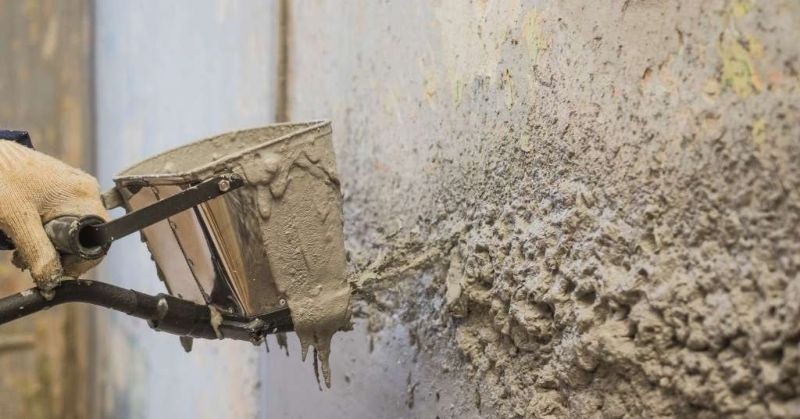
A solution is applied to the container, the device is connected and the mixture begins to be applied. It is necessary to work until the entire portion of the composition is over. It may happen that one arm is very tired from movements, then you need to relax a bit or begin to act with the second hand.
When the solution begins to creep out of the profile, its surplus is removed, the beacons are moved higher. If there are holes on the wall, they are filled with a trowel (manually). After drying, the masses begin its mashing and finishing.
to contents ↑Cleaning the air bucket from plaster
After finishing work with the stucco mixture, it is necessary to immediately clean the bucket of its residues. Dried clumps are quite difficult to remove. If the solution has frozen, it is worth spraying the tool with water or immersing the container in warm water. It is also important to clean the nozzle immediately, because when it is clogged, the bucket may break immediately after restarting.
Manufacturers
The most popular brands of buckets on the market are:
- Titan - manufactures industrial devices of high power;
- "Dream plasterer" - in the assortment there are different buckets with excellent performance characteristics;
- “Hopper-Bucket” - the company gives a long guarantee for all products, their quality is not satisfactory;
- "Condor" - produces wall and ceiling models of stucco buckets with different technical parameters.
How much is the use of a pneumatic bucket
Depending on the manufacturer and the cost of construction, the price of hopper buckets varies greatly. For example, small devices of the WESTER KP-10, MATRIX brands cost from 2 thousand rubles. Bucket "Dream plasterer" sold at a price of 6 thousand rubles. (without compressor). A special compressor with all the necessary equipment for connecting can be bought for 5 thousand rubles. and more. Professional pneumatic buckets cost from 11-15 thousand rubles.
to contents ↑Self-made plaster bucket
If necessary, the hopper bucket can be made independently, if all materials and consumables are available.
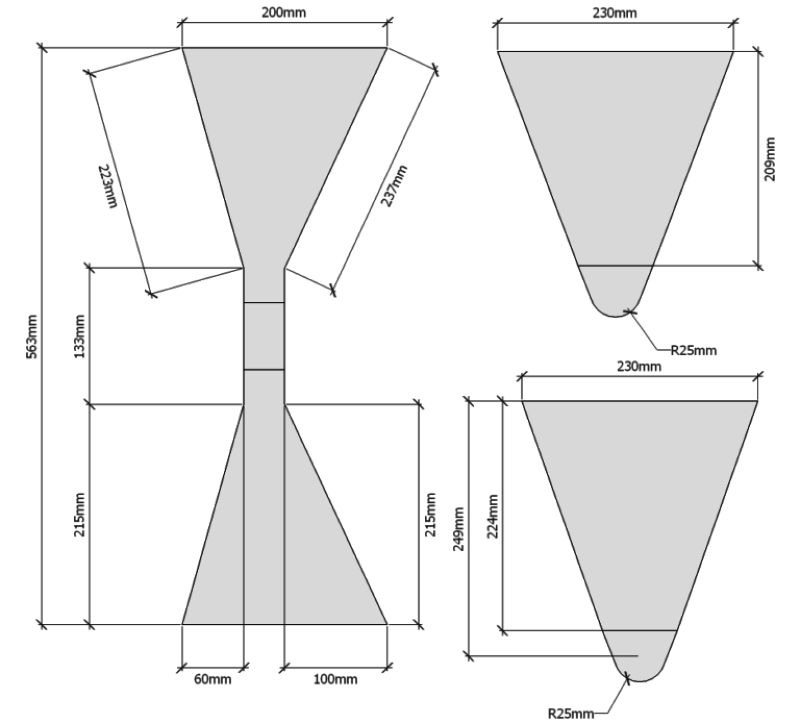
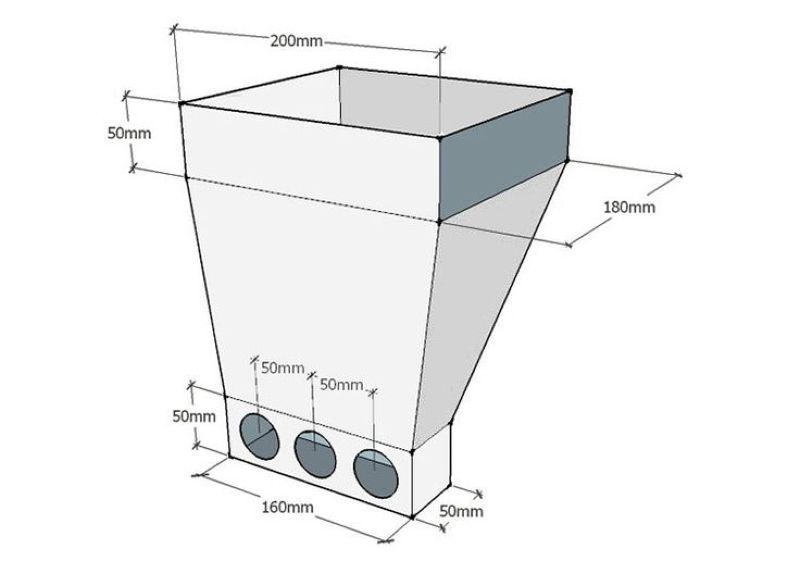
Blueprints
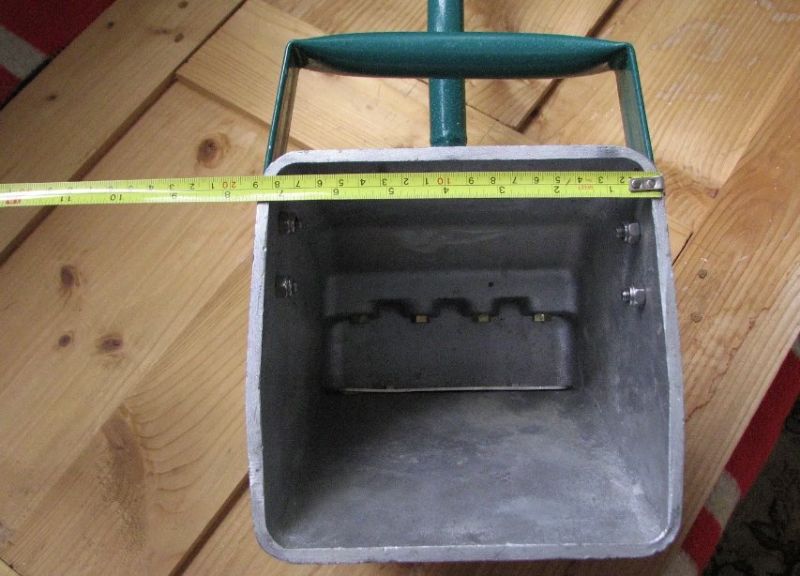
The main element of the bucket is capacity, and it is precisely its manufacture that needs to be paid close attention. When choosing a tank size and creating a drawing, the following requirements should be considered:
- the presence of a movable or hinged cover on the supply side of the hose, as well as holes for the pneumatic valve;
- the diameter of the inlet is more than 1.2-1.5 mm and less than 5 mm (if the hole is too small, it will clog, and a large one will cause an excessive pressure drop);
- the length of the socket of the outlet nozzle is up to 20–22 cm (a too long socket negatively affects the accuracy of work), the angle of the conical part is 70–90 degrees.
Capacity should be made of sheet steel or aluminum. If you take a tin, the part quickly deforms. The aluminum bucket will be an order of magnitude lighter than the iron, but separate sections will have to be connected with self-tapping screws, and the joints should be strengthened with rubber seals.
The steel tank can be welded, which is much more reliable. The optimum sheet thickness is 0.8–1 mm.
A pneumatic valve for a container can be taken from a tire inflation device, or a ball valve can be fitted for this purpose. The latter is used as a last resort, since instant shutoff of the plaster supply will become impossible, and its loss will be inevitable.
As for the compressor, its purchase is not mandatory if there is an automobile unit with compressed air pressure up to 60–70 atmospheres. When the pressure is too low, the mixture will flow unevenly and the quality of the finish will decrease.
It is good if the flow rate of the working mixture is from 500 liters / minute. The volume of the receiver in the compressor should be 50 liters or more. When developing the drawing, it is also necessary to take into account that the total weight of the hopper bucket is required to be less than 5–7 kg, otherwise long work with it will become impossible.
to contents ↑Tools and materials
In addition to the listed consumables and devices, for the manufacture of a hopper bucket you will need:
- metal pipe for the handle;
- nozzle;
- washers with a diameter of 10-12 mm by the number of nozzles;
- Bulgarian;
- scissors for metal;
- electric drill with a set of drills;
- marker;
- sharp knife;
- tracing paper;
- metal ruler;
- welding machine or self-tapping screws, riveting (depending on the selected option of fastening parts).
to contents ↑
Bucket Stages
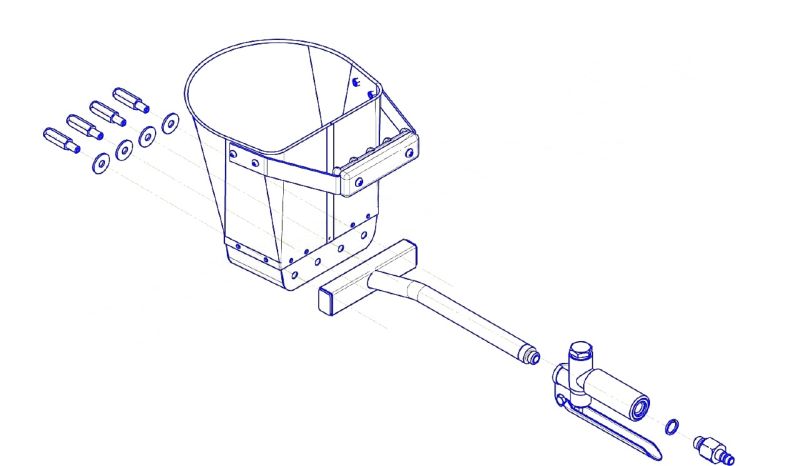
First, transfer the drawing lines to the metal using tracing paper and a marker, or scratch the contours with a knife. The pattern of the container is cut with scissors for metal or grinder. If necessary, you can divide it into several elements, and then weld them. The workpiece is bent along the lines of the lower plane, the front and rear parts are welded to it. If fastening is carried out using self-tapping screws, allowances of 1 cm are left.
Then they act in this way:
- Attach the top handle of the bucket.
- In the lower part, holes are drilled under the nozzles, fixed with steel washers.
- Make a hole opposite the spray guns.
- Inside the tank, a nozzle is installed for mounting the compressor.
- Two reinforcing plates are cut from steel and attached to the side walls of the bucket.
For a trial test, a solution is collected in the bucket, connected to a compressor, and plaster is applied to the wall, experimenting with different pressures. If you want, you can make such a device in a couple of hours. The hopper bucket will significantly reduce the time for plastering walls and reduce the complexity of the process, so when performing a large amount of work, you should use this device.


