To make an interior design according to an individual pattern with your own hands will help a textured roller. This painting tool will appeal to everyone who wants to make designer painting the walls with their own hands, without calling a special team.
- Types of roller surfaces
- The structure and features of working with decorative tools
- Steps for creating a picture on the wall
- DIY patterns on the wall

A positive feature of the rollers is that the costs of a one-time purchase significantly pay off due to the long-term use and the ability to decorate not only the walls, but also the ceiling, wallpaper for painting, furniture and even fabric.
to contents ↑Types of roller surfaces
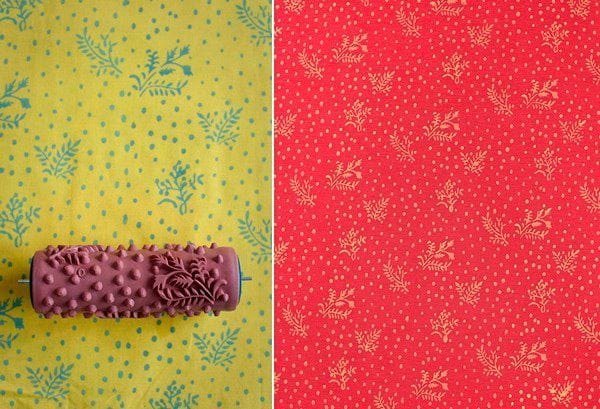
To do it yourself, you will need a structural roller, which can be applied in two ways. The first is the use as a tool for stamping the image, just as the plot continues on the wallpaper one after the other.
The second method allows you to give a different texture by treating the wall or ceiling with a rough roller, or with a pattern, achieving the effect of glaze, imitation stone, marble with a pronounced relief. For each of your ideas, you need to buy the appropriate tool or succumb to imagination and make a structural paint roller with your own hands.
There are several types of decorative rough paint rollers made from the following materials:
- rubber;
- foam rubber;
- tree;
- metal;
- the cloth;
- fur.

All varieties can be used to create a pattern on any flat surface. But metal and wooden paint rollers are more suitable for working with plaster, and they are not convenient with oil paints, because they do not preserve the paint layer on the surface well and you often need to dip the tool.
to contents ↑The structure and features of working with decorative tools
Any roller consists of a metal rod-holder, a cylinder and a handle. But if we are not talking about standard tools made of fabric or foam rubber, but about structural instances used to create patterns on walls and ceilings, then they are endowed with two components: a foam cylinder that draws paint, and a rubber nozzle with a cutout design for print.
The patterned roller is used to add parts to the surface, therefore, before any work with it, it is necessary to prepare a wall or ceiling.
This can be done according to the standard procedure, since we will be painting with oil paints. To do this, the wall is cleaned of old wallpaper, smoothened with putty, and finally covered with a primer. After drying, you need to apply the first coat of paint - the base one with any convenient tool.
to contents ↑Steps for creating a picture on the wall

An extruded roller works using this technology:
- Paint is poured into the pallet (a little), the foam part is dipped into it to nourish it well.
- A structural rubber roller is attached, after which it is necessary to roll along the corrugated surface of the bathtub to squeeze out excess paint that can give smudges.
- Clutching the tool against a wall or ceiling, begins to lay a patterned path from top to bottom.
- Having reached the edge of the surface to be decorated, we apply a roller to paint the second track exactly along the border where the first strip went for uniform distribution of the pattern.
to contents ↑If the standard white ceiling does not suit you, and you want to add variety, then paint work with the roller should be carried out in the direction where the sunlight diverges. This will allow you to monitor the thoroughness of the painting, and the light will not hit the eyes.
DIY patterns on the wall
If you want and perseverance, you can do it yourself with your own hands to make the drawing that you like more. There are two ways to do this. More complex is when they create textures on the roller by gluing blanks to it.
From the eraser (linoleum), cut out the shapes suitable for the idea and stick them on the rubber roller. The most important thing is to make sure that the ornament is complete. It is advisable to round the edges of the parts so that there are no too sharp transitions.
The second method is winding various ropes around the tool, which, when in contact with the wall, will leave a mark similar to a tree bark. To create the effect of patterns on frosty glass, a do-it-yourself roller is prepared as follows:
- Wrap it with a fabric, preferably textured (linen or cotton), crumpled strongly. It is important that it is not loose.
- Paint the wall in a basic tone and allow it to dry.
- The contrast paint is diluted to a more liquid state, so that the layer is thinner, and paint is carried out.
- Until the layer on the wall or ceiling has dried out, they begin to remove the paint with a rag roller, moving in different directions. The main background will appear under the second layer, which will have the character of frosty patterns.
Relief roller - a kind of tool that requires little preparation. However, it is difficult to come up with a more convenient means to make your room bright, unusual for a relatively small financial investment.


Hello! Can you buy a roller with birds?