The bathroom is one of the most visited rooms in the apartment. Hygiene procedures require constant contact with water. It is known that this substance is capable of causing significant harm to various types of surfaces. Steel structures are subject to corrosion. And due to constant high humidity, steam, temperature changes on the surfaces of walls, ceilings, floors, mold can form. Soaps, smudges and alkaline deposits, rust are also common for bathtubs and bathtubs. In order for the room to last longer, you need to choose the right intermediate building and finishing materials for repairs. How and what should be primed the walls of the bathroom, more on that later.
- Types of primers with special performance
- Priming work before tiling
- Priming surfaces before other types of finishing work
- Enamel restoration bath
Types of primers with special performance
Since the bathroom is a specific room, not every building material is applicable here. Primed surfaces of walls, ceilings, floors before decorative finishes (painting, whitewashing, laying tiles) should be mandatory.
First of all, the substance improves the adhesive properties of base materials and finishes. It is also a kind of additional protection against the influence of a characteristic microclimate.. An antifungal primer will prevent the formation of mold. Deeply penetrating solutions increase the density and strength of the base elements. Protective primer film provides two-way waterproof.
So, the primer used for the bathroom wall and ceiling must be:
- antifungal;
- moisture resistant;
- waterproofing;
- water repellent;
- deeply penetrating;
- firming;
- increasing adhesion of other materials;
- increasing hydrophobization of cement-concrete mixtures.
Materials are classified into two groups, the principle of selection becomes one of the properties - adhesion or hardening. If priming is done on a rough surface, it is recommended to use both types of materials. Pretreatment with a hardening solution, followed by improved adhesion.
You should also pay attention to the composition of the primer mixture. Some of them are not recommended for domestic use indoors. In residential and non-residential premises, the use of alkyd, acrylic and mineral primers for walls is allowed.

Important information about the reinforcing solutions for walls: in addition to the fact that a strong film forms on the surface of the wall, the substance penetrates deep into several centimeters, thereby strengthening the material from the inside. The solution is applied in a thick layer, it is recommended to use it during intermediate work before installing the tiles, decorative plaster.The composition of the primer mixture should be compared with the composition of the tile adhesive.
By the way, all the loose, porous surfaces of the walls, ceiling in the bathroom must be primed. But, if you plan to lay the tiles on concrete, then you can try to do without priming.
When choosing the appropriate mixtures, one must be guided by both the type of surface of the base, and the quality of other finishing materials. For instance:
- wooden walls - alkyd and shellac primer;
- concrete walls - acrylic, emulsion;
- metal construction of walls - special mixtures for metal.
Before buying, you must definitely read the composition, properties and characteristics of the use of the substance indicated on the package. It does not hurt to consult with people who are knowledgeable in construction and repair issues.
to contents ↑Priming work before tiling
Tile in the bathroom as a decorative lining can be found most often. Properly laid tiles have a long operational period. She is less demanding in care. It has good technical characteristics of resistance to environmental influences. Before laying tiles in the bathroom, it is necessary to carry out several stages of preparatory work.
- Walls, floor or ceiling (base) should be plastered and leveled; concrete screed may be required for the floor.
- The primer to be used is diluted and thoroughly mixed.
- It can be primed with a roller or brush.
- If this is necessary, after the first layer has dried, the wall surface is primed again.

Priming surfaces before other types of finishing work
If the walls and ceiling will be further processed with putty, then the surfaces must be before priming:
- clean old decorative coatings;
- degrease, remove dirt;
- plaster joints, seams, cracks;
- sandpaper;
- collect dust from the walls.
Then you can primer. For general work, use a roller with a pile; for priming in corners and inaccessible places - use a brush.
Often walls, floor and the ceiling of the bathroom is just painted. Both paint and other materials used for intermediate work must be hydrophobic. In order for the paint to lay down qualitatively, hold well and for a long time, an antifungal, deeply penetrating primer with good adhesion is required.
Repairing the bathroom will take some time, since before applying the paint the primer should be allowed to dry for 5-6 hours. The sequence of preparatory work for painting is similar to preparing the walls of the room for putty.
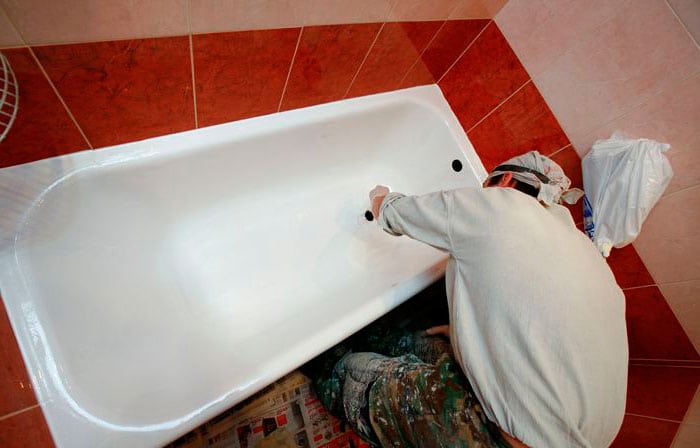
to contents ↑Enamel restoration bath
As mentioned above, not only the walls, but also the tank for taking baths can suffer from the special conditions of the room. We mainly use enameled tanks. During operation, the enamel is subjected to various influences. And once white, it turns yellow, darkens, scratches ... Restoration work can be carried out independently, it is much cheaper than buying a new tank.
Enamel restoration - the task is complex, multi-stage, often requiring special skills and knowledge, but at the same time quite feasible. Throughout the entire duration of restoration work, the operation of the room is not recommended.
- The surface must be cleaned of rust, especially if there are chips on the enamel.
- After the container should be thoroughly washed and wait until it dries.
- Next is the priming of bare metal areas. You can use glyptal mixture, which has good adhesive properties.
- The primer must dry completely. This will take up to two days.You can, of course, artificially accelerate this process, but experts prefer drying in natural conditions.
- The next step is putty. Thus, it is necessary to level the treated area with a common surface (plus 2 mm). The substance will dry for about an hour.
- Re-priming.
- Enamelling.
The arrangement of such a specific room requires increased attention to the quality of building and finishing materials. Walls, ceiling, floor must be reliably protected from excessive influence of moisture and sudden temperature changes. After all, humidity and heat are one of the main reasons for the formation of fungus and mold. If you are not sure that you will cope with the repair tasks yourself, entrust this matter to specialists.


