Sealing the seams of the sink is a priority when installing plumbing fixtures. It is impossible to ignore this procedure, otherwise water will flow into the cracks and joints. Dampness creates a favorable environment for the formation and propagation of mold and fungi, which is unacceptable in the bathroom.
- Choosing a sink for countertops
- Which sealant to choose for the sink
- Acid and neutral sealants
- Acrylic
- Polyurethane
- Silicone
- What is required for work
- Preparing for sealing
- Installation Rules
- Install mortise model
- Installation of integrated washing
- Installation of the corner model
- Installation of stone sinks
- Mixer installation and connection to communications
- How to remove the sink from the sealant in the kitchen

Sealing avoids such troubles. It is about filling and sealing the gaps between the sink and the wall / worktop, preventing leakage. Special materials are used here - sealants.

Their consumer properties depend on the substances taken as a basis. Sealants are divided into:
- acidic / neutral;
- acrylic;
- polyurethane;
- silicone.
These funds are widely available. You can buy them in a specialized store and in the market. Sealants are presented in a wide price segment. You can choose the tool that is ideal for solving the task.
Their scope is extensive. They are suitable for sealing kitchen sinks, sinks in the bathroom, showers and other plumbing fixtures.
to contents ↑
Choosing a sink for countertops
When purchasing a sink, it is necessary to remember several priority factors, and the primary task is to determine the size. It is necessary to build on the dimensions of the countertop:
- for large models, a deep sink with wide sides is suitable;
- small-sized worktops are combined with small sinks (models with several compartments are available for washing and drying dishes).
The shape of the sink plays an important role: square, rectangular, angular, round, oval. Corner models are installed in cabinets adjacent to two adjacent walls. They have a special geometric shape, so they are convenient and practical to use. Square / rectangular sinks are suitable for wide countertops with a large cutting area.

The number of bowls is another important factor. They allow you to sort dishes and wash vegetables much more productively and easier. The more bowls, the more pleasant the work in the kitchen.
The presence of racks for utensils is a useful feature of a kitchen sink. They provide the flow of water into the sink, accelerating drying and preventing the formation of unpleasant plaque.
The kitchen sink should be:
- resistant to wet environments and household chemicals;
- strong enough and durable;
- practical to use;
- easy to wash, maintain, connect.
Choosing overhead sinks, be sure to worry about purchasing sealant. During installation between the edges of the sink and the countertop, gaps remain in which water flows. They need to be sealed. Mortise sinks are considered more practical, but expensive.
to contents ↑Integrated models are the most convenient from the point of view of operation. Their design does not allow leaks and the formation of puddles.So the countertop and stand remain dry.
Which sealant to choose for the sink
When purchasing sealant, it is necessary to build on the type, design, and material of the sink. These are priority requirements. For convenience, we will analyze each type of sealant separately.
Acid and neutral sealants
These funds contain in their composition:
- silicone rubber;
- vulcanizing components;
- fillers;
- adhesion promoters;
- fungicides;
- plasticizers;
- dyes.
Acid / neutral (sanitary) sealants are known for simple application to the surface (increased adhesion affects). In conjunction with a viscous consistency, these products do not drain off vertical surfaces, providing constant contact. The presence of fungicides prevents the appearance and development of fungi / mold in the area of the sealing joint.
 Sealant")
The moisture contained in the air promotes the rapid polymerization of the sealant immediately after exiting the tube. This reduces the hardening time. Acetic acid may be released during curing, which is accompanied by a characteristic odor. This imposes restrictions on the use of acidic sealants. They can not be used with materials that interact with acetic acid:
- marble, limestone;
- metals sensitive to corrosion;
- mirrors containing amalgam.
A similar solution is neutral sealants. They are known for chemical inertness, but their cost is much higher.
to contents ↑Acrylic
Their key feature is the absence of toxic substances that can harm health. Another plus is increased adhesion, due to which acrylic sealants are compatible with the following materials:
- Chipboard;
- MDF;
- metal, etc.
These products are resistant to high vibration loads. They dry quickly when applied, and therefore are convenient and practical to use.

Acrylic sealants have disadvantages:
- high shrinkage;
- rigidity.
As a result, the seam may crack over time. Moisture seeps through minor defects, so it is not recommended to use acrylic sealants when installing a kitchen sink.
to contents ↑Polyurethane
They perfectly withstand high humidity and do not deform. Another plus is the wide range of operating temperatures. Polyurethane sealants are well known for adhesion to most modern materials.
A seam deserves special attention. It is elastic and has a slight shrinkage, which simplifies the sealing process. Squeezing polyurethane sealant from the tube can be done using an ordinary gun.

It is not recommended to use this type of sealant when working with surfaces with polymer cladding, including particleboard and MDF. They are used in the installation of sinks made of granite and artificial stone and have proved to be excellent during operation.
to contents ↑Silicone
One of the most common types of sealants to date. Silicone-based products have the following properties:
- lack of shrinkage;
- elasticity;
- resistant to vibration.
Silicone sealants are great for sealing joints between the sink and countertop. They allow you to make a high-quality and durable seam that is resistant to humid environments and low mechanical stress.

Ease of use is another indisputable plus of these tools. Silicone sealants are sold in tubes and are suitable for all types of guns. Before use, you must carefully read the instructions, paying attention to safety precautions.
When working with silicone sealant, gloves are recommended.Due to increased adhesion, it is difficult to remove from the skin of the hands.
The most practical are sealants, which contain antibacterial additives. They do not allow the development of fungi and microorganisms, which is extremely important in the kitchen.
to contents ↑What is required for work
You should choose a convenient and practical gun. A skeleton type or models with a half-closed cylinder will do. Such devices are used for tubes with an integrated nozzle.

When installing a sink in the kitchen, it is recommended to stock up on the following tools and appliances:
- electric drill, a set of drills of various diameters;
- jigsaw;
- several screwdrivers or nozzles for a drill with a screwdriver function;
- building level;
- a marker;
- metal measuring corner;
- stationery / construction knife.
The mixer is connected to the water supply by flexible connections. Tighten nuts and couplings with a wrench / adjustable wrench. The thread is sealed with an FUM tape.

If the base brackets for the sink are too flimsy or not suitable in size, then you need to purchase additional fasteners. This will ensure stability and extend the life of the sink, and the absence of backlash will not allow premature destruction of the sealing joint.
to contents ↑Preparing for sealing
Before applying sealant, make sure that the surface of the sink / countertop is dry. It should not have greasy, oily traces. You can eliminate them with household solvents and detergents.
The surface should be wiped with a soft cloth, removing dust and small debris. This will increase adhesion with the sealant and provide a high-quality, dense and elastic joint without cracks and defects.

Installation Rules
To install the sink you must:
- place the sink in the cut out opening and make sure of stability;
- turn the sink upside down, insert the drain grate, thread a screw;
- install a plastic pipe, not forgetting about the carved / polymer gasket;
- connect all the elements, making sure of their density and tightness (do not twist the joints, because they can crack and deform);
- insert the nozzle into the siphon, tighten the nut with the o-ring;
- screw the flexible connection for cold / hot water into the special holes;
- insert the screw and washers for the mixer body;
- do the same operations with flexible eyeliner;
- install brackets using dowels and screws;
- Insert the sink into the cabinet.

Make sure that the sink is securely mounted on the brackets. Then they should be strengthened to the stop. After that, the plumbing is connected.
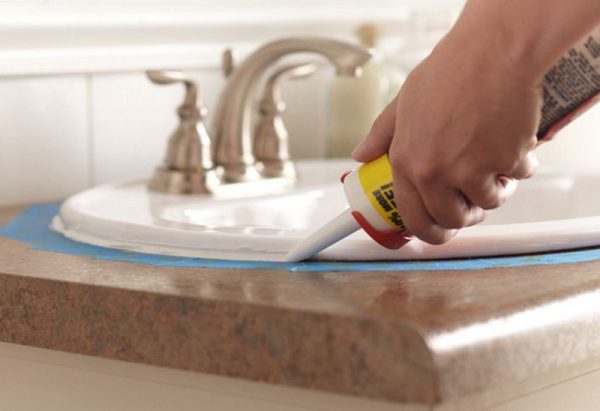
At the final stage, the joints are sealed. If excess is formed, then it is removed with a soft cloth until it hardens.
The standard procedure for installing kitchen sinks was given above. It must be borne in mind that the installation technology depends on the design of the sink, and therefore this nuance should be considered in more detail.
to contents ↑Install mortise model
Here you need to make sure the convenient location of the eyeliner and the drain corrugation so that they do not bend and crack over time. This is due to the limited installation area.

The shape of the sink on the countertop should be outlined along the contour. Then you will need to make a marking of the inner contour to attach the sink. To cut out the opening was not difficult, you must first drill a hole and then insert a jigsaw tip into it.
to contents ↑To seal was reliable and durable, use the gasket from the kit to the sink. An additional seam is done with sealant.
Installation of integrated washing
In this case, the installation is performed joint to joint.Clearances of no more than 1-2 mm are allowed. They are wiped with a special tool, sealed and ground. Thus a homogeneous appearance is achieved.

Care must be taken when installing the integrated sink. It can be easily damaged if installed incorrectly. The precise marking deserves special attention, due to which the maximum compatibility of the sink with the countertop is achieved.
to contents ↑Installation of the corner model
In general, the technology for installing sinks of this type is no different from the process described above. It is only necessary to take into account the rotation of the curbstone at a right angle. To make the washing convenient in operation, it should be turned 45 degrees. So it will be located exactly in the center.

When marking, you need to keep the upper corner of the sink to yourself, and the wide one to the wall. Remember that accurate marking will help to avoid distortions and too large gaps between the sink and countertop.
to contents ↑Installation of stone sinks
It is necessary to take into account the large mass of such shells. This condition imposes a number of installation restrictions. Such models should be installed on strong steel brackets. For greater reliability, it is recommended to use additional supports.

Due to its high weight, it is recommended to get an assistant. The sink sinks into the opening on both sides, slowly and systematically. She sits on the brackets and firmly fixed, after which the stage of connecting plumbing.
to contents ↑Mixer installation and connection to communications
This procedure is practically no different from the standard installation technology of the mixer, drain-overflow system and siphon. Here it is necessary to take into account the type and method of connecting the plumbing fixtures themselves.
There are some useful tips that will come in handy during the work:
- Do not save on FUM tape, because it allows you to avoid even the smallest leaks;
- no need to tighten the bolt connections, as this can lead to thread breakage;
- Before operating the sink, make sure that all joints are fixed and that there are no leaks;
- there should be no backlash between plumbing fixtures;
- metal washers should be secured with a wrench, not a plastic nozzle, which comes complete with a flexible eyeliner.

How to remove the sink from the sealant in the kitchen
There are two ways to remove the old sealant layer:
- dissolve it using household and industrial chemicals (safety precautions must be observed);
- cut with a sharp clerical knife (you should be careful, as this can cut or damage the surface of the sink / countertop).
Even the most dense professional sealants can be removed without any difficulty. This procedure does not take much time and effort.