During the repair, you will definitely have to paint something. I want to do it quickly and efficiently. The most effective option is to use a spray gun. Buying it is easy, but a serious brand is expensive, and a cheap one is short-lived. It’s easier to save money and assemble it yourself, from a familiar household appliance - a vacuum cleaner.
- The principle of operation of the air spray gun
- Types of spray guns
- Which vacuum cleaner to use
- Do it yourself
- Vacuum cleaner preparation
- Necessary parts and tools
- Manufacturing process
- Nuances
- Testing
- The nuances of working with a spray gun from a vacuum cleaner

The principle of operation of the air spray gun
The first spray guns - prototypes of modern ones - were invented closer to the end of the 19th century. These were air-operated atomizers. He picked up the liquid and squeezed it out of the nozzle under pressure. Under these conditions, paint was sprayed onto droplets. Since then, the spray guns have become more perfect and more efficient, but the principle of operation has remained the same.

Any atomizer needs an air source to compress it and actually perform its function. The air flow is forced by a compressor, gasoline or electric. Large professional devices work thanks to serious compressors and surround receivers (from 25 to 50 liters). Such units are semi-stationary. Electric spray guns are more compact due to the smaller size of the blower.
If you want to make a spray gun yourself, it is better to keep in mind the second option with a lower pressure.
The design of a modern plastic spray gun involves a body equipped with a trigger, a needle, a nozzle (also called a nozzle), a spray head and a liquid container. By pulling the trigger, you move the needle so that its tip-cone opens the hole for the paint to exit the nozzle. Two tubes are included with the tank: one, in short, is air, the other, more authentic, sucks the mixture. Once in the device, the air flow (part of it) helps to increase the pressure inside the tank and push the liquid up a long tube. If you do not pull the trigger, that is, block the outlet, the pressure will increase until it reaches the movement of the safety valve. If not, the device is depressurized, and it will not be painted what is needed.

The paint is picked up by the remainder of the air flow and pushes it out of the nozzle. In addition, a certain part of the flow, entering the channels of the spray head, exits with force, crushing the substance into tiny droplet particles.
to contents ↑It is unrealistic to design a professional device in a domestic environment. But there is the opportunity to assemble a simplified version of the spray gun.
Types of spray guns
Factory-made devices are divided according to various criteria. There are:
- providing both high and low pressure;
- automatic and designed to work manually;
- with a tank bottom and top;
- airless and forced airflow devices.

According to the quality of work, professional and semi-professional devices are distinguished.
to contents ↑The low-pressure paint sprayer is most reminiscent of homemade paint in terms of performance (a conventional household appliance does not provide high pressure). On sale there are still serial versions of spray guns designed for use with a vacuum cleaner.
Which vacuum cleaner to use
The main characteristic of a supercharger is power, the flow pressure indirectly depends on it. If the suction power is low, blowing will also be weak. If there is no blowing channel, you will have to create it by sealing all the holes and leaving only one where the hose is connected.
There are devices where the air vent is provided by design. Old models from the USSR have an outlet (“Rocket”, “Ural”, “Seagull”). If you still have this artifact, you can use it. Modern devices, as a rule, are not equipped with an air outlet, but sometimes it is still found - for example, the Samsung SC4140. Construction vacuum cleaners can blow out, their pressure is very powerful.

Do it yourself
Before you take up the independent production of a spray gun, you will need to prepare the original apparatus. Also, collect all the necessary parts and tools so that they are at hand.
Vacuum cleaner preparation
First of all, remove the dust collectors available in the device - everything that accumulates and retains dust. This is especially true for filters. Wash other parts thoroughly and minimize dust from entering before starting the assembly process. Perform wet cleaning in advance in the room where the assembly will take place.

Necessary parts and tools
To create a spray gun you will need:
- the apparatus itself, working as a source of pressure (vacuum cleaner with a hose);
- receiver (you can use a rubber camera - automobile or from the ball);
- capacity for paints and varnishes of the volume you need;
- pressure reducing valve;
- any suitable fastener material.
Manufacturing process
To change the direction of traction in an old vacuum cleaner, it is necessary to force its engine to rotate in the opposite direction, then the movement of the air flow will change. Try reversing the terminals leading to the rotor and stator. But the force of the reverse thrust will still depend on the design of the impeller blades. If they are asymmetric, then the reverse thrust will become much weaker than the original, standard. If possible, it is better to replace the impeller with another, with symmetrical blades.
Next, you must ensure constant pressure using the receiver. The principle of a home-made sprayer is the same as that of a factory-made one: paints and varnishes are sprayed from the tank, where they are pre-filled, through the nozzle.
A pressure reducing valve is required as it is responsible for the throughput of the atomizer.
If the old model does not have a special jack for connecting a hose, you can create it yourself. There are two ways:
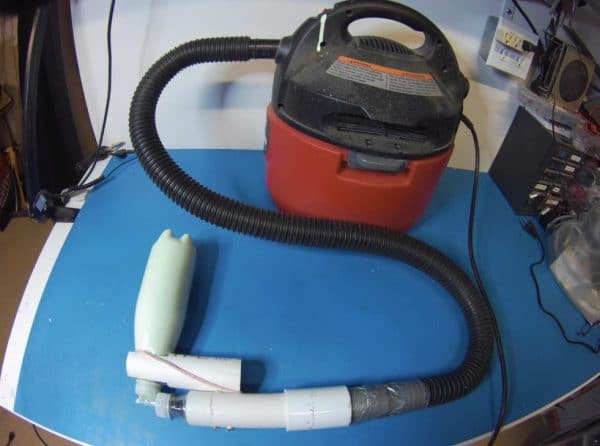
- Seal all air vents (use any suitable material: mounting foam, hot melt adhesive, epoxy). At the location of the blower, cut a hole of the same diameter as the inside of the existing hose. Pick a suitable piece of PVC pipe, insert it into the hole and glue it firmly. Calculate so that the outside is at least 7 cm of pipe. You will get a supercharger for a spray gun.
- The second method does not require making a hole in the case. We need a solid volumetric bag, insulation tape and another hose - it will supply air. You put the device inside the bag, take the "native" hose out and tightly wrap everything with insulation. Outgoing air will fill the space of the bag and will go through the second hose. The method will work reliably if the package is quite tight, and all possible openings are sealed qualitatively.

The device must be cleaned. To do this, fill in a container of 100-150 g of solvent and turn on the device for at least 10 minutes.
to contents ↑When spraying a solvent, try to adjust the nozzle and pressure in the structure so that your homemade device does not spit with paint and varnish materials, but applies them to the surface with a uniform layer.
Nuances
Be careful when choosing fasteners - they should seal the places of all connections of the parts of the device as much as possible.
Already at the “design” stage and during the assembly process, it is possible to foresee the option of using various burners with nozzles of different widths. This will make the tool more versatile.

Testing
A freshly created instrument should be tested. Carry out tests at various distances from the painted surfaces (optimum - from 15 to 20 cm). The most effective check with a minimum nozzle diameter.
To minimize risks and not to encounter unpleasant surprises, take a water-based paint for testing (it is easily washed off) and conduct a test on the street. After all, the device was created “by eye”, without calculations, and therefore it can suddenly give out a focus in the form of an unexpected rain of coloring liquid from the wrong hole from which it is required.

The nuances of working with a spray gun from a vacuum cleaner
Learn how to handle the spray gun gradually. If you need to paint a car, first apply both the developing and the main coatings of paintwork to those areas where the flaws will be subtle: doorways, sills, end faces of the boxes. Then try to spray the enamel on the edges of the parts, where the borders of masking tape and film pass - so you will prevent the appearance of drips. They will be on protective equipment.
If the edges are painted successfully, you can go to the main areas of the car. Try to paint all parts with quick horizontal movements, making sure that no drips form.
The quality of the final result depends on the number and thinness of the layers - the more they are and the thinner they are, the better the painted surface looks. The minimum number of layers for a presentable type of car is three, including a developer. Do not save time drying the surface between layers. Developing is better to dry for more than 30 minutes, so that the solvent completes the active phase of evaporation.
Due to the low pressure in a homemade spray gun, the enamel consumption will be significant. After staining, you will need to adjust the appearance of the car by polishing, especially if you varnished the car. Defects will inevitably appear - they can be eliminated with fine-grained abrasives and pastes.