A man can collect and repair anything. And the more difficult the task, the more desire to work can arise. One of these difficult tasks can be a compressor for an airbrush with your own hands, which is not always easy to assemble. Despite the fact that it looks very serious, it will not frighten a real lover of technology.
- Pros and Cons of a Homemade Appliance
- Stage one
- Direct compressor
- Receiver
- Stage Two: Work with Nodes
- Stage Three: Two-Stage Assembly
- Inclusion moment
As a rule, the compressor is taken as a basis, which is previously removed from the old refrigerator. Sometimes they take a car electric pump, and for some masters a fire extinguisher comes to the rescue.

Pros and Cons of a Homemade Appliance
Like any technical product, a homemade airbrush compressor has a number of both positive and not very pleasant sides. If you look globally, the main advantage of a “manual” compressor is aesthetic. Working with a personal assembly machine is always a pleasure. The feeling that it was you who made this compressor is very tuned to work.
In addition, in most cases (when the refrigeration compressor, fire extinguisher, or car electric pump is taken as the basis), a low noise level is observed during operation, while a purchased one can make a very loud noise.

As for the price, the cheapness of a homemade compressor is a very stretched myth. It all depends on the selected components, so the price of such a product is very often a little cheaper than buying a factory one.
to contents ↑Stage one
The compressor of "manual" work is good in that it can be made exclusively for your needs. For example, if you make a compressor for an old-style airbrush (single action), then the receiver, in principle, is not needed. This reduces the cost of assembly costs.
But modern conditions of painting require the best technology, so a double-action airbrush is in use. It controls the air flow, so a receiver is needed.

Direct compressor
The most popular option is to pull it out of the refrigerator. The sites for the sale of refrigeration equipment will help you choose the technical side of the compressor you need. The most important criterion when buying such a compressor is the price. The air discharge characteristics are the same in almost all models.
Receiver
It should be a container that is capable of working with gas (or liquids) under pressure. The use of plastic barrels or cans for these conditions is not recommended. The first option in order to make a good receiver is a fire extinguisher. A pressure accumulator, an oxygen cylinder or a propane cylinder may also be used. When the main parts are selected, it remains to assemble them together.
to contents ↑
Stage Two: Work with Nodes
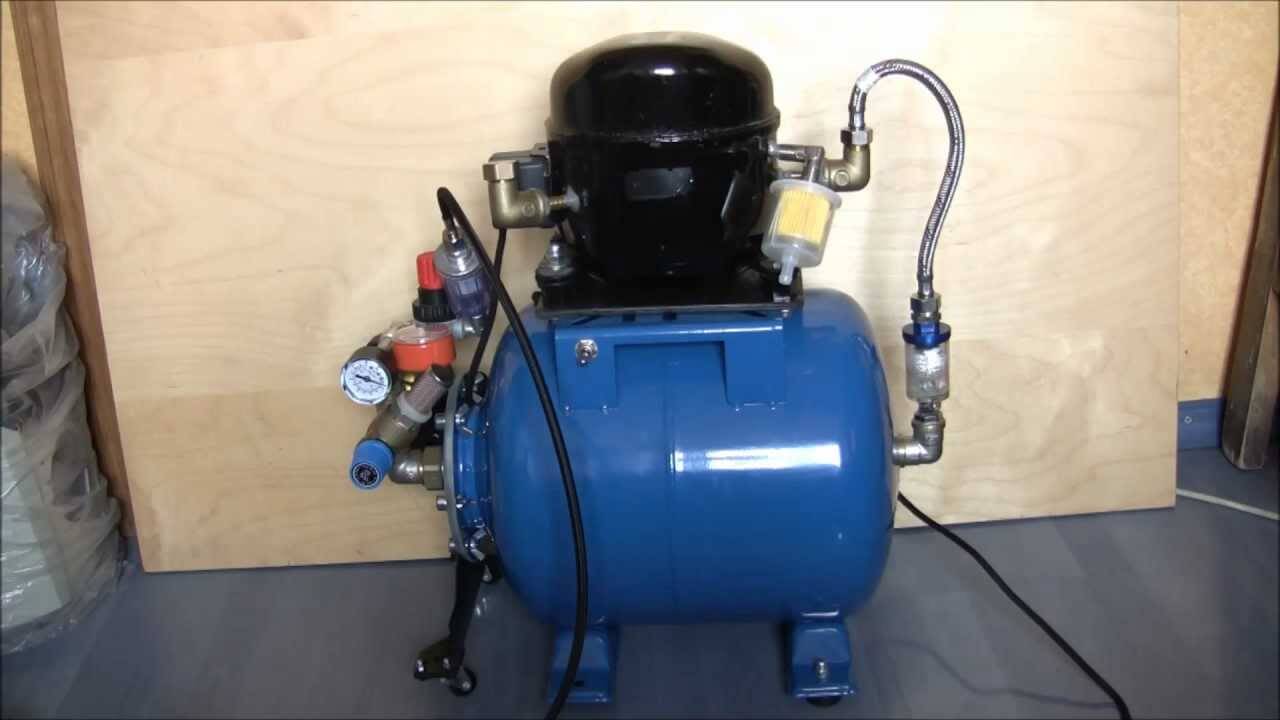
When assembling the selected compressor and receiver, you must reliably connect all the transitions and nodes for high-quality painting in the future and follow clear rules:
- The first node provides fasteners to the receiver.
- The second number in order, but not of importance, is the pressure switch. It is necessary to turn off the machine in time when the pressure in the receiver reaches a peak point, and in case of normalization, turn it on. Relays can be dispensed with if you want to break the product you made very quickly. A popular and reliable option is RDM-5.This is a relay that is used in plumbing systems. The relay can also be obtained from the refrigerator, which served as the compressor donor.

- The third node is a pressure gauge that will indicate the pressure in the receiver.
- We also need a manometer, which will help to track the pressure that occurs during the preparation of air. To do this, you need a gearbox, to which a pressure gauge will be attached.
- Need to stock up on the filter. Compressors of home assembly have the unpleasant property of “spitting” slightly, so you need to either make a bend elbow or install filters.


Do not forget about adapters. To increase the tightness, you can make the joints putty with Poxipol.
to contents ↑Stage Three: Two-Stage Assembly
The main problem with the first part of the assembly is the assembly that connects the receiver. In the case of a fire extinguisher, the valve is generally not suitable for this design. Therefore, you need to cut it and weld a suitable fitting conductor.
For a less cautious but faster build, you can do the following:
- Remove the control element.
- Leave only internal mechanics.
- Select the adapters with internal thread for the remaining outputs. Press with an adjustable wrench. It is not necessary to screw up to the “refusal”, as often there is a mismatch with the adapters.
It is enough to make a reliable grip and grease everything with poksipol or cold welding.

The second stage of assembly is needed for the convenience and presentability of the product. The device is not small (refrigerator parts, receiver, multiple knees and adapters), and carrying it in your hands is not always productive.
Therefore, an oak board or chipboard is used as a stand. A machine is mounted to it using self-tapping screws, and on the other side you need to install furniture wheels for convenience and mobility. Or you can build something like a pedestal to store in it everything you need for painting (directly paint, nozzles, etc.). You can also download spare parts (adapters, nuts, wrenches) there.
to contents ↑Inclusion moment
Reinsurance with automatic shutdown and inclusion indicates that the connection line must go through the relay. You need to study the instructions that came with the compressor. This is especially important since it works in unusual conditions. Often there is a need to install a capacitor (depends on the type of compressor, refrigerator, from which it was removed).

From the outlet we go to the switch. Then we connect the phase wire to the desired relay terminal. The zero wire can go in two directions. If there is a ground wire - leave it, if not - connect to the ground terminal on the relay. The second option is better.
As a result, we get protection with the help of grounding. Then the phase and neutral wires go to the compressor starting drive. According to the specified circuit, the wires are connected to the desired terminals. Everything is ready for painting. To summarize the materials used:
- compressor (can be used from the refrigerator);
- receiver (fire extinguisher, for example);
- pressure switch;
- manometers;
- flexible hose (oil resistant);
- adapters, plumbing, FUM tapes, etc .;
- Chipboard or stand board.
This is a superficial list, but it covers all the main parts of the compressor for painting. In addition, the entire product can be driven into a box or case, built a lid or somehow decorated and given a solid and professional look. As mentioned above, in order to get a compressor, it is not necessary to break the refrigerator. Often used automobile electric pumps that give good results. But their assembly system is slightly different, and more difficulties in connecting to power, cooling system.

