Many craftsmen already liked electric glue guns, which allow them to quickly glue a lot of materials. However, there are situations when this convenient tool is not at hand and you have to look for an alternative way. There are two ways to use glue sticks, constructing a heating element from improvised means.

Boiler gun
The first way you can build your own gun is to use a small domestic water heater. To create it, you will need some supplies and tools.
What is needed:
- wooden block;
- a piece of tin;
- tape made of non-stick coating or teflon;
- copper wire;
- a small boiler.

Having prepared the materials, you can begin to work:
- At the first stage, a convenient and safe handle is made. For this, a wooden block is taken, onto which the contours of the lower part of the boiler are transferred. The sizes are copied twice, since the handle will consist of two halves.
- After transferring the dimensions along the contour, a depression is made in two parts of the bar, equal to half the thickness of the lower part of the device. Having folded the halves around the device, they get a ready-made handle. For convenience, it can be rounded and processed with sandpaper. Connect the halves of the handle with small screws or wrapped with insulating tape.
- Before installing the handle, the middle part of the heating element is treated with Teflon tape or other non-stick material. This is necessary in order to protect the tree from excessive heat during operation.
- The next step is the manufacture of a heating chamber in which the glue stick will melt. To do this, take an ordinary can of lemonade or beer. It is necessary to cut from it two rectangular blanks of approximately 80x150 millimeters each.
- A cylinder is twisted from the first plate, the outer diameter of which should be equal to the inner diameter of the boiler. A cone with a small outlet is twisted from the second workpiece.
- To work with metal, it is better to use pliers, round-nose pliers and a hammer. The cone must be attached to the cylinder, squeezing the edges, and insert this design into the spiral. For reliability of fastening parts, you can use copper wire.
The device is almost ready. To start operation, an adhesive core is inserted into a cylinder of copper or sheet metal and the boiler is connected to the network. Just wait a few seconds to get started. To do this, lightly press on the core of the glue so that the liquid mass flows out of the outlet.

A gun from a domestic boiler must be used with extreme caution. Without water, it heats up very quickly to a critical temperature. This can lead not only to failure, but even an explosion.
To avoid these troubles, it is better to use a wire with a regulator to turn on, which will allow you to control the voltage supplied to the device and its heating.
to contents ↑
From a lighter and an aluminum can
The second method of manufacturing a pistol from improvised means gives a device that is safer to operate. Consumables for such a device are much easier to find than in the first case.
You will need:
- a can of beer or lemonade;
- stationery gum;
- stationery tape;
- glue stick;
- any gas lighter.

The following tools are needed during the manufacturing process:
- stationery scissors;
- stationery knife;
- small pliers;
- black marker.

Procedure:
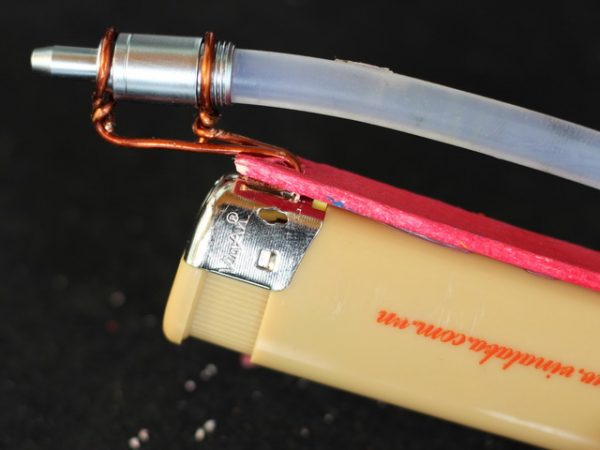
- At the first step, a square blank is cut from a prepared can. This is done with a clerical knife, align the edges with scissors. A piece in the form of a cone with a small outlet at the end is twisted with round pliers from the workpiece.
- The edges are trimmed with scissors and fixed with tape. It can be replaced with a simple insulating tape. Regardless of the material, the fixation must be carried out as far as possible from the working edge of the cone. The tip will become very hot and this can lead to melting of the tape or insulating tape.
- Next, you need to assemble the device in a single design. To do this, the cone is attached to the lighter so that the flame warms up the tip of the device. As the fixing element, you can use the same adhesive tape or insulation tape.
- As for the office gum, it will be needed for the continuous supply of the glue stick to the working cone. A longitudinal incision is made at one end of the stick, as on screws for a flat screwdriver. The rod is inserted into the cone, and the elastic is thrown on one side of the lighter and the other enters the groove.
- As a heating element in a homemade glue gun of this design, you can use a pistol lighter. This will make the application more convenient and allow you to quickly adjust the flow of fire, and mounting the working cone on the "trunk" is much easier to perform.

Conclusion
In conclusion, we emphasize that the above methods of manufacturing glue guns "on the knee" are not the optimal solution. They are more suitable for traveling conditions or when there is an urgent need for a device in its absence. For high-quality and long-term work, it is better to purchase a factory-made tool.