Who would like to paint one thing all day? Of course, no one, especially since there is an automatic device that allows you to do this faster. Airbrush and is designed for these purposes. It allows you to spray paint in small drops on the surface of the subject with the ability to adjust the thickness of the line. When working, there is only one problem - timely cleaning of the airbrush is required.

How is an airbrush
The principle of operation of all devices of this kind is the same. Air enters under pressure through a horizontal tube. Due to the pressure drop, the material for painting is drawn along the vertical channel. The amount of air supplied is controlled by the trigger. Due to this, there is a change in the spraying of the spray jet. The airbrush device is distinguished by the nodes in which the process of mixing flows occurs. The second difference between the devices is different mechanisms for controlling the supply of paint and air jets.
There are several options for the implementation of airbrushes. They can be single-acting - automatic or semi-automatic. In these models, the trigger only controls the air supply. Mixing of two streams can occur both outside and inside.

In independent dual-action airbrush models, after triggering the trigger, both flows can be controlled. In the process, such an apparatus initially delivers air, and then slowly delivers the paint material.
The composition of an independent double-acting airbrush includes:
- needle and nozzle with clamps;
- several bushings;
- spring-loaded air valve;
- spring with a guide;
- needle position adjuster;
- fitting for connecting to an air hose;
- a tank for paint material;
- trigger (trigger), otherwise referred to as a trigger.


However, all components are small and require careful handling. For example, from the outlet, the paint material should come in a steady stream. However, if the hole in the nozzle is deformed, splashing will occur. For repair, you will need to buy a set of spare parts, and in addition - brushes.
to contents ↑Cleaning process
The life of the airbrush depends on the correct and timely cleaning process. Work must be done carefully, sharp movements are excluded, since the internal parts of the apparatus are fragile. Particular attention is paid to working with the needle and nozzle.
How to clean the airbrush - the main question that needs to be answered to increase the service life of such an apparatus.
Cleaning can be complete when a repair kit is used, and partial when changing the color of the coating material. When cleaning the airbrush with the supply of paint material from above, to reduce the cost of time, you should use practical tips:
- The lid of the tank during operation can not be used. In this case, you don’t have to wash it every time you change the color.
- Approximately as much paint material must be poured into the apparatus’s capacity in order to suffice for painting a small area. Preferably less than half the tank - this amount will not splash out during operation.
to contents ↑
Partial
In the process of work, a frequent change of colors is possible.To do this, the remaining material in the container must be drained into a container for temporary storage, for example, a plastic cup. After all, this material may still be needed. Pouring the residues into the original container is by no means possible - this leads to the drying of the entire contents of the can, since the solvent contains in the residues.
A small amount of solvent (water or alcohol) is poured into the empty container for the coloring material. The liquid should dissolve this particular paint. When you pull the trigger normally, the solvent will spray. If you close the nozzle with your finger, then the air flow is blocked, and it enters the tank. Both of these steps must be performed several times. The remaining solvent must be poured onto a rag, with which to wipe the container from the remnants of the poured paint. If streaks remain directly on the case, they are also removed.

If there is no certainty that the container is clean, the procedure must be repeated. Only then can you continue working with a different color. The same manipulations are performed if necessary to take a break in painting.
To reduce the amount of small particles in the air when spraying solvent or remaining paint, a special device is on sale. It is called an airbrush cleaner and is a jar with an opening into which a replaceable filter is inserted. A little water is poured into this container. Then the nozzle of the device to be cleaned is attached to the rubber cuff of the hole. When you press the trigger of the airbrush, spraying is done inside the can.

Such an auxiliary device allows you to breathe less paint, which will have a beneficial effect on health. The airbrush cleaner can be used as a stand.
to contents ↑Full
This procedure is performed with a complete disassembly of the device. In this case, additional accessories are required:
- needle;
- brushes - their set is on sale;
- wooden stick, which is sharpened from one end (you can use a toothpick);
- ring spanner;
- solvent;
- rags.

The exact solvent that is suitable for the paint is needed.
With a large load on the airbrush, that is, when working for more than five hours, full cleaning is required. The airbrush spits and subsequently clogs - this is another reason for disassembling the device. In this case, the entire set of necessary tools is applied, including brushes.
Partial cleaning is initially required. This process is discussed above. After that, the air supply from the compressor is shut off, and the hose is disconnected from the airbrush. Next, the device understands in this sequence:
- The handle is removed (in fact, this is the back of the airbrush). Then you need to loosen the needle, which is done by turning the collet clamp.
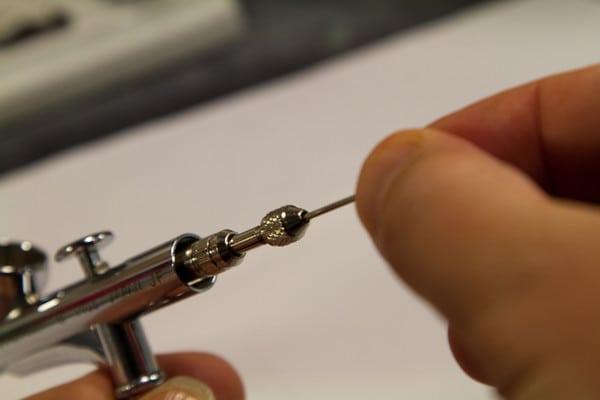
- There is a possibility of free removal of the needle. However, to save time on cleaning, it is better to remove the needle through the front. In this case, less internal parts will have to be cleaned. Therefore, the nozzle cap is first removed. This allows you to take out directly and the nozzle itself. The needle is pulled out through the front.
- All removed parts are immersed in a solvent to soak.
- The airbrush nozzle must be cleaned with a special needle. She is soft and thin. But even with such a tool, it is necessary to clean the hole carefully. This is the most important place of the whole apparatus. Airbrush parts are expensive.

- Next, to remove the trigger, the guide needle is twisted. The trigger is pulled out.
- Brushes - the main assistants. They clean the internal parts and the body of the device. Their set should always be available.
- The final step is rinsing, washing, wiping with a rag. Cotton buds can be used for this.To clean inaccessible places, a toothpick prepared in advance is used. Need to rinse and brushes.

Assembly is carried out strictly in reverse order. When installing the trigger, its stem must be lubricated with special grease. You can store the device unassembled.
You cannot completely soak the airbrush body. This leads to premature wear of the gaskets, the set of which costs a lot. Spare parts for airbrushes are best purchased in the same stores where the devices themselves are sold. Cleaning brushes can be replaced with sticks - brushes for cleaning teeth, a set of which is sold in pharmacies.

