Foam is a truly unique product. You probably know that it is used to seal the gaps between window frames and the opening, as well as to seal all kinds of holes in the walls, etc. Some craftsmen even use it as a decor, creating bizarre architectural forms, but this is far from all possible applications facilities. You will be surprised, but there are many examples of making figures from polyurethane foam with your own hands.
- Polyurethane foam properties
- Materials for the manufacture
- Basic Rules
- Production examples with instructions
- Christmas tree
- New Year crafts
- Lamb
- Snail
- Frog
- A fox
- Lizard
- Garden figure gingerbread man
- Stork
- Donkey
- Review of Original Ideas
- Universal circuit

These are original sculptures made with tremendous accuracy. Of course, this process is quite painstaking and requires a lot of diligence, but we will try to simplify it as much as possible and even make it more pleasant.
Polyurethane foam properties
This product is known for its characteristic of expansion in contact with air. First, the composition foams, repeatedly increasing in volume, and then begins to harden.

In solid form, the foam has a porous structure. It is very sensitive to mechanical stress (you can easily cut it off or even push it with your finger), but it has excellent resistance to:
- temperature differences;
- high humidity;
- atmospheric factors.
Thanks to these useful properties, mounting foam is the best suited for creating garden sculptures. Here, several more features should be noted:
- excellent adhesion (this is a very useful property, especially when you work with the frame of the future figure);
- durability (hardened foam does not "fall" with time and does not lose its shape);
- ease of handling (thanks to an aerosol spray and a special nozzle, the composition is squeezed out in small portions, which will help create even small details);
- convenient cutting (if surpluses have formed on the sculpture, they are removed using an ordinary clerical knife).
to contents ↑
Materials for the manufacture
To begin, let's talk about what kind of foam is needed to create garden and interior sculptures. It is recommended to buy a mounting tool from well-known manufacturers, as it is non-toxic and has a balanced composition. Such foam quickly seizes, but at the same time allows you to easily edit the sculpture as needed.
Make sure that the foam has good adhesion to the materials we will discuss later. Most often this is tested in practice, but you can study the instructions on the spray can and note for yourself that the composition holds well on both rough and smooth surfaces.

The foam must be fireproof (in hardened condition). If the kit does not have a special nozzle-injector, then buy a gun for extrusion (it is inexpensive and is in any construction or hardware store).
Take care of hand protection in advance. Get cotton gloves (possible with PVC coating). In addition, stock up on a few meters of film that you lay on the table or on the floor when you create figures for the garden.
Of the other tools and fixtures you will need:
- sharp clerical knife;
- a means for removing foam from various surfaces (kerosene can be used, but be extremely careful when working with it);
- sandpaper for grouting (try both fine and coarse)
- putty;
- brush and acrylic paints (your choice depends on the type of figure, its size and other factors);
- clean rags (will help remove excess).
You will also need a lot of devices to create the frame of future sculptures. It can be nails, durable wire, tennis balls, wooden slats, plastic bottles, etc.

Basic Rules
Before working with foam, carefully read the instructions on its packaging. If you work outside the apartment, then note that the foam can absorb dust and small debris, and therefore it is recommended to ensure the cleanliness of the workplace and the absence of draft.
You can start painting only with complete drying of the mounting foam. Otherwise, its surface will be heterogeneous, porous and ugly. If we are talking about a large figure, then its complete drying can take at least a week, be patient.

If you create figures for the New Year and plan to install them on the street, it is recommended to cover them with oil paint, because it will perfectly protect products from cracking. Try not to touch the mold before the foam has hardened. Firstly, this way you just get your hands dirty, and secondly, you can ruin the shape and leave prints and dents on it.
Putty is used to protect sculptures from deformation. The applied layer somewhat makes the figure heavier, making it more stable.
to contents ↑
Production examples with instructions
Creating volumetric figures using this technology resembles papier-mâché: you make a frame, and then paste over it with foam, layer by layer.
For starters, try experimenting with small forms. Inflate a regular rubber ball and gradually apply a little. Then another layer (it strengthens the walls). You see, you have a semblance of a ball, and this is a blank for a snowman or part of larger figures.

Christmas tree
To make a spectacular Christmas tree, you will need:
- create the appropriate frame (you can use ordinary cardboard, roll it into a cone, glue and cut from the bottom);
- shake the can well and apply a small amount of foam on all sides of the cardboard frame;
- wait until the product has completely dried and proceed to the decor (improvised glass balls can be made of the same foam, applied in small fragments and painted with different colors).
New Year crafts
Using the same principle that was described above, you can create beautiful Christmas balls and various themed decor. There are many options for crafts:
- Santa Claus. By combining some cardboard blanks and plastic bottles with tape, you can create a grandfather silhouette, and then foam it, dry it and cover it with red and white paints.
- Snowman. To do this, you need 2-3 round billets (which are made from ordinary balls). They are bonded to each other using silicone glue. If you are unhappy with the shape of the blanks, you can always trim them with a knife and sand them with sandpaper, making the surface smooth and even.

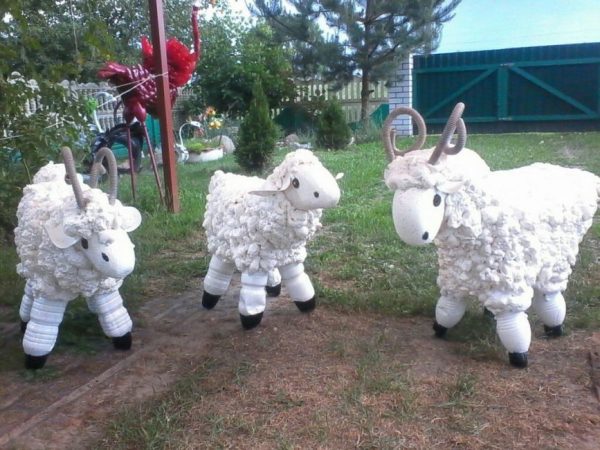
Lamb
For the manufacture of the frame, you will need tin cans, as well as planks. Make the body of a lamb from a plastic bottle, and the head from a can. For the neck and legs you can use wooden slats. All elements are easily bonded to each other with nails, screws or even double-sided tape.
Do not worry that the frame may be jagged and crooked.It is easy to fix this later when you apply foam and adjust the sculpture. It is very easy to make a sheep. You can color it with white acrylic, and your eyes and muzzle with black. The very shape of the hardened foam is very similar to the natural curls of a sheepskin.

Snail
The main difficulty lies in the manufacture of the "house" of the snail. To do this, you need to make a metal spiral. Foam should be applied in a circle, starting with a wide radius and gradually leading it to the center. If the first time did not work out - it's okay, try again.
Try not to work on a flat surface. By fixing the frame of the "house" vertically, you can make the figure more voluminous and natural. As for the manufacture of the "body" of the cochlea, an additional frame is made for it, after which the components are connected to each other.

Frog
In this case, you need an appropriate frame and as much green paint as possible! Having shown enough imagination, you can even make the Princess a frog, comfortably settled on a sheet of water lily. To do this, you need 3 blanks:
- for the frog;
- for the crown (it can be coated with spectacular gold paint);
- for the water lily.
The biggest difficulty is the manufacture of the frame, so that it turns out to be as reliable as possible and, at least from a distance, resembled the shape of a frog. In this case, you can not grind the figure to perfect smoothness, since the characteristic pimples will give the sculpture a special charm.

A fox
Here you can also show a lot of imagination! For example, to make a fox from a fairy tale about Kolobok, rubbing his paws and licking a narrow black muzzle. To make it look more natural, you can take plastic eyes from an old Soviet toy.
Be sure to look at the pictures or drawings of real foxes. In this case, you will need the skill of the artist. It will be necessary to colorize the figure of the animal, making characteristic white spots on the breast and the tip of the fluffy tail.

Lizard
Everything is pretty simple here:
- squat, flattened frame;
- characteristic bend of the long tail;
- raised head.
As with the frog, it will take a lot of green paint. There is one curious trick. You can buy a mounting grid, put on top of a dried base and go again with a brush, using a lighter tone. So you can recreate the scales on the body of a lizard.
Garden figure gingerbread man
This is the simplest model that is made from a ball. The problem is that the usual sphere may not be enough, and therefore you have to apply 3-4 layers of foam (one on top of the other). After that, carefully grind the bun, and boldly paint it in yellow, not forgetting to draw eyes and mouth.

Stork
This figure is quite complicated, but if you get comfortable with all of the above, then you can handle this. Here you need to create a stork’s body out of mounting foam, and leave your legs out of a wire painted with red paint (do not forget to make one bent, like a real stork).
The bird’s neck should be as thin as possible, with a small head and a long red beak. Such a stork will be a real decoration of your garden.

Donkey
The donkey is simple, like the sheep. Their frame is not very different from each other. The only thing is that you need to make him elongated ears and tail, and carefully sand the body, neck, legs and head with sandpaper to make the surface smooth. After that, you can safely cover the burro with gray paint, leaving a white tip of the muzzle.

Review of Original Ideas
You can give your garden and interior figures a special charm. If you have an old mirror or a lot of unnecessary CDs, then crumble them (of course, observing all safety precautions). So you can make a real disco ball, reflecting the rays of the searchlight.
Fragments of a mirror or disk are simply sunk into the foam before it hardens, and then thoroughly cleaned and leveled.By the same principle, you can decorate figurines with old unnecessary ceramics, carefully splitting it into small fragments.
to contents ↑
Universal circuit
As you can see, there are a huge number of ideas for realizing your creative potential, and polyurethane foam helps to create beautiful sculptures. If you are not sure what you can do, then start with the simplest. Create any craft from an ordinary wire frame and apply a small amount of the product on it, layer by layer.
Gradually, you will see how the silhouette of the figure begins to appear, and you can easily edit it with a clerical knife, giving it the desired shape. Try to be inspired by the characters of your favorite children's cartoons: Cheburashka, Gena crocodile, lion cub and turtle, and many others.